Fuzzy Pouf Ear Muffs
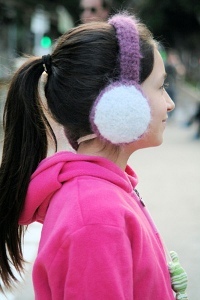
Looking for a quick and thrifty gift idea? Try this crochet ear warmer pattern, free! These fuzzy pouf ear muffs are extra warm, perfect for battling cold winter weather. Stitch up a bunch at once to match every outfit.

Size:
2 [4, 6, 8 years]
Size shown: blue & purple - 4 years; beige and light blue - 4 years; purple and light blue - 8 years
Finished Measurements: Warmer circle diameter is approx 4½ inches
Materials:
- Blue Sky Alpacas Brushed Suri [67% baby suri, 22% merino, 11% bamboo; approx 142 yards/130 meters per 50 gram hank];
- Girl's version:
- 914 Agua – 1 hank
- 912 Acai 1 hank
- Boy's version:
- 906 Toasted Marshmallow - 1 hank
- 908 Snow Cone – 1 hank
- 3.25 mm US size D3 Crochet hook.
- 1 plastic Head band at least 2cm wide– it is better to choose a firm band that will hold tight on the child's head – the padding will make it comfortable to wear
- Stitch marker
- 3½inch long elastic band
- Small amount of stuffing material
- Sewing pins
- Tapestry needle
- Gauge
Gauge: 17 sc and 20 rows = 4 inches square. Exact gauge is not important in this project
Pattern Notes:
- Item is crocheted using smaller size hook in order to create a tight fabric that will hold the stuffing well.
- Because children's heads vary in size, it is advised to add an elastic band at the bottom of the warmers, this will secure the warmers better on their little ears.
- Sc2tog: Pull up a loop in each of next 2 sts, yo and draw through all 3 loops on hook.
Skills Required: Increase and decrease in sc, crochet in rounds
Instructions:
Girl's Version:
Outer Circle (make 2)
Using CC ch 2.
Rnd 1: 6 Sc in second ch from hook; sl st in first sc to join.
Rnd 2: Ch 1, 2 sc in each sc around; sl st in first sc to join: 12 sc.
Rnd 3: Ch 1, (sc in next sc, 2 sc in next sc) around; sl st in first sc to join: 18 sc.
Rnd 4: Ch 1, sc in next sc, 2 sc in next sc, (sc in next 2 sc, 2 sc in next sc) around to last sc, sc in last sc; sl st in first sc to join: 24 sc.
Rnd 5: Ch 1, (sc in next 3 sc, 2 sc in next sc) around; sl st in first sc to join: 30 sc.
Rnd 6: Ch 1, sc in next 2 sc, 2 sc in next sc, (sc in next 4 sc, 2 sc in next sc) around to last 2 sc, sc in last 2 sc; sl st in first sc to join: 36 sc.
Rnd 7: Ch 1, (sc in next 5 sc, 2 sc in next sc) around; sl st in first sc to join: 42 sc.
Rnd 8: Ch 1, sc in next 3 sc, 2 sc in next sc, (sc in next 6 sc, 2 sc in next sc) around to last 3 sc, sc in last 3 sc; with MC, sl st in first sc to join; cut CC: 48 sc.
Rnd 9: Ch 1, (sc in next 7 sc, 2 sc in next sc) around; sl st in first sc to join: 54 sc.
Rnd 10: Ch 1, sc in each sc around; sl st in first sc to join, fasten off.
Inner circles (make 2)
Using MC throughout, follow the instructions of the Outer Circles.

Head Band
Please note – if you choose a wide head band you will need to crochet a wider band , in this pattern I used a ¾ inch (2 cm) wide plastic band.
With MC ch 7.
SkadiRow 1: Sc in third ch from hook and in each ch across: 6 sc.
Row 2: Ch 2, turn; skip first sc, sc in next 4 sc and in next ch.
Repeat Row 2 until band measures 10 [11, 12, 13] inches.
Cut yarn leaving a 20 inch long tail and fasten off.
Boy's version:
First Outer Circle
Using MC throughout, follow the instructions of the Girl's Version Outer Circles; do not cut yarn.
Next Row: Ch 1, turn; skip first sc, sc in next 9 sc, sl st in next ch: 11 sts.
Next Row: Ch 1, skip first st, sc2tog, sc in next 5 sc, sc2tog, sl st in next ch: 9 sts.
Next Row: Ch1, skip first st, sc2tog, sc in next 3 sc, sc2tog, sl st in next ch; fasten off: 7 sts.
Second Outer Circle and Headband
Using MC throughout, follow the instruction for the Outer Circle; do not fasten off.
Place marker and continue as follows:
Next Row: Ch 2, turn; sc in second ch from hook and in next 5 sc: 6 sc. turn
Repeat last row until work measures 10[11, 12, 13] inch from the marker , cut yarn , fasten off

Inner Headband
First Inner Circle (inner part is a little smaller in size)
Using CC throughout, follow the instructions for the Girl's Version Outer Circle through Rnd 9; do not fasten off.
Next Row: Ch 1, turn; skip first sc, sc in 7 sc, sl st in next sc: 9 sts.
Next Row: Ch 1, turn; skip first sc, sc2tog, sc in next 3 sc, sc2tog, sl st in next ch: 7 sts.
Next Row: Ch 1, turn; skip first sc, sc2tog, sc in next sc, sc2tog, sl st in next sc; fasten off: 5 sts.
Second Inner Circle
Work same as First Inner Circle; do not cut yarn.
Place marker and continue as follows:
Next Row: Ch 2, turn; sc in second ch from hook and in each of next 4 sts: 5 sc.
Repeat last row until work (from the marker) length is 9½ [10½, 11½, 12½] inches; fasten off.
Finishing:
Please note- in this pattern WS of sts are fuzzier and are therefore used as the outer side of ear warmers.
Girl's Version:
Fold the long edges of headband together, then stitch together forming tube. Insert the plastic headband in tube. Center the crocheted band so that the excess edges of the plastic headband are equal on both sides.
Place one Outer Circle and one Inner Circle with WS of sts together, sew outside edge leaving a one inch opening; cut yarn leaving an 8 inch tail of yarn. Invert work so that WS of sts are facing. Repeat for second pair of circles. Stuff the circles evenly.
Using 8 inch tail, attach ear warmers to head band by sewing edges of head band inside each filled circle (now is a good time to measure the work on a child if you want to..)
Attach elastic band to both ends of the ear warmers, about ¼ inch inside the inner side.
Boy's Version:
Weave in ends.
Using the mattress stitch sew together the outer headband to the outer circle – taking care that both circles are sewn with RS facing the same direction.
Repeat for the Inner Circles and Headband.
Join MC, and sc along side and around outer edges of the Inner piece; fasten off, cut yarn leaving a 20 inch tail.
With WS of both parts facing and using sewing pins as an aid to stretch the shorter inner side to match the outer side, use the mattress stitch sew around the first circle, along one side of the head band and around the second circle, do not cut yarn, turn work so that WS of sts (fuzzier side) is facing. Stuff the side circles evenly, then insert the plastic headband inside work taking care to center the plastic band. Add stuffing to create more volume in the headband area. Once you're happy with the look, sew remaining seam.
Attach elastic band to both ends of the ear warmers, about ¼ inch inside the inner side.

Read NextForever Crochet Bracelet
Your Recently Viewed Projects
elocin1104 2800379
Jun 02, 2018
I have been looking for a good ear muff pattern to crochet! This is pretty great, and the pattern is really easy to follow. Unfortunately, I think my kids are past the age of wanting ear muffs. I could make some and give them to the schools in the winter for kids that may not have a hat.
Report Inappropriate Comment
Are you sure you would like to report this comment? It will be flagged for our moderators to take action.
Thank you for taking the time to improve the content on our site.

