Personalized Pencil Topper
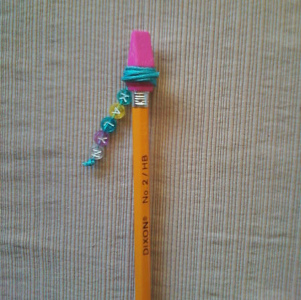
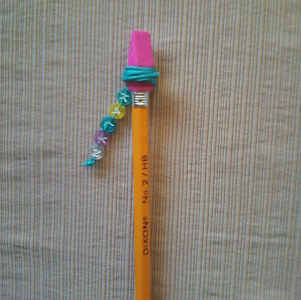
Get your child excited about school with these back to school crafts! This personalized pencil topper from Chris Molnar is simple and easy to make, plus kids will love having their name on their pencil. These make great back to school ideas for teachers, too!
Materials:

- Stringable letter beads
- Charms, decorative beads or other decorative elements, if desired
- School glue
- Scissors
- 1" x 8” and 1x3” lengths of jewelry cord in colors your child likes
- Pencil
- Pencil eraser head in a color your child likes
Instructions:
-
Choose a pencil eraser color. Fit it onto the top (eraser end) of the pencil.
-
Choose jewelry cord in a contrasting color to the pencil eraser (or match the two colors – it's up to you). Cut the cord about 7-8” long. Use less if the name is shorter.
-
Tie a knot in the end of the jewelry cord large enough that the beads won't slip off once you string them.
-
Choose letter beads that spell your child's name or a special message. String them onto the knotted cord, in reverse order (so you end with the last bead being the first letter of your child's name). If your child would like added decoration, string colored beads or charms at this point as well.

-
Give the knot at the bottom of the cord one last tug to make sure it's snug, then cut the excess string from the bottom of the cord as close to the knot as possible without allowing the cord to un-knot.
-
Knot the top end of the string close to the first letter so that the beads won't budge. You should now have two knots: one a the beginning of the name and one at the end. Cut the top end of the cord so you have about 2” excess.
-
Take another piece of cord in the same or a contrasting color. Cut about 3” long.
-
Place a line of glue to completely cover the “neck” of the pencil eraser head. Begin wrapping the cord around the neck until the area is covered with string. Allow the glue to set, about 2-3 minutes. (You may need to hold the end of the cord against the glue for about a minute to get it to stay.)
-
Now take the string with the letter beads attached. Glue all over the string that you previously glued to the eraser, then cover this with the new piece of string, holding letter beads down slightly so they lie roughly parallel to the pencil as they dry. This doesn't need to be perfect – you just don't want the name sticking out too far and possibly getting snagged on things later.
- Allow to dry completely. We recommend 1 hour, depending upon how thickly you've spread the glue. A thinner line of glue will dry faster.
Tips:
-
For added pizzazz, string charms or colored beads before and after your child's name on the jewelry cord, or in between each letter. Possible charms include hanging musical notes, favorite cartoon characters, animals, sports emblems or your child's school mascot. Look in your local dollar or crafts store for threadable charms.
-
This craft requires some dexterity, particularly wrapping the cord and holding it for the glue to set, so if your child is 7 or under, help her with this part.
-
Beads can be a choking hazard. Do not do this craft with, or give it to, children under 3 or children who may place items in the mouth.
-
If your child tends to be rather rough on her school supplies, you may choose to use a hot glue gun instead of school glue to attach the cords to the eraser and one another. DO NOT allow any child, even an older one (12 and up), to use a hot glue gun unsupervised. For children under 12, have an adult do the gluing and allow the kids their fun by having them choose all the colors and bead elements instead.
-
This craft is appropriate for:
- With adult help: ages 4 and up
- Without adult help: ages 7 and up
Read NextBack To School Homemade Tote Bag

