Illuminate the Night
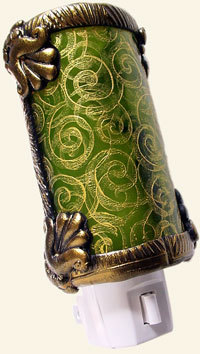
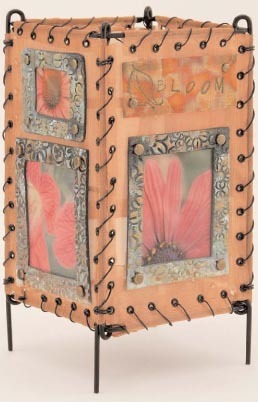
These can grace any area of your home with a soft glowing light; no longer will you trip over things or get lost in your room. These gorgeous night lights from Jacquard Products will show you the way without being harsh white light blaring through your room or house.
Find this project and more in our free eBook, 14 Toilet Paper Roll Craft Ideas.

Materials:
- One store bought night light (The ones I use are made by GE, 25J4 is the product code. They are inexpensive and have an on/off switch)
- Stamp: I used All Night Media - Swirl pattern for the light shade and Noon for the outside of the shade.
- Q-tips
- push mold Sconce
- Pearl Ex Stamp Pads: I used metallic gold
- Pearl Ex Powder: Aztec Gold
- Cernit Phthalate Free Polymer Clay: Black And Porcelain White—about 2oz. ea.
- Pearl Ex Varnish
- Piñata Inks: I used lime green for this one
- Clay Dedicated Pasta machine
- Clay Slicing Blade
- 5 x 7" plain index card
- Toilet paper cardboard roll
- Make-up wedge applicator
- Scotch tape
Instructions:
-
Condition your clay in the pasta machine by cutting your 2 ounce block into three slabs 1/4" or so thick by the size of the block.
-
Place the three sliced off slabs side by side and run through the pasta machine on the thickest setting, fold the whole sheet in half and place the fold into the rollers and roll through the pasta machine again on the thickest setting. Do this 5 or 6 times until you have nice smooth sheet of clay.
-
Cut into a sheet that is 3" x 3 1/2".
-
Place the sheet into the center of the 5" x 7" index card, 3 1/2" side with the 5" side of the card wrap card around toilet paper roll and tape ends of card together with scotch tape.
-
Bake the toilet paper roll and the clay in a pre-heated 275° oven for 20 minutes.
-
Shut off the oven and let cool for a while inside the oven.
-
Take out of the oven and let cool completely.
-
Place the nozzle of the Piñata tube onto the curved sheet of translucent and gently let the ink flow on to it. Rub the ink onto the curved sheet and blend and drag it to the rest of the shade with the Q-tip. Add more ink and cover the curved sheet completely, you can at this point either let it dry in the air for a couple of hours or put it into a pre-heated 200° oven for 15 minutes to set the ink take out of the oven and let cool.
-
Ink up your stamp of choice with Pearl Ex Stamp Pad, place on to the cool colored curved sheet and stamp onto the surface your image onto it.
-
If you use a large stamp it is a little easier ink up the stamp and roll the curved sheet carefully across the surface from one side to the other, it might have a tendency to slide so be careful.
-
Bake again in a pre-heated 200° oven to set the Pearl Ex ink.
-
Condition and roll out 1/2 block of black clay in the pasta machine on the thickest setting.
-
Roll the sheet again through the machine on the 3rd thickest setting.
-
Cut 4 strips of this sheet, they will be as long as the longest side of the curve baked sheet of clay and 3/8" wide.
-
Place 2/3 of one strip of black over the edge of the longest side of the curved sheet and fold the extra 1/3 over the side of the curved sheet.
-
Do the other long side of the curved sheet with another strip of black.
-
Do the top and the bottom next.
-
Do not overlap the side strip but place the strip of black just inside of each end of the side strips.
-
Press down and fold over the excess 1/3 of the strip.
-
Press your stamp into this outside strip to make an imprint in the outside black clay.
-
Press 3/4" balls of black clay into one of the button molds on the sconce mold; trim the excess off the back of the mold with the clay slicing blade.
-
Place one button at each corner of the curved sheet on the black clay.
-
Use the make up applicator rub Aztec gold Pearl Ex Powder into the surface of the black clay.
-
Paint a thin layer of Pearl Ex Varnish on to the Aztec Gold and let dry completely.
-
Bake in a pre-heated 275° oven for 25 minutes, shut off the oven and let cool for a while in the oven.
-
Take your night light out of the package and turn the shade so it is the right way.
-
Add a bead of glue to the center of the plastic shade and place you clay shade over the plastic shade.
-
Center the clay shade onto the surface of the plastic shade.
-
On the bottom near the switch make sure the bottom of both the plastic shade and clay shade are even, place a rubber band around both shades to hold the clay shade in place.
-
Let dry for at least 24 hours or until the glue is pretty clear.
-
Plug in and let it light your way!!!
- These are some other variations of the same technique using different colors of Pearl Ex Powder and Piñata Inks.
Read NextDecoupage Dresser

