This project was submitted by one of our readers, just like you.
Building a Christmas village Display
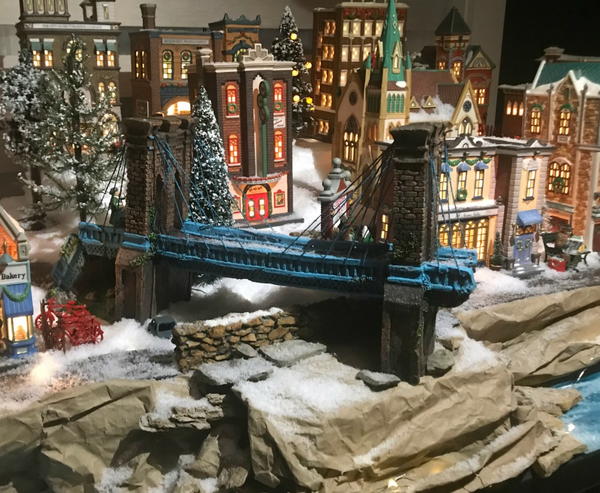
"I’ve always found miniature villages magical and have been collecting Dept. 56 buildings for years. Over the years as my collection has grown, I’ve also honed my architectural skills. And I think I finally have it figured out. This year I built a display that is not only charming but one I’ll be able to use for years to come. No more constructing my fictional city from scratch. And, aside from a few basic tools, I didn’t need a fully-stocked woodworking shop to build this display. "
Primary TechniqueGeneral Crafts

Materials List
- 6 ft folding table
- 3 pieces of thin plywood, each measuring 2 ft x 2 ft
- wooden blocks
- power drill with a 1 1/8″ spade bit
- EPS (expanded polystyrene) white foam boards
- Hot Wire Foam Factory sculpting tool
- white felt or fabric
- fake snow flurries
- extension cords & surge protector
Instructions
-
As any Department 56 enthusiast will tell you, the jumble of electrical cords is the biggest nuisance when constructing a village. I’ve always used a table skirt to hide the cluster of cords, but personally I like a cleaner look. So this year I found a solution. I bought 3 pre-cut pieces of plywood, each measuring 2 ft x 2 ft, from Home Depot. These fit my 6 foot table perfectly, and they are also easier to store than a large single piece of wood. I purposely left a few inches across the front of the table showing, as I plan to create a river there. I aslo had Home Depot cut a few wooden blocks to use as risers. These should be stacked to at least 3″ high to allow ample room for cords. Now all my electrical infrastructure can easily be concealed, with only one cord (from a surge protector) plugged into the outlet beneath the table.
-
This next step is fun – planning the layout of the city. My village is the Christmas in the City collection from Department 56, so I like to fashion it as a replica of Covington, KY, a charming historical neighborhood nestled on the bank of the Ohio River, with a stunning view of the Cincinnati skyline. It’s also entertaining to see if Christmas party guests can recognize any of the city landmarks. Keep in mind that a multi-tiered display gives a village depth and beauty. Using pieces of EPS foam, play around with building at least 3 levels, while experimenting with different building placements. Remember to build each level tall enough to showcase the buildings well. Don’t worry if the pieces of foam are roughly cut; they will be refined later with a sculpting tool.
-
Once you have an idea of building placement, mark where you will need holes drilled for the electrical cords. Start with the buildings on the ground level (that rest on the bare wood, not foam). Underneath each building, draw a circle where a hole is needed. Be sure to mark the name of the building on the wood for future reference.
-
Next, move to level 2, drawing the circles on the foam beneath each house. The tallest level will be in the back, so holes are probably not needed for those, as the cords can easily drape over the back of the table and underneath the wooden platform. For those houses on level 2, after a circle is drawn onto the foam, use the sculpting tool to carve a hole through the layers of foam. Next, draw a circle (for drilling) onto the wood directly beneath the foam hole.
-
Once all the cord placement holes are marked and cut through the foam, drill the holes into the wood bases, using a 1 1/8″ spade bit. *Tip: snap photos to help remember the building placements before dismantling it to drill the holes.
-
The hard work is mostly done. Now it’s time to bring the city to life. Rebuild the different levels with all the cord holes aligned. When adding each building, make sure the bulb is placed inside and the cord is pulled through the base and plugged into an extension cord. Now it’s time to introduce you to a new tool. If you haven’t used a hot wire sculpting tool before and have been fashioning your village with craft store foam and a kitchen knife, you’re going to thank me. After seeing how skillfully structures and steps can be carved with this tool, I knew it would be worth the investment. My skill level is still not advanced, but my village has improved 100 percent since purchasing it. Because the city has multi-levels, decide where steps are needed. With the sculpting tool, carve the steps. I had so much fun with this (it cuts the foam like butter), so I went crazy carving snow banks, erecting steps and pathways, and gently sloping all the rough boxy edges of the foam into more realistic snow-covered hills.
-
Now it’s time to fully unleash your creativity and imagination. For the ground level, cover the bare wood with either white fabric or felt. Next, add streets and sidewalks. Don’t worry if it still looks unrealistic; snow will be added to soften the edges. And don’t forget fences, decorations, trees and people!
-
Amp up the magic by adding a frozen pond or lake. Because my neighborhood rests on the bank of the Ohio River, I love adding an icy river with a rocky crags. This year I bought an inexpensive Plexiglas poster frame from Michaels then cut the Plexiglas into rectangular strips. Plexiglas makes beautiful waterways. Peel off the protective plastic film, then paint one side of the Plexiglas with acrylic paint. Once dry, add it to the village with painted side face down.
-
To create a rocky bank, I used paper grocery bags. Tear them into strips, dampen them with water, and crinkle them into balls. Then unfold them and mold them into the shapes you desire and let dry. Scavenge a few rocks from the yard to add as well. It’s that easy! In fact, I make my entire French creche with paper bags and rocks! A river bank is also a clever way to hide the electrical infrastructure under the platform!
-
Lastly, sprinkle a layer of snow over the entire city. This camouflages the hard edges of the sidewalks and streets. Create snow mounds to cover any flaws. And don’t forget to “sweep” the walkways for an even more realistic effect.
NotesRefer to the post on my blog for complete instructions with photos.
Celebrate With More Christmas Craft Ideas
If you enjoyed creating your Christmas village display, you might love trying out these other fun and festive Christmas craft projects:
1. DIY Snow Globe Ornaments: Create your own mini winter wonderlands with these adorable snow globe ornaments. Simply glue a tiny figurine, like a snowman or reindeer, onto the inside of a clear plastic ornament. Add faux snowflakes or glitter, fill with water, and seal shut. Hang on your tree for a touch of whimsy!
2. Pinecone Christmas Trees: Collect pinecones on a nature walk and turn them into adorable tabletop Christmas trees. Paint the edges of the pinecone "branches" green, then sprinkle with glitter for a festive touch. Add a small star on top and place on a bed of faux snow or a mini wooden slice for a charming holiday decoration.
3. DIY Advent Calendar: Count down the days until Christmas with a handmade advent calendar. Create pockets out of felt or small envelopes, decorate them with festive embellishments, and hang on a ladder or frame. Fill each pocket with a small treat or activity for each day leading up to Christmas.
These Christmas crafts are perfect for adding a touch of handmade charm to your holiday decor and are sure to bring joy to your heart just like your Christmas village display. Happy crafting!
Read NextChristmas Tree


