Classic Christmas Gingerbread House
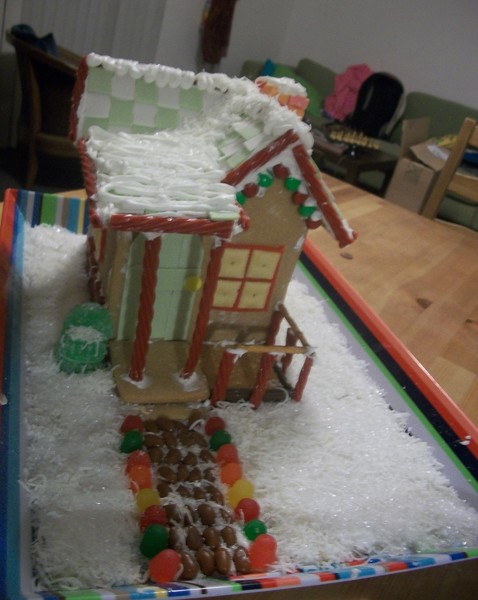
This Classic Christmas Gingerbread House project is so easy to personalize with the shapes and candy of your choice. Create a miniature winter wonderland with this easy homemade gingerbread house.
Materials:
- Lightweight cardboard or card stock for template (I used old clothing gift boxes)
- Ruler
- Scissors
- Tape
- Structural dough recipe ingredients (Technically, this isn’t gingerbread dough. Since I wasn’t planning on eating it, I tossed out the molasses and spices in favor of a sturdier, less expensive recipe. The instructions are below in the project.):
2 cups dark corn syrup
1 1/2 cups firmly packed light brown sugar
1 1/4 cups Crisco
9 cups all-purpose flour (plus extra for flouring surfaces)
1/2 teaspoon salt
- Gallon-sized Ziploc bag
- Parchment paper
- Pizza cutter
- Stable surface for building the house
- Royal icing recipe ingredients (The instructions are below in the project.):
3 egg whites
2 lbs confectioner’s sugar
1 tsp cream of tartar
- Handheld mixer or standing mixer
- Icing bags and tips
- Assorted candy and decorations (I used the following):
Stick gum
Hershey’s chocolate bars
Caramel
Starburst
Graham crackers
Twizzlers (pull-and-peel and regular)
Licorice squares
Pretzel sticks
Skittles or M&Ms
Sparkly white sugar
Shredded coconut
Gum drops
Fruit slice jellies
Sugar Babies
Graham crackers and small square crackers like Cheez-Its
Instructions:
1. Create a template. I pretty much made up my own. If you want a symmetrical house, you’ll need one cardboard stencil for each: front and back walls, side walls, and roof pieces. Draw your shapes onto the card stock with a ruler and cut them out. The best way to make sure your template works is to cut out all of the pieces, label them (e.g. write "Wall 1" on the carboard) and actually tape them together before you begin.
2. Get baking! Here's the recipe I used to make the structural dough (tweaked from a few different recipes):
- Combine flour and salt in a large bowl.
- Combine corn syrup, brown sugar, and crisco in a medium-sized microwaveable bowl.
- Microwave corn syrup mixture, stirring every minute, until sugar had dissolved and Crisco has melted.
- Pour corn syrup mixture over the flour mixture.
- You can stir it together to combine it if you wish, but I had a lot of fun squishing it around with my hands until the consistency was smooth. If you're working with kids, they'll love this part; just make sure the mixture is cool enough for them to handle without burning themselves.
- Combine until the consistency is even and the dough pulls away from the sides of the bowl. Add more flour if it's too sticky. At the end, you should be able to mold it like playdough, or put a smiley face in it. It's happy to see you!
- Preheat oven to 350 degrees F.
- Store dough in a gallon-sized plastic bag and set aside.
3. Roll out a large piece of parchment paper and lightly flour the surface. Keep the parchment paper and flour on hand.
4. Pull off about 1/4 of the dough and reseal the bag. With a lightly floured rolling pin, roll the dough to 1/4-inch thickness, smoothing to ensure that there are no air bubbles in the dough. Lightly flour your stencils and lay them on the dough. Use the pizza cutter to slice the shapes according to your template.
5. Remove the excess dough and transfer the entire sheet of parchment paper to a cookie sheet. Repeat steps 1-2 until your entire template has been cut out. You may wish to make extra pieces in case of breakage, or you may reserve the remaining dough for such emergencies. (I used my extra dough to make dinosaur cut out cookies, because who doesn't like dinosaurs?)
6. Bake the pieces at 350 degrees F for 12-14 minutes or until the dough has hardened and the edges are lightly browned. Allow the pieces to cool completely before using.
7. In the meantime, prepare your surface and supplies.
8. Make the royal icing:
- Combine the egg whites and cream of tartar in a large bowl.
- While beating the mixture in the bowl, gradually add the confectioner's sugar, beating 1-2 minutes at a time, until the icing forms stiff peaks.
- Cover the icing bowl with a damp towel until you are ready to use it.
- Put the icing tip of your choice (preferably a narrow, round tip) into your icing bag, then place the icing bag tip down into a tall glass. Fold the sides of the bag over the edges and use a spatula to fill the bag to the brim of the cup. Pick up the bag by the edges and twist to squeeze the icing toward the tip.
9. To construct the walls, lay one wall on the table and draw a line of icing along each side edge. Hold the adjacent pieces onto the icing until it has hardened enough for the walls to stand on their own. Carefully lift the house into an upright position and add the remaining wall, holding it in place until the icing has hardened. Repeat with roof pieces. Allow the icing to set before decorating.
10. Now comes the fun part! Go to town with your decorations. Use your own ideas, or try the ones below! I learned from trial and error that it's easier to add the icing to the candy and then place it on the house; otherwise, mistakes are slightly messier.
- Use sticks of gum for shingles, and edge the roof with TwizzlersConstruct windows from crackers and licorice strands.
- Create a front porch of crackers with beams of twizzlers, pretzels, or candy canes.
- Create a chimney of Starburst.
- Add bricks to the sides of the walls with red licorice.
- Create a cobblestone path from Sugar Babies and line with gumdrops.
- Add a door of stick gum and an M&M or Skittle doorknob.
- Add Christmas lights out of jellybeans, M&Ms, or skittles.
- Create a woodpile of thick pretzels.
- Surround your house with grated coconut snow topped with sparkly white sugar.

Read NextDIY Pom Pom Ornaments

