Merry Christmas Candle Holder
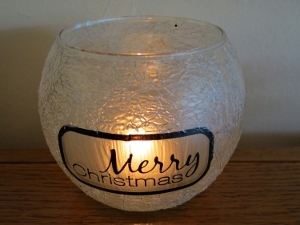
May your days be merry and bright with this Merry Christmas Candle Holder! With the clever use of silver spider-web net ribbon, you can decorate an ordinary glass bubble votive holder for Christmas (or even Halloween, if you'd like!). The spider-web net ribbon will create an interesting display of light, perfect as a centerpiece for your Christmas dinner table or to have on display on your fireplace mantel.

Materials:
- 3.5” glass bubble ball votive holder
- 60” silver spider-web net ribbon
- Self-adhesive Merry Christmas sticker
- Mod Podge
- 8/32” paint brush
- Black acrylic paint
- Quick-drying matt spray varnish
- Few sheets of old newspapers to protect the working area
- Hairdryer
- Standard scissors
- Battery operated tea light candle
Instructions:
The spider-web net ribbon is quite stiff, so it does not stick easily to a rounded holder. If you are inexperienced with decoupage techniques, it is advised that you rather use a square glass votive holder.
-
Wash the glass bubble votive holder in warm soapy water and then leave it upside down overnight to dry thoroughly.

-
Apply the Merry Christmas sticker onto the votive holder.
-
Cut small squares from the silver spider-web net ribbon.
-
Paint a substantial amount of Mod Podge to a small section of the votive holder.
-
Put the first square of spider-web net ribbon in position on the votive holder. Paint Modge Podge over the spider-web net ribbon, so that it will stick to the votive holder.
-
Use the hairdryer to dry the square of spider-web net ribbon.
-
Repeat steps 4-6 with the other squares of spider-web net ribbon, until the votive holder has been covered with the spider-web net ribbon. Remember not to cover the bottom and the Merry Christmas sticker.

-
Paint the bottom of the votive holder with the black acrylic paint and allow to dry thoroughly.

-
Spray the bottom and outside of the votive holder with the spray varnish. Remember to work in a well-ventilated area when spraying the varnish.
-
Allow to dry thoroughly.
- Repeat steps 9-10 twice.
Read NextRainbow tree
Your Recently Viewed Projects
Report Inappropriate Comment
Are you sure you would like to report this comment? It will be flagged for our moderators to take action.
Thank you for taking the time to improve the content on our site.

