Tile Snowman Coasters
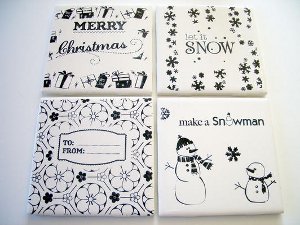
These adorable Tile Snowman Coasters make a great holiday gift for everyone on your list. Whether you stuff them in a stocking or present them with an assortment of cups and a handmade hot cocoa mix, these handmade coasters are as fun to give as they are to make. Mix and match your designs or create four of the same kind. This is a fun last-minute gift idea and will easily be appreciated by anyone. Make a few Tile Snowman Coasters and make your holiday gatherings truly merry.

Materials:
- Season’s Greetings Simple Stick™ Repositionable Rubber Stamps (8" x 8")
- Easy Stamp Press
- Stamp Block Set
- 3-in-1 Corner Squeeze Punch (Dot to Dot)
- Comfort Loop Rotary Cutter (45mm)
- Coastal Colors Acrylic Ruler (6" x 24")
- Cutting Mat (12" x 18")
- Ceramic tiles
- Permanent ink pad (suitable for stamping onto ceramic)
- Assorted decorative paper
- Assorted fabrics
- Spray adhesive
- Mod Podge
- Q-tips
- Glue gun
- Cork sheets
Instructions:
- Fiskars has a huge assortment of holiday themed stamps and I was inspired to have a go at using them in a less traditional way. I used some Fiskars lever punches and border punches from the seasonal range to make some decorative gift wrap so that my bundles are ready for gift giving.
- I bought some white tiles from a hardware store for less than .20c each. I made sure they were clean by washing them in warm, soapy water and drying them thoroughly. Next, I gathered some of the really fun Fiskars stamp sets and a permanent ink, suitable for stamping onto ceramic surfaces. I practiced a few designs on paper before committing to stamping the tiles. When stamping onto the tiles, I was able to get a very neat impression with the ink, though it is very useful to have a few Q-tips to hand to erase any unwanted ink spots or smudges. I used one end wet and the other dry.
- After allowing the ink to dry, I sprayed the tiles with an adhesive spray. I experimented with several different finishes, and I found this spray gave a lovely glittery sheen to the tiles. Make sure to use the adhesive spray in a well-ventilated space (preferably outside) and allow to dry thoroughly. (This may take up to several hours to be dry to the touch but it will take a couple of days to be thoroughly dry).

- Since it’s always useful to have a few extra gifts on hand, I made two more sets of coasters using paper and fabric.
- I found some wonderful handmade paper which I cut to fit neatly on my tiles with my paper trimmer. I then used my Fiskars corner punch to decorate the corners of the papers and adhered them to the tiles with Mod Podge. I gave the tiles about 6 coats of Mod Podge (allowing each coat to dry thoroughly before doing the next) to seal the surface.

- I did the same with some fun Christmas fabric.


- For my final set of coasters, I couldn’t resist using the Fiskars’ Seasonal punches to decorate the tiles. After 5 coats of Modge Podge, I finished them off with a coat of Modge Podge Glitter to give the surface a bit of Christmas sparkle.


- Finally, to complete the tiles, I cut some cork sheets to the correct size with my rotary cutter and glued it to the underside of my tiles with my glue gun.

Read NextTin Can Succulent Christmas Tree
Your Recently Viewed Projects
allcraftlover
Oct 26, 2013
Why did you us adhesive spray on the stamped tile? Wouldn't that be sticky???
elainebushell 9491 626
Oct 21, 2013
I love the idea. Will make some for christmas presents. Can you tell me if the glue has to be any special kind to withstand any heat from hot cups?
Report Inappropriate Comment
Are you sure you would like to report this comment? It will be flagged for our moderators to take action.
Thank you for taking the time to improve the content on our site.

![Pill Bottle Crafts: Reuse Pill Bottles [15 Ideas]](http://irepo.primecp.com/2017/06/334076/PILL-BOTTLE-CRAFTS-Header_Category-CategoryPageDefault_ID-2274135.jpg?v=2274135)
