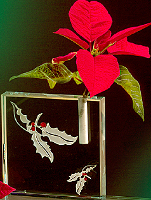
Custom Etch Holly Leaves
This is a beautiful glass, holiday decoration you'll be surprised you can make yourself! For an elegant, festive glass craft create the custom etch holly leaves. This decorative piece will impress everyone and look great in your home.

Materials:
- Armour Etch Cream*, Sand Etch Kit** or Pencil Bottle Blaster***
- 31-0401 Beige Vinyl masking
- 30-2291 Stem Block Vase
Tools & Accesories:
- Craft knife
- Craft or sponge brush
- Pencil or marker that will write on the vinyl masking
- Scrap or sheet of computer paper
- Popsicle stick
- Old credit card or letter opener
Instructions:
- Wash & dry vase in hot soapy water prior to applying contact vinyl.
- Cut a piece of vinyl masking slightly longer and wider than the length & circumference of your glass.
- Wrap the piece of vinyl masking completely around glass, applying and smoothing in one direction as you go, leaving no gaps or air bubbles. Trim masking at the top & bottom.
- With a pencil or marker, draw the Holly Leaves, or trace the design through carbon or grahite paper.
- Cut out the design part use wish to etch and peel away a section. Continue cutting and removing until your design is complete.
- Take a piece of paper and lay over remaining masking. Take a popsicle stick, letter opener or old credit card and rub over the paper to smooth down the vinyl. Examine every edge of the design and make sure every edge is tight to the glass. The better the masking is bonded to the glass, the better your results will be.
- Etch the vase with your preferred method. If you are using the Etch cream, Sand Etch or Sandblasting, follow the directions on the product.
- Rinse vase under warm, running water until all cream or sand is off the vase. Remove masking and rinse again.
- Dry vase & enjoy!
NOTE: We colored the Berries (red dots) with the Glass Effects Gel pen #86-6223
Read NextVintage Christmas Mini Trees

