Clay and Crystal Keychain
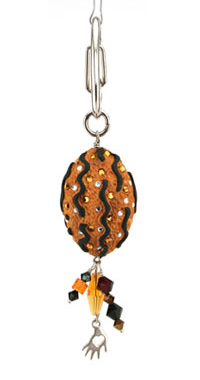
Use Amaco's Pro Bead Rolling system to create big and beautiful beads with sparkle and attitude. Design elements of FIMO® Soft surface embellishment and Swarovski crystal components combine to create metallic beads that are perfect as pendants or fabulous as key fobs.
Materials:
- FIMO Soft Clay - Black, White and Gold, Copper or Silver metallic
- AMACO Professional Bead Roller - Set 6
- AMACO Professional Bead Baking Rack
- AMACO Pasta Machine for Clay
- AMACO PolyBlade
- Swarovski Flatback crystals and assorted crystal beads/pearls
- Ball Tip Stylus
- Small Kemper circle clay cutter or drinking straw
- Tweezers
- 3" long head or eye pin
- Round nose, flat nose, wire cutting jewelry pliers
- Optional: Wavy Blade, Charm
Instructions:
- Follow bead roller directions for measuring clay and rolling bead. Once bead is formed, insert a bead pin (included with roller set).
- Place the bead on the bead baking rack for stability. Stipple the surface of the bead with the ball tip stylus. Smaller styluses will create a finer surface effect while a larger ball tip will give the bead more of a carved look. Continue stippling the entire surface, rotating the bead on the rack until it is completely textured.
- Choose one of the following variations for creating the clay surface embellishments:
Wavy Bead (shown in photo): Use a wavy blade or craft knife to cut squiggly strips from black clay that's been rolled through the 6th largest setting (very thin) of the pasta machine. Lightly press small sections of these strips over the stippled bead. Press flatback crystals in between curves in the waves.
Polka Dot Bead: Roll out small sheets of black and white FIMO® clay on the 5th largest setting of the pasta machine. Punch out either white or black circles using the circle punch. If using the straw to punch holes, roll these into balls and slightly flatten with between your fingers. Lightly press the punched circles (or flattened balls) randomly over the bead. Cut punched clay circles of the opposite color in half. Roll these halves into balls and flatten between your fingers. Press these contrasting colored discs of clay over the larger clay circles. Press a flatback crystal into the center of the polka dots.
Note: Press the crystals into the clay deeply enough to embed them slightly. This will create a natural forming bezel around the edge of the crystal, holding it firmly in place.
Swirly Bead: Roll out 2" x 3" sheets of black and white polymer clay on the 6th largest setting of the pasta machine. Cut thin (1/16" -1/32" wide) strips of these clays using the clay blade. Start each swirl by gently pressing the end of a strip against the stippled bead. Wind the length of the clay strip in a circular fashion to create a swirl. Be sure to leave a gap of the underlying clay color showing between rotations. Make a variety of large and small swirls. Press a crystal into the base of each swirl.
- When your bead is fully formed, bake in a preheated 230-265ºF oven (checking the temperature before baking with an oven thermometer is recommended) on the bead rack for 30 minutes.
- When the bead is cool, thread a bead or two on the base of a head or eye pin. Insert the pin through the baked bead. Add another bead at the top of the bead.
- Grip the head pin with the round nose pliers just over the top of the last bead. Bend the wire back 90º degrees. This will leave a vertical length of wire standing over the bead. Hold the loop stable between the round nose pliers. Use the flat nose pliers to grip the excess wire and wrap it around the vertical section of the pin underneath the loop 2-3 times. Trim the excess wire with the cutters. Tuck the end of the wire in against the base of the coil or filed smooth.
Read NextClay Embellished Wine Bottle Cork

