Lady in Red Earrings
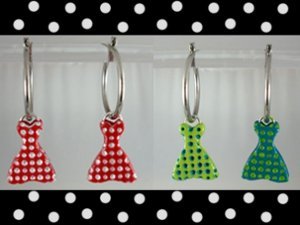
These adorable vintage-inspired Lady in Red Earrings are the perfect summertime accessory! Super easy to make and wear, these DIY clay earrings can be made in any color you'd like. In fact, you can make a cute little polka dot dress to match your favorite outfits so you always have a fun pair of earrings to wear! These cute clay charms can also be used to decorate a charm bracelet or necklace. Perfect for the fashionista in your life, these clay earrings are whimsical and fun.

Materials:
- 1 block Premo! Sculpey®: Pomegranate - 2 oz
- Translucent Liquid Sculpey, 2 oz
- Clay Conditioning Machine
- Sculpey® Clay Mat
- premo! Sculpey® Mini Metal Cutters-Wedding
- White acrylic paint
- Card stock or index card
- Two 1/4" round silver jump rings
- Hoop style earrings with top hinged wire closure
- Craft knife
- Small stencil brush
- Paper towels
- Fine mist spray bottle
Getting Started: Do not use unbaked clay on unprotected furniture or finished surfaces. Start with clean hands and work surface area. Good work surfaces include wax paper, metal baking sheet, or disposable foil. Knead clay until soft and smooth. For best results, clean your hands in between colors. Shape clay, pressing pieces together firmly. Bake on oven-proof glass or metal surface at 275°F (130°C) for 30 minutes per ¼" (6 mm) thickness. For best baking results, use an oven thermometer. DO NOT USE MICROWAVE OVEN. DO NOT EXCEED THE ABOVE TEMPERATURE OR RECOMMENDED BAKING TIME. Wash hands after use. Baking should be completed by an adult. Begin by preheating oven to 275°F (130 °C). Test temperature with oven thermometer for perfectly cured clay. For best results, condition all clay by running it through the clay dedicated pasta machine several passes on the widest setting. Fold the clay in half after each pass and insert the fold side into the rollers first.
Instructions:
-
With the clay conditioning machine on the thickest setting roll a sheet of Pomegranate clay. Secure to a clay mat, mist the dots Technique Design Block with water and press into clay with a little pressure. The ideal texture depth is 1/3 through the clay thickness. Do not press all the way through the clay. Cut out two wedding dress shapes and remove the excess clay from around them.

-
With the clay conditioning machine on setting #3 roll out a sheet with the extra clay. Cut out two (non-textured) dress shapes. Use a craft knife to lift one smooth clay dress shape off of the mat. Apply a thin layer of TLS to the top back area of the dress, lay the dress smooth side/face down onto cardstock and press a jump ring into clay so half of the ring extends beyond the top of the dress edge. Gently press a textured clay dress shape on top of the thin dress, lining up the edges. Repeat this step for the second earring. Bake the earrings as directed above. Allow to cool thoroughly.

-
Apply a thin coat of glaze to the dresses and allow them to dry completely. Then, dip the stencil brush into white paint and apply to the top surface and into the dots of the clay dress (shown on left). Immediately wipe away the excess paint with a water- misted folded paper towel. Wipe off any paint that is on the side edges of the clay dresses as well. If the paint looks smeared on the red areas, wipe again until clean, but don’t use too much pressure or the paint inside the dots will be wiped away.

- When the paint is dry apply a final coat of glaze and let dry. Thread onto the non-hinged end of the hoop earring. You’ll want to make these dress charms in additional colors so that you can change them to match your outfits. Use contrasting colors of paint for the design dots really shows up. Opposite dress/dot colors are also a fun way to make two different but matching earrings.
Read Next41 Clay Crafts for Adults

