Clay Rock Box
This kids crafts project from Polyform Products will be fun for the whole family. Use colorful new clays from Sculpey to create your own clay rocks and embellished wooden box to place them in. Get ready to have some fun because this box rocks, literally.
You can find this project and more kids' crafts in our free eBook, Family Fun Crafts: 16 Craft Ideas for Kids!

Materials:
- Unfinished wooden box
- Pluffy™: black, pink, white, brown, green, turquoise, grey, glow-in-the-dark, and beige
- Sculpey Premo Fashion Art Mini Metal Cutters: oval and circle
- Sculpey Premo Fashion Art 6 piece glitter sets
- Firefly™ Tool Set
- Craft paint in your selected color – this project shows a forest Green color
- Small foam brush
- Small piece of scrapbook paper in a complementary color to your paint – preferably one with a pattern that looks like a rock
- Brown craft paint
- Bamboo skewer
- Small amount of ground Black pepper from the kitchen
- White craft glue, such as Crafter's Pick Super Tacky glue
- Small bag of cotton balls to line the finished box
- Wax paper
- Metal baking sheet or disposable foil
- A handful of pepper
- A leaf or two to make the fossil rock
Instructions:
- Start with clean hands and work area. Good work surfaces include wax paper, metal baking sheet, or disposable foil. Knead clay until soft and smooth. For best results, clean your hands in between colors. Shape clay, pressing pieces together firmly.
- Bake clay on oven-proof glass or metal surface at 130 °C (275 °F for US customers) for 15 minutes per 6 mm (1/4”) of thickness. DO NOT USE MICROWAVE OVEN. DO NOT exceed the above temperatures or recommended baking time. Baking should be completed by an adult. Wash hands after use.
- Paint the inside and the outside of the wooden box with the craft paint and small foam brush. Set it aside to let it dry thoroughly.
Black Lava Rock:
- Lava tends to be rather sharp and covered with holes and bumps, so make a small lump of black Pluffy clay and texture it really well, using both sides of the bamboo skewer. Set aside on a paper lined baking tray.

Gold Nugget:
- Use the knife tool to cut several small pieces of the beige clay and gently press them together to form the nugget.

- Cover the nugget with Gold Premo Fashion Art Glitter, pressing it into the clay. (NOTE: Do this on a paper plate AWAY from your work area. This way, you can fold the paper plate and pour the leftover glitter back into the container and not have to worry about getting glitter all over the rest of your clay). Set the finished nugget on your baking tray.

Igneous Quartz Nugget:
- Since you probably have some leftover small pieces of beige clay from the Gold nugget, cut up a few small pieces of brown and black Pluffy and push them gently together.

- Texture the brown and black pieces and leave the beige areas smooth to represent the quartz crystals in the rock.

- Add some Silver Premo Fashion Art Glitter to help represent the mica flakes in the rock. Set the finished rock on your baking sheet.
Crytal Quartz:
- Use the clay knife tool to cut a rough crystal shape from the opened package of white Pluffy clay.

- Add a small amount of brown clay at the bottom to represent the bed of rock that the crystal is growing in. Before you set the finished crystal on the baking sheet, you can add one or more colors of glitter to the crystal shape.

Moon Rock:
- Form a small piece of the glow-in-the-dark Pluffy clay into a good rock shape and texture it with your bamboo skewer; Moon rocks tend to have very sharp edges to them so they don't appear to be rounded too often.
- Rub some of the Yellow Premo Fashion Art Glitter onto the surface to make it look like it came from space even when it's not glowing in the dark. Set the finished rock on your baking tray.

Green Agate Pebble:
- Make small “snakes” of green and white clay, make the snake of green larger than the white. The snakes should only be about 3 inches long.

- Twist the two snakes together and continue to twist until the pattern gets pretty small; meaning the bands of color get thinner.


- Pinch the roll in half and roll the twisted clay into a ball and set it on your baking tray. Roll the rest of the clay into a ball to make a second pebble if you wish!

Pink and Brown Sandstones:
- Make snakes of brown and beige or pink and beige clay and follow steps 1 and 2 above for the Green Agate Pebble.
- This time, pinch a small piece off and flatten it in your hand to create a flatten piece of sandstone to represent a section of layered sandstone.


- You can texture the stone if you wish and even add glitter to represent some of the minerals that could be in the sandstone. Place the finished sandstones on your baking tray.

Fossil:
- Cut of a piece of beige clay (to represent the sandstone part of the fossil) about 2x3 inches.

- Lay a piece of real or plastic plant leaf on the clay and roll across the leaf with the plastic roller to press the leaf into the clay.

- Remove the leaf and you will have a fossil patterned rock, place the piece of fossil onto your baking tray.

- AFTER the clay has baked and cooled, you can paint the surface of the fossil with brown paint and quickly, before the paint dries, wipe the top surface with a damp paper towel to remove some of the paint. The paint should stay in the lower parts of the pattern you pressed into it. As a variation: Try pressing a small plastic dinosaur into a piece of clay to make a dinosaur fossil.

Turquoise Stone:
- Cut a piece of turquoise clay, like you did for the fossil and smooth the edges slightly with your fingers.
- Use the knife tool, to draw lines for texture through the piece of clay. Place onto your baking tray.

- AFTER the clay has baked and cooled, you can paint it with brown craft paint and quickly, before the paint dries, wipe the top surface with a damp paper towel. You can also use black craft paint to represent the black lines or “matrix” often found in turquoise stones.
Ammonite:
- Roll two small brown Pluffy snakes about 3 inches long and twist them together.

- Starting at one end, gently coil the twisted snake to create the round shape of the ammonite. Set on the baking sheet.


Grey and White Granite:
- Make small pebble shapes from white and grey Pluffy.
- Put some pepper into a small dish and put the clay into the pepper and gently press the pepper into the top of the clay.

- If you wish, you can also add some glitter to represent the shiny minerals, such as mica, that could also be present in granite. Set on your baking dish.
Finishing Rocks:
- Bake according to the instructions above. Allow the clay to cool.
Box Decorations:
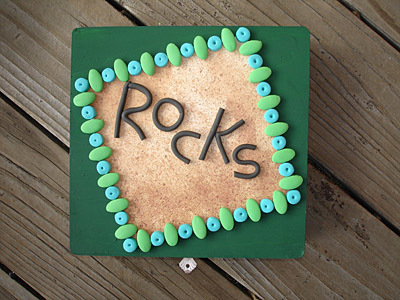
- Pinch off about ¼ of the package of green and turquoise clay. Press each color as flat as you can and then use the plastic roller to roll it out even and flat to about ¼ inch.
- Use the oval cutter to cut the green clay. Use the wide back of the Sculpey shape tool to gently press the clay from the cutter.

- Use the round cutter to make the turquoise decorations. Press the point of the Sculpey shape tool into the center of each circle.
- Set the piece of paper you selected into place on the painted box top and gently set your clay pieces into place on one side of the paper so that they are positioned half on the paper and half on the wooden box. This will help you determine just how many pieces you need to make.
- Move the pieces to a baking tray and bake the pieces according to the clay package directions.
- Once the pieces have cooled, glue the pieces into place on the box. The clay pieces will hold the paper in place.

- Roll some of the Black clay into a very long small snake and use pieces of this snake to form the letters for “rocks” on a small piece of paper.
- Bake according to the instructions above. Allow the clay to cool. Once the clay is baked and cooled, glue the pieces into place on the paper.


Read NextEasy Coffee Filter Butterfly Craft
Your Recently Viewed Projects
cinsew1 4854859
Feb 17, 2012
Wow! can't wait to try this with the grandkids and to make some faux gems for jewelry!
Report Inappropriate Comment
Are you sure you would like to report this comment? It will be flagged for our moderators to take action.
Thank you for taking the time to improve the content on our site.

![Gratitude Letter [free printable]](http://irepo.primecp.com/2020/04/444332/gratitude-letter-01_Large400_ID-3654510.jpg?v=3654510)
