Rainbow Watercolor Box
Get your kids creating with this rainbow watercolor box. This watercolor tutorial from Jane Drynan for Interactive Artist Magazine shows you how to make a box and how to decorate it with gorgeous painting techniques.

Materials:
- 1 sheet 285 lb. Susan Scheewe watercolor paper, size 8 1/2 x 11 (by Martin/F. Weber)
- Watercolors: Susan Scheewe Cadmium Yellow, Alizarin Crimson, Ultramarine Blue
- Watercolor brushes: A large flat and a large #5 or #6 round ( I used Susan Scheewe brand)
- Water container
- Paper towels
- Pencil
- Ruler
- Scissors
- Scotch tape or white glue
- Divided styrofoam plate with at least 3 sections
- Coarse sea salt
- Can of spray acrylic sealer (I used Krylon brand Matte Finish #1311)
- Sharpie Fine Point and Ultrafine Point Permanent Markers (I used black, but other colors could be used)

Instructions:
- Dampen one side of the watercolor paper with the large flat brush. Now turn the paper over and wet the other side. Let dry. This helps to "flatten" the paper in preparation for the watercolor.

- Create individual washes of Cadmium Yellow, Alizarin Crimson and Ultramarine Blue by placing each color into the individual sections of the divided styrofoam plate. Add water to each color and stir to make a wash. Be sure to have strong pigment in each wash for a bold and bright box!
- Rewet one side of the paper with the large flat brush - be sure all areas are "shiny wet". With the round brush, immediately drop some Cadmium Yellow wash randomly on the wet paper and watch it spread. Clean the brush and immediately pick up some Alizarin Crimson wash and drop it onto the paper - continue with the Ultramarine Blue wash.

- You will notice that the colors blend and form other secondary colors. While the paper is still wet, sprinkle the coarse sea salt all over the colorful paper.
- Let the paper dry completely before removing the salt.
- Now turn the paper over and repeat the colorful process. This is a great time to stop and view the beautiful patterns that the watercolors and the salt have created. If you like these designs, call the project finished! However, sometimes it is fun to continue creating patterns with the Fine Point Sharpie Marker by outlining some of the different colored shapes. Another idea is to use the Ultrafine Point Sharpie Marker and create fun imaginative mini designs within the larger patterns. Whatever you decide, the idea is to have fun with color and design.
- Now seal the watercolor paper with the spray acrylic sealer on both sides of the paper. This keeps the watercolor from "moving" if it should become damp. Be sure to spray outdoors to avoid fumes.
- The design can now be matted and framed, or turned into a box by following the next set of directions.

- Measure in 2 1/2" from the edge of each side and draw lines parallel to each side.

- Using the scissors, cut the flaps.

- Fold each side up using the ruler for a straight edge.
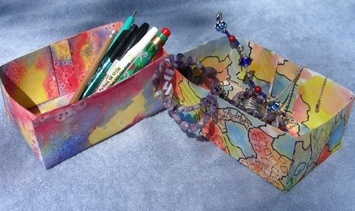
- This photo shows the two styles of boxes:

Design with markers used to outline large colored shapes and extra design pattern embellishments within the large shapes.
Design with salt patterns only.
- Use white glue or tape to fasten the sides. I used pinch clothespins to hold the sides together while the glue dried.

Your boxes are complete!Of course, you can add glitter, beads, fringe and all kinds of other embellishments to make your watercolor box even more bright and beautiful! Now you are all ready to use your boxes and put all sorts of things in them from pencils and pens to jewelry - have fun!

