Embrace Cardigan
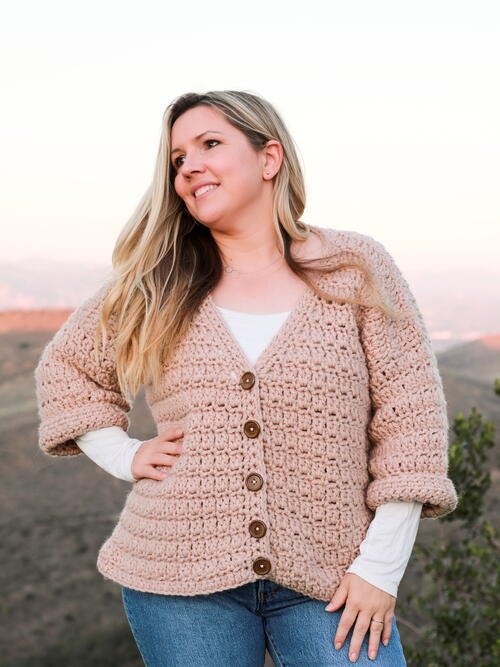
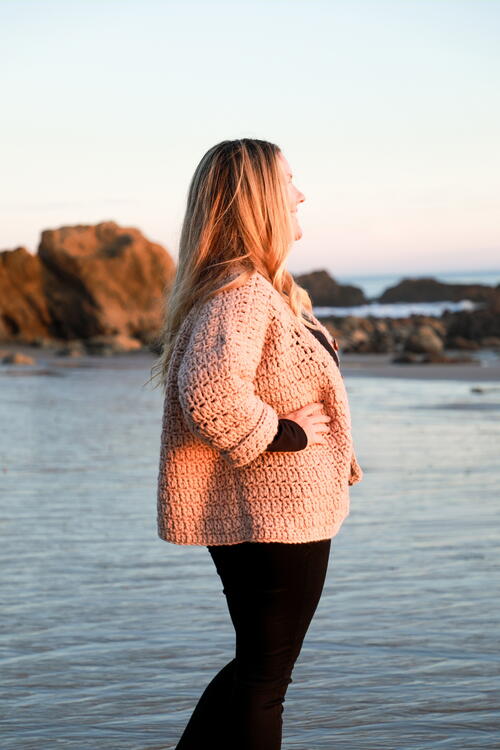
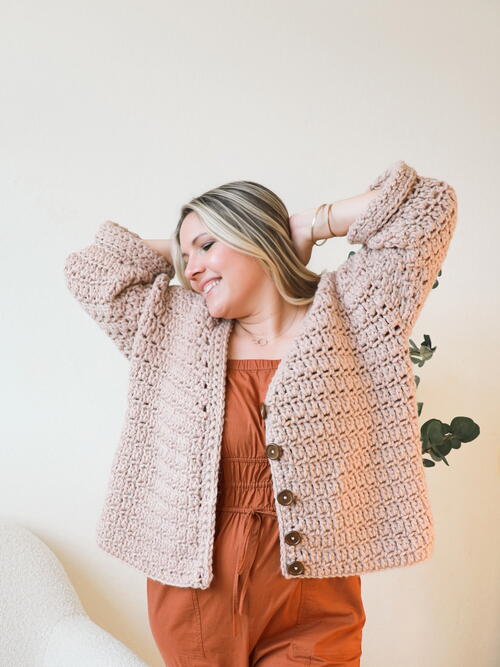
With this cardigan, you’ll be buttoned up and embracing whatever new outing the day holds for you! Worked up in a bulky yarn, this three-quarter cuffed sleeve cardigan is full of texture and fun details. This design uses a simple technique to incorporate buttons so that you can wear it open or closed, and once you see how easy it is to make the button band, you’ll be wanting to add buttons to all your cardigans.
Project Time: 4.5–6 hours (XS-XL), 7–10 hours (2X-5X)
Sizing
XS (S, M, L, XL) (2X, 3X, 4X, 5X)

Materials List
-
Yarn
Lion Brand Yarn, Bulky Weight, Hue + Me (80% Acrylic, 20% Wool), 137 yd (125 m), 4.4 oz (125 g)
-
Shown in
Desert
-
Yardage/Meterage
781 (834, 959, 1015, 1135) (1194, 1321, 1382,1420) yd [714 (763, 877, 928, 1038) (1092, 1208, 1264, 1300) m]
-
Hook
US M (9 mm)
-
Notions
Locking stitch markers
Yarn needle
Scissors
5 buttons, 1 inch (27 mm)
Sewing needle and thread for your buttons
-
Gauge
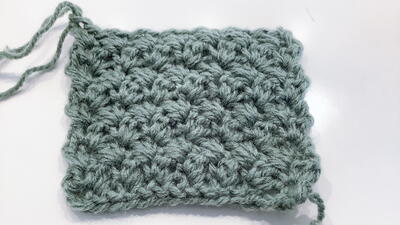
11 sts x 8 rows = 5" (12.5 cm) in pattern (Rows 2 and 3 of the Back Panel repeated) (blocked)
-
Finished Measurements
- For reference: Model is 5'3" (160 cm) wearing a M
- Based on chest measurement of: 30 (34, 38, 42, 46) (50, 54, 58, 62)" [76 (86, 96.5, 107, 117) (127, 137, 147, 158) cm]
- Fit is oversized. 15" (38 cm) positive ease included
- Finished Chest (A): 45.5 (49, 53, 56.5, 60) (66.5, 70, 73.5, 77.5)" [115.5 (124.5, 135, 143.5, 152.5) (169, 178, 186.5, 197) cm]
- Sleeves (B): 11 (11, 10, 10, 9) (9, 8, 8, 6.5)" [28 (28, 25.5, 25.5, 23) (23, 20, 20, 16.5)]
- Armhole Depth (C): 7 (7, 8, 8, 9) (9, 10, 10, 11)" [18 (18, 20, 20, 23) (23, 25.5, 25.5, 28) cm]
- Underarm to Bottom Hem (D): 14.5" (37 cm)
- Neck Opening (E): 6" (15 cm)
-
Abbreviations
ch | chain
Ch-sp | chain space
Dc | double crochet
2dc | double crochet twice into the same stitch
dec | decrease
RS | right side
sc | single crochet
sk | skip
Sl | St slip stitch
WS | wrong side
Notes
- The starting chain is also referred to as the foundation chain in the pattern.
- Beginning chain doesn’t count as a stitch in this pattern unless otherwise stated.
- This cardigan is constructed in panels that are sewn up to create the cardigan shape. Sleeves are then added on, along with the button band.
- Use a whip stitch for sewing up the seams.
- When joining in the round, Sl St into the top of the beginning chain.
- The sleeves drop farther down the arm due to the chest circumference and oversized ease of the garment with a drop shoulder. Row count goes down as the sizes go up.
INSTRUCTIONS
-
PANELS:
Back Panel Ch52 (56, 60, 64, 68) (74, 78, 82, 86).
Row 1: (RS) Starting in the 3rd ch from the hook, dc for the row. [50 (54, 58, 64, 68) (72, 76, 80, 84) sts]
Row 2: (WS) Ch1, turn, *ch1, sk1, sc1, repeat after * for the row.
Row 3: Ch2, turn, *sk1, 2dc, repeat after * for the row.
Notes: For your repeats, your stitches fall in the same places. Your last stitch of your Row 2 repeat will always fall in the 2nd dc of the previous row.
For Row 3, your 2dcs will always fall in the ch-sp you made during Row 2.
Row 4: Ch1, turn, *ch1, sk1, sc1, repeat after * for the row.
Rows 5–34 (34, 36, 36,38) (38, 40, 40, 42): Repeat Rows 3 and 4.
Note: Adjust length as needed for height or preference, ending on a WS row.
Fasten off and weave in the ends.
Front Left Panel (when worn)
Ch26 (28, 30, 32, 34) (38, 40, 42, 44).
Row 1: (RS) Starting in the 3rd ch from the hook, dc for the row. [24 (26, 28, 30, 32) (36, 38, 40, 42) sts]
Row 2: (WS) Ch1, turn, *ch1, sk1, sc1, repeat after * for the row.
Row 3: Ch2, turn, *sk1, 2dc, repeat after * for the row.
Row 4: Ch1, turn, *ch1, sk1, sc1, repeat after * for the row.
Rows 5–20: Repeat Rows 3 and 4.
Note: If you added additional rows for length to your Back Panel, add the same number of extra rows now before continuing to the V-Neck Shaping.
V-Neck Shaping
Row 1: (RS) Ch2, turn, *sk1, 2dc, repeat after * until the last 4 sts, dc1 in each ch-sp from previous row for a decrease (2 sts worked), skipping the scs from the previous row. [22 (24, 26, 28, 30) (34, 36, 38, 40) sts]
Row 2: (WS) Ch1, turn, *ch1, sk1, sc1, repeat after * for the row.
Rows 3–8: Repeat Rows 1 and 2. [16 (18, 20, 22, 24) (28, 30, 32, 34) sts]
Rows 9–14 (14, 16, 16, 18) (18, 20, 20, 22): Repeat Rows 3 and 4 from the Front Left Panel, continuing in established pattern without decreases.
Fasten off and weave in the ends.
Front Right Panel (when worn)
Ch26 (28, 30, 32, 34) (38, 40, 42, 44).
Row 1: (RS) Starting in the 3rd ch from the hook, dc for the row. [24 (26, 28, 30, 32) (36, 38, 40, 42) sts]
Row 2: (WS) Ch1, turn, *ch1, sk1, sc1, repeat after * for the row.
Row 3: Ch2, turn, *sk1, 2dc, repeat after * for the row.
Row 4: Ch1, turn, *sk1, sc1, ch1, repeat after * for the row.
Rows 5–20: Repeat Rows 3 and 4.
Note: Ensure both panels have the same number of rows up to this point before continuing to the V-Neck shaping.
V-Neck Shaping
Row 1: (RS) Ch2 (counts as a st for this row), turn, sk2, dc1, *sk1, 2dc, repeat after * for the row. [22 (24, 26, 28, 30) (34, 36, 38, 40) sts]
Row 2: (WS) Ch1, turn, *ch1, sk1, sc1, repeat after * for the row.
Note: Last st goes in the top of your turning ch from Row 1.
Rows 3–8: Repeat Rows 1 and 2. [16 (18, 20, 22, 24) (28, 30, 32, 34) sts]
Rows 9–14 (14, 16, 16, 18) (18, 20, 20, 22): Repeat Rows 3 and 4 from the Front Right Panel, continuing in established pattern without decreases.
Fasten off and weave in the ends. -
SEAMING:
Shoulder Seams: Lay the Back Panel down, RS up. Lay the Front Panels on top of it with RS down and the outer edges aligned. RS should be facing each other, and the Front Panels should form the V-Neck in the center.
Using a piece of yarn twice the shoulder width, sew the shoulders together.
Side Seams: Using a piece of yarn twice the length of the side seam, sew the side seams leaving a 7 (7, 8, 8, 9) (9, 10, 10, 11)" [18 (18, 20, 20, 23) (23, 25.5, 25.5, 28) cm] gap from the shoulder seam.
Weave in the ends. Turn the garment right side out. -
BUTTON BAND PLACEMENT:
Row 1: With the garment RS up in front of you, attach the yarn with a ch1 at the bottom left corner (Right Panel if worn), sc1 per row ending up to the V-neck section, sc2 per Row 1 ending, sc1 per Row 2 ending, sc into each worked stitch around the collar, repeat stitch placement for the other side so each side has the same number of stitches.
Note: Adjust as needed for the gauge. The lapel should lay flat; if it buckles, you have too many sts. If it pulls tight, you have too few.
Button Placement
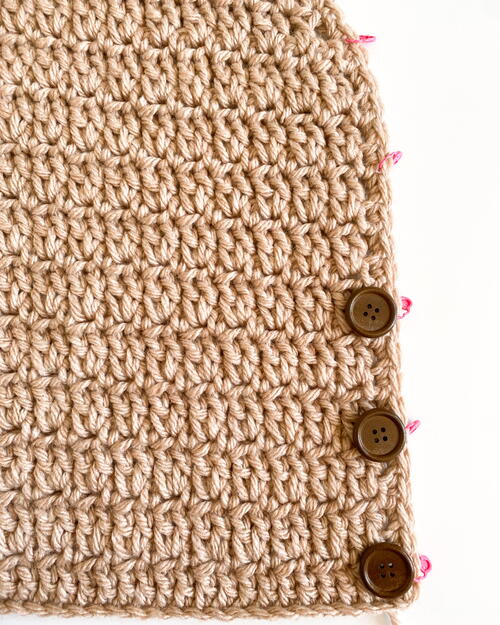
This method will help you customize your cardigan (Photo A).
Notes: If you prefer no buttons, don’t work the skipped chains for the button row; just work each stitch as you normally would.
Each locking stitch marker placed will be a buttonhole. The buttons in Photo A indicate where the buttons will be sewn after completing Row 3. If you’d prefer more or fewer buttons, you can place your preferred number of markers.
With the garment RS up in front of you, attach a locking stitch marker in the 2nd stitch up from the bottom hem/foundation chain on the left side (Right Panel if worn). This is where my button
placement started. I evenly placed my remaining markers 4 sts apart (marker, st, st, st, st, marker), working up the lapel, with my last button placed at where the V-Neck started. Adjust this for your size and based on the amount of sts worked for Row 1 above. I used five buttons but using more or less buttons will be easy when you use this method for placement.
Row 2: (Button Row) (WS) Ch1, turn, sc until you reach your marker, *ch1, sk the stitch with the marker, sc to the next marker, repeat after * for the remaining row until the last st, sc1.
Row 3: (RS) Ch1, turn, sc for the row.
Note: Sc into the chains for the buttonholes (not around them) as you come to them.
Fasten off and weave in the ends.
Attaching Buttons
Using a sewing needle and matching thread, with the garment RS up in front of you and the button holes on the left-hand side, line up the bottom hems. Sew your buttons on the right-hand side, along Row 2, so that they line up with the buttonholes on the other Button Band. -
SLEEVES:
Make two
Work around the sleeve opening.
Round 1: (RS) Attach yarn with a ch1 in the center of the underarm, sc30 (30, 36, 36, 40) (40, 44, 44, 46) around the sleeve opening, Sl St to join in the round. [30 (30, 36, 36, 40) (40, 44, 44, 46) sts]
Round 2: Ch2 (no turn), *sk1, 2dc, repeat after * for the round, Sl St to join in the round.
Note: Worked in joined turning rounds for the remainder of the sleeve.
Round 3: (WS) Ch1, turn, *ch1, sk1, sc1, repeat after * for the round, Sl St to join in the round.
Round 4: Ch2, turn, *sk1, 2dc, repeat after * for the round; Sl St to join in the round.
Rounds 5–12 (12, 10, 10, 8) (8, 6, 6, 4): Repeat Rounds 3 and 4.
Note: If additional sleeve length is needed due to height adjustments, adjust rows now before working your decreases. End on a RS round.Sleeves decrease section
Round 13 (13, 11, 11, 9) (9, 7, 7, 5): Repeat Round 3.
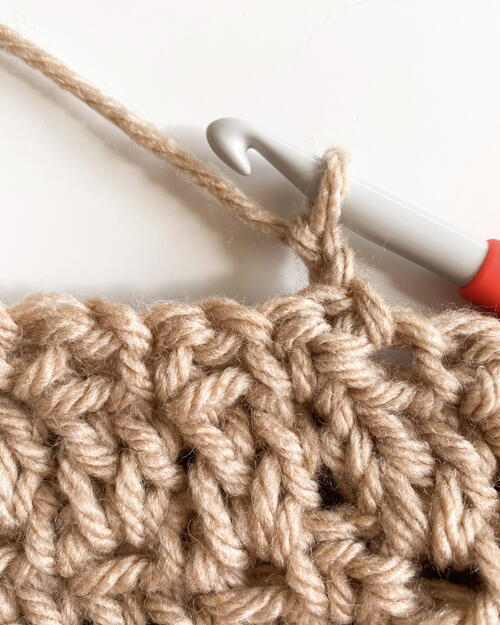
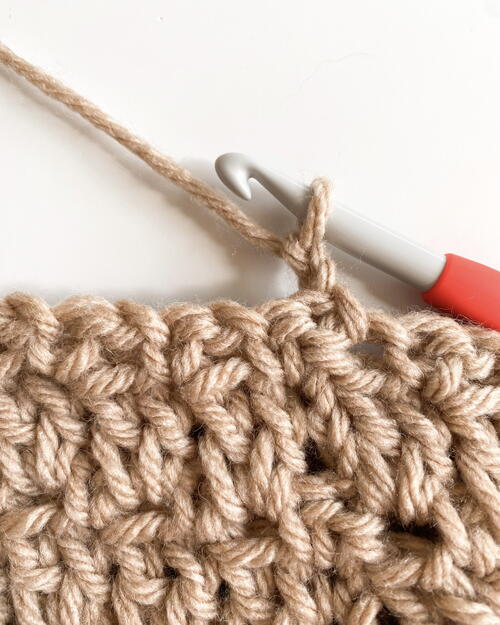
Round 14 (14, 12, 12, 10) (10, 8, 8, 6): (Dec) (Photos B and C) Ch2, turn, sk2, *sk1, 2dc, repeat after * for the round, Sl St to join in the round. [28 (28, 34, 34, 38) (38, 42, 42, 44) sts]
Round 15 (15, 13, 13, 11) (11, 9, 9, 7): Repeat Round 3.
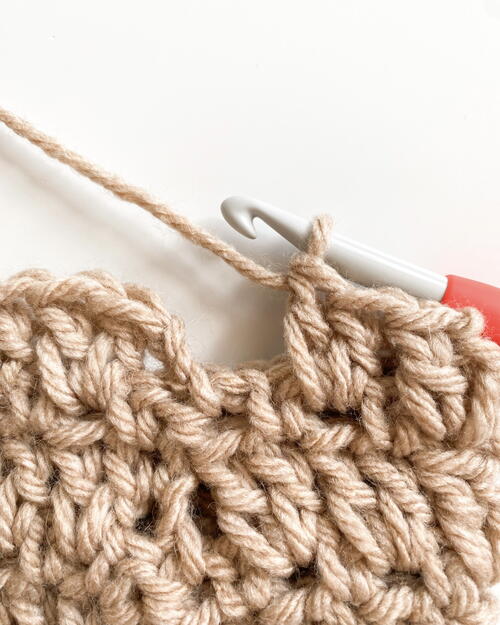
Round 16 (16, 14, 14, 12) (12, 10, 10, 8): (Dec) (Photo D) Ch2, turn, *sk1, 2dc, repeat after * for the round until the last 2 sts, sk2, Sl St to join in the round. [26 (26, 32, 32, 36) (36, 40, 40, 42) sts]
For XS-L sizes only, work the following rounds:
Round 17 (17, 15, 15,-) (-, -, -, -): Repeat Round 3.
Round 18 (18, 16, 16, -) (-, -, -, -): Repeat Round 4.
Round 19 (19, 17, 17, -) (-, -, -, -): Repeat Round 3.
Round 20 (20, 18, 18, -) (-, -, -, -): Ch2, turn, hdc for the round for a nice edging, Sl St to join in the round.
XL-5X sizes only, work the following rounds:
Round - (-, -, -, 13) (13, 11, 11, 9): Repeat Round 3.
Round - (-, -, -, 14) (14, 12, 12, 10): (Dec) Ch2, turn, sk2, *sk1, 2dc, repeat after * for the round, Sl St to join in the round. [ - (-, -, -, 34) (34, 38, 38, 40) sts]
Round - (-, -, -, 15) (15, 13, 13, 11): Repeat Round 3.
Round - (-, -, -, 16) (16, 14, 14, 12): (Dec) Ch2, turn, *sk1, 2dc, repeat after * for the round until the last 2 sts, sk2, Sl St to join in the round. [ - (-, -, -, 32) (32, 36, 36, 38) sts]
Round - (-, -, -, 17) (17, 15, 15, 13): Ch2, turn, hdc for the row for a nice edging, Sl St to join in the round.
All sizes
Fasten off and weave in the ends. Cuff your sleeve up for a cuff depth of approximately 1.5" (4 cm), and tack it down with your yarn and sewing needle along the inside of the garment so that it stays cuffed when you wear it.
Voila! You’re done! Block your project.
Credit Line
Reprinted with permission from Crochet in a Day by Angie Bivins. Page Street Publishing Co. 2024. Photo credit: Stephen and Angie Bivins.
Read NextWrapture Free Crochet Shawl Pattern

