Patterned Poncho
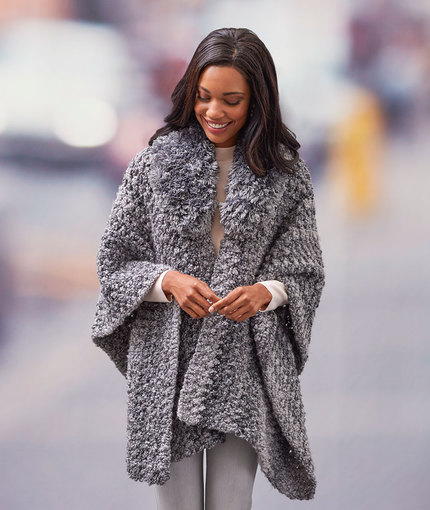
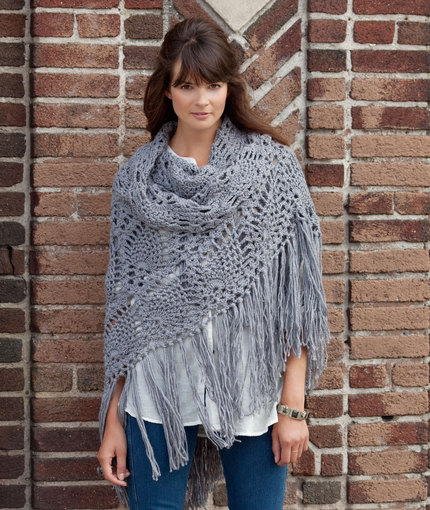
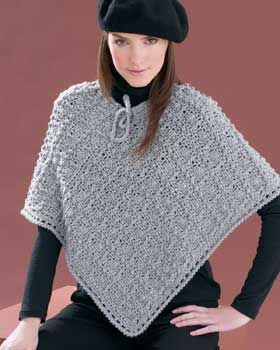 For the intermediate skill level, this crochet poncho pattern has eyelet detail around the edges and a textured pattern. Have fun making this Patterned Poncho and be sure to wear it everywhere. This is a great easy crochet poncho for fall and winter - it'll keep you warm and toasty until spring rolls around. The light colors in this pattern make it a great addition to any outfit. This poncho is versatile, interesting and anything but ordinary. That said, it looks great on anyone, so make one for yourself and give another to a friend.
Materials:
- Bernat® Berella 4
- Bernat® Super Value
- Bernat® Satin
- Bernat Super Value (Grey)
- Size XS/M
- 390 g (13.75 oz)/685 m (760 yds)
- Size L/2XL
- 485 g (17 oz)/850 m (945 yds)
- Size 3/5XL
- 585 g (20.5 oz)/1025 m (1140 yds)
- Crochet Hook: size 5.5 mm (U.S. I or 9) or size needed to obtain gauge
SIZES
To fit bust measurement:
- Extra-Small/Medium
- 28 - 38 ins [71 - 96.5 cm]
- Large/2 Extra-Large
- 40 - 50" [101.5 - 127"]
- 3 Extra-Large/5 Extra-Large
- 52 - 62" [132 - 157.5"]
Finished measurement from neck edge to point
- Extra-Small/Medium
- 18¾ ins [47.5 cm]
- Large/2 Extra-Large
- 21½" [54.5"]
- 3 Extra-Large/5 Extra-Large
- 25¼" [64"]
GAUGE
12 dc and 7 rows = 4 ins [10 cm].
Save & Print! Learn how to take care of your yarn with our free PDF printable!
INSTRUCTIONS
The instructions are written for smallest size. If changes are necessary for larger sizes the instructions will be written thus ().
Note: Turning ch 2 does not count as a stitch.
When working tr push stitch to RS of work.
When working Bobble, push Bobble to RS of work.
Make 2 pieces alike.
Ch 41 (47-53).
1st row: (WS). 1 hdc in 3rd ch from hook (counts as 1 hdc). 1 hdc in each ch to end of ch. 39 (45-51) hdc.
2nd row: Ch 3 (counts as dc). Miss first hdc. *Dcfp around next hdc. 1 dc in each of next 2 hdc. (Yoh and draw up a loop. Yoh and draw through 2 loops on hook) 4 times in next hdc. Yoh and draw through all loops on hook – Bobble made. 1 dc in each of next 2 hdc. Rep from * to last 2 sts. Dcfp around next hdc. 1 dc in last hdc. Turn.
3rd row: Ch 2. 1 hdc in first dc. *Dcbp around next st. 1 hdc in each of next 5 sts. Rep from * to last 2 sts. Dcbp around next st. 1 hdc in last dc. Turn.
4th row: Ch 1. 1 sc in first st. *1 tr in next st. 1 sc in next sc. Rep from * to end of row.
5th row: Ch 2. 1 hdc in each st to end of row.
Rep rows 2 to 5 for pat until work from beg measures approx 27 (29-31) ins [68.5 (73.5-78.5) cm], ending with 3rd or 5th row. Fasten off.
FINISHING
Pin garment pieces to measurements and cover with damp cloth leaving cloth to dry.
Sew 2 pieces tog as shown in Diagram.
Top edging: Join yarn with sl st at any seam at neck edge.
1st rnd: Ch 1. 1 sc in same sp as sl st. Work 83 sc around neck edge. Join with sl st to first sc.
2nd rnd: (Eyelet rnd). Ch 2. 1 hdc in same sp as last sl st. *(Ch 1. Miss next sc. 1 hdc in next sc. Rep from *to last sc. Ch 1. Miss last sc. Join with sl st to first hdc.
3rd rnd:Working from left to right instead of right to left as usual, work 1 reverse sc in each st around. Join with sl st to first sc. Fasten off.
Bottom edging: Join yarn with sl st to any corner at bottom.
1st rnd: Ch 1. 3 sc in same sp as last sl st. Work 120 (132-144) sc along bottom edge to next corner. 1 sc in point.
Work 120 (132-144) sc to next corner. Join with sl st to first sc.
2nd rnd: Ch 2. 1 hdc in same sp as last sl st. *Ch 1. Miss next sc. 1 hdc in next sc. Rep from * to last sc (having 1 hdc. Ch 1. 1 hdc in each corner sc). Ch 1. Miss last sc. Join with sl st to first hdc.
3rd rnd: Working from left to right instead of right to left as usual, work 1 reverse sc in each st around. Join with sl st to first sc. Fasten off.
Drawstring: Make a chain 40 ins [101.5 cm] long.
1st row: Sl st in 2nd ch from hook. 1 sl st in each ch to end of ch. Fasten off.
Beg at center front, thread Drawstring through eyelets at neck edge.
Read NextSimply Savvy Crochet Ruana Pattern
Your Recently Viewed Projects
Zeemer
Oct 20, 2018
I like this Patterned Poncho for its size, it's just right for the model, at least. I also like it for its color, the stitches used and the total look it gives this model. The grey color used contrasts well with black. So coool!!
Report Inappropriate Comment
Are you sure you would like to report this comment? It will be flagged for our moderators to take action.
Thank you for taking the time to improve the content on our site.

