Blitzen Crochet Bottle Top
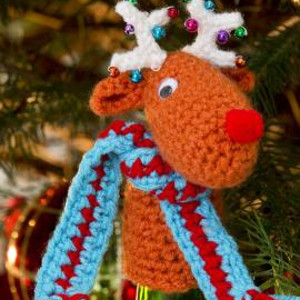
This Christmas craft idea will surely add a little something extra to your holiday cheer. Create a Blitzen Crochet Bottle Top for a quick, easy project that will keep everybody smiling all season long. The reindeer up north know that the best way to throw a party is getting creative with your gifts and decorations (and a little booze, of course). This beginner crochet pattern is just right for making your holidays happy. Cap off your Christmas fun with a Blitzen Crochet Bottle Top.
Primary TechniqueCrochet

SeasonWinter
Crochet HookF/5 or 3.75 mm hook
Materials:
- RED HEART® Super Saver®: 1 skein each 256 Carrot A, 512 Turqua B, 319 Cherry Red C, and 316 Soft White D
- Susan Bates® Crochet Hooks: 3.75mm [US F-5], 5 mm [US H-8]
- Stitch marker, stuffing, assorted round colored beads, small red pompom for nose, (2) small sew on wiggle eyes, sewing thread and needle, yarn needle
Instructions:
- Head Round 1: With A and smaller hook, ch 2; 6 sc in 2nd ch from hook; do not join but work in continuous rounds. Place marker in first sc and move up each round.
- Round 2: 2 Sc in each sc around – 12 sc.
- Round 3: [Sc in next sc, 2 sc in next sc] 6 times – 18 sc.
- Rounds 4-6: Sc in each sc around.
- Neck Opening-Round 7: Sc in first 12 sc, ch 4, skip next 4 sc, sc in last 2 sc.
- Round 8: [Sc in next 2 sc, 2 sc in next sc] 6 times – 24 sc.
- Rounds 9-11: Sc in each sc around.
- Round 12: [Sc in next 2 sc, dec] 6 times – 18 sc.
- Round 13: Sc in each sc around.
- Round 14: [Sc in next sc, dec] 6 times – 12 sc.
- Round 15: [Sc in next sc, dec] 4 times – 8 sc. Stuff head firmly.
- Round 16: [Dec] 4 times – 4 sc. Fasten off. Finish stuffing. Use yarn end threaded on tapestry needle to close hole. Set aside.
- Neck With A and smaller hook, attach yarn to any st at neck opening.
- Round 1: Ch 1, sc in each sc and ch around; do not join – 8 sc.
- Round 2: Sc in each sc around.
- Round 3: 2 Hdc in each sc around – 16 hdc.
- Round 4: [Hdc in next 7 hdc, 2 hdc in next hdc] twice – 18 hdc.
- Rounds 5-9: Hdc in each hdc around.
- Rounds 10 and 11: Sc in each hdc around. Fasten off.
- Ears (Make 2) With A and smaller hook, ch 5; sc in 2nd ch from hook and in next 2 ch, 2 sc in last ch, working in remaining loops on opposite side, sc in 3 ch, (slip st, ch 1, slip st) in next sc, slip st in next 3 sc, (slip st, ch 1, slip st) in next sc, slip st in next 3 sc. Fasten off leaving long tail for attaching ear to head.
- Antlers (Make 2) With D and smaller hook, ch 8. Working in back bumps on wrong side of ch for each section, slip st in 2nd ch from hook and in next 2 ch, ch 4, slip st in 2nd ch from hook and next 2 ch, slip st in next 3 ch on ch- 8, ch 4, slip st in 2nd ch from hook and next 2 ch, slip st in last ch of ch-8. Fasten off leaving long tail for sewing.
- Scarf With B and larger hook, ch 43.
- Row 1: Sc in 2nd ch from hook and each ch across changing to C in last st; turn – 42 sc. Cut B.
- Row 2: With C, ch 1, sc in each sc across changing to B in last st; turn. Cut C.
- Row 3: With B, ch 1, sc in each sc across. Fasten off.
- Fringe: Cut 4” (10 cm) strands of yarn. Knot fringe across each end of scarf as follows: fold strand in half forming a loop; insert the crochet hook through the fabric from the wrong side and draw the loop through, then draw the yarn ends through the loop and tighten. Trim yarn ends.
- Sew beads randomly on antlers. Sew ears and antlers to head with yarn ends. Locate desired eye placement and with A, soft sculpture eye socket by taking st in one eye placement, then insert needle and run it across to other eye placement area. Bring needle out at this 2nd eye area and pull tightly causing yarn to make indentation for eye socket. Repeat process again and then bring yarn out behind ear and knot securely. Weave in yarn end. Sew wiggle eyes securely in eye sockets just made. Sew pom pom nose to face. Slip onto bottle, tie scarf around neck.
Read NextHome for the Holidays Afghan

