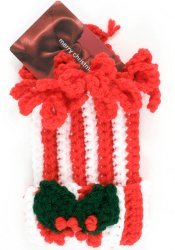
Crocheted Gift Card Holder
A Crocheted Gift Card Holder is a lovely and fun way to display a gift card. This adorable crochet pattern uses a 5mm hook and is perfect for giving Christmas gifts. Stuff this cute crocheted pouch with a gift card assortment or cash for a gift that's sure to keep on giving. You could even use this little crocheted bag to store homemade goodies, candies, or chocolate covered pretzel sticks.

Materials:
- 1 ball RED HEART® “Super Saver®" yarn in White (A)
- 1 ball RED HEART® “Super Saver®" yarn in Hot Red (B)
- 1 ball RED HEART® “Super Saver®" yarn in Hunter Green (C)
- 5mm [US H-8] crochet hook
- Yarn needle
Gauge: 16 sts = 4"; 20 rows = 4" in pattern. CHECK YOUR GAUGE. Use any size hook to obtain the gauge.
Instructions:
With A, ch 26.
-
Row 1: Sc in 2nd ch from hook and in each ch across; turn – 25 sc.
-
Row 2: Ch 1, sc in back loop only of each sc across, changing to B in last st; turn.
-
Rows 3 and 4: With B, repeat Row 2, changing to A in last st of Row 4.
- Rows 5-28: Repeat Row 2, alternating 2 rows A and 2 rows B until 7 stripes of each color have been completed, ending with 2 rows of B. Fasten off.
Pompom
- Working into row ends, join B with a slip st in upper right corner st; * ch 10, slip st in end of next row; repeat from * across. Fasten off.
Leaf (Make 2)
- With C, ch 4, sc in 2nd ch from hook, hdc in next ch, 5 dc in next ch, working along opposite side of foundation ch, hdc in next ch, sc in last ch; join with a slip st to first sc. Fasten off, leaving a 12" end for sewing.
Finishing
- Sew back seam. Fold up brim. Flatten cap and tack bottom opening closed. Sew Leaves to brim; embroider several French Knot berries with a doubled strand of B.
Tie
- Make a chain 12" long. Weave chain through cap directly under Pompom row. Insert gift card. Pull tie tightly to close top opening of cap and form a pompom. Tie ends together to form hanger.
Read NextFree Crochet Christmas Tree Pattern
Your Recently Viewed Projects
Thanks for your comment. Don't forget to share!
bobbylonardo 50143 99
Nov 21, 2013
If these patterns are "Never before featured" how are there comments that go back to 2011?
editorKS
Dec 08, 2011
Hi, lisakaylegodfrey 8588505. You might be interested in checking out all of our Jewish holiday crafts; here is a link: http://www.favecrafts.com/Jewish-Holiday We hope you find something you like! --Editors of FaveCrafts
Report Inappropriate Comment
Are you sure you would like to report this comment? It will be flagged for our moderators to take action.
Thank you for taking the time to improve the content on our site.