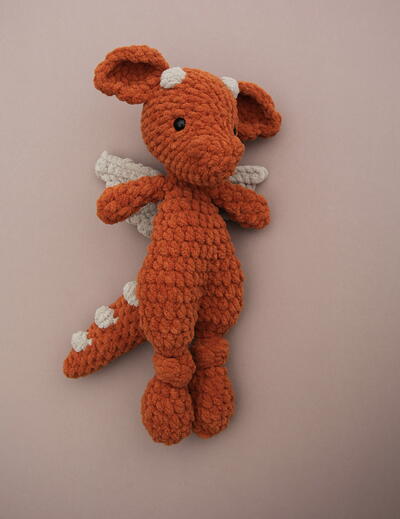
Dusty Dragon

Who can roast the perfect marshmallow with just one big breath? Dusty can! This little dragon may seem fierce, but he is as gentle as they come. He uses his fire-breathing skills to whip up delicious treats and loves to share his enchanting creations. Dusty looks great in contrasting colors that make his fantastical details really pop.
FINISHED SIZE:
15 inches (38 cm) from top of head to tip of toe
Materials List
-
Yarn:
- Super bulky weight/category 6
- Main color: Rust
- Contrast color: Sand
-
Hooks:
- US 7 mm — head
- US 8 mm/L — body, legs, arms, ears, tail, wings
-
Notions:
- 14 mm safety eyes or embroidered eyes
- Darning needle
- Fiber fill for head and tail
- Scissors
- Stitch markers
Instructions:
ABBREVIATIONS:
BLO: back loop only
CC: contrast color(s)
ch: chain
dc: double crochet
hdc: half double crochet
hdc inc: 2 hdc in next stitch
hdc2tog: half double crochet 2 stitches together using invisible decrease
MC: main color
sc: single crochet
sc inc: 2 sc in next stitch
sc2tog: single crochet 2 stitches together using invisible decrease
sl st: slip stitch
st(s): stitch(es)
SPECIAL STITCHES
3x bobble
4x bobble
5x bobble
6x bobble
REQUIRED SEWING
Arms
Tail
Wings
EARS
-
Right Ear
Begin working in MC with 8 mm hook.
Round 1:sc 6 in a magic circle [6]
Round 2:sc inc around [12]
Round 3:sc 5, sc inc x 2, sc 5 [14]
Round 4:sc 5, sl st 4, 3 dc in next st, sl st in next, 3 hdc in next st, sc 2 [18]
Fasten off.
Place st markers in the 2nd st and 2nd to last st of round 4. You will use the 4 sts from st marker to st marker when attaching each ear to the head. -
Left Ear
Begin working in MC with 8 mm hook.
Round 1:sc 6 in a magic circle [6]
Round 2:sc inc around [12]
Round 3:sc 5, sc inc x 2, sc 5 [14]
Round 4:sc 2, 3 hdc in next st, sl st in next, 3 dc in next st, sl st 4, sc 5 [18]
Fasten off.
Place st markers in the 2nd st and 2nd to last st of round 4. You will use the 4 sts from st marker to st marker when attaching each ear to the head.
HEAD
Begin working in MC with 7 mm hook.
-
Round 1 is the front of the head.
Round 1:sc 6 in a magic circle [6]
Round 2:sc inc around [12]
Round 3:sc 4, 3x bobble, sc 3, 3x bobble, sc 3 [12]
Round 4:sc 4, sc inc x 2, sc 1, sc inc x 2, sc 3 [16]
Round 5:sc 7, sc inc x 4, sc 5 [20]
Round 6:sc 8, (sc inc, sc 1) x 3, sc inc, sc 5 [24]
Round 7:sc around [24]
Round 8:sc 9, (sc inc, sc 1) x 2, sc inc x 2, (sc 1, sc inc) x 2, sc 5 [30]
Round 9:sc around [30]
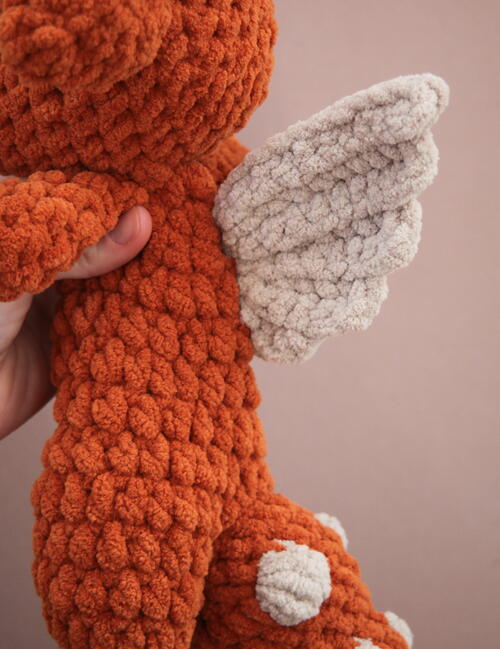
Round 10:MC:sc 13, CC:6x bobble, MC:sc 6, CC:6x bobble, MC:sc 9 [30]
-
The ears are crocheted in place in the next round. Position each ear against the head with the wrong side of the ear facing you and the right side of the ear touching the head.
Round 11:sc 10, sc left ear in place using next 4 sts, sc 6, sc right ear in place using next 4 sts, sc 6 [30]
Round 12:sc 2, sc inc, (sc 4, sc inc) x 5, sc 2 [36]
Round 13:sc 2, sc2tog, (sc 4, sc2tog) x 5, sc 2 [30] -
Stuff the head firmly, but do not overstuff.
-
Place safety eyes between rounds 6 and 7, approximately 9 sts apart.
-
Round 14:(sc 3, sc2tog) x 6 [24]
Round 15:sc 1, sc2tog, (sc 2, sc2tog) x 5, sc 1 [18]
Round 16:(sc 1, sc2tog) x 6 [12]
Round 17:sc2tog around [6] -
Fasten off, leaving a long tail for closing the head. Use a darning needle to thread through the outside loops of the remaining 6 sts, then pull tight to close. Use the needle to pull the yarn end up into the head to finish off.
BODY
Begin holding the head upside down with the nose pointing away from you. Working in MC using 8 mm hook, work 9 sc sts into the head in a circle (use rounds 8 to 10 of the head as an approximate guide for where to place the sts). This will be the foundation for the body.
-
Round 1:hdc around [9]
Round 2:(hdc 2, hdc inc) x 3 [12]
Round 3:(hdc 2, hdc inc) x 4 [16]
Round 4:(hdc 3, hdc inc) x 4 [20]
Round 5:hdc around [20]
Round 6:(hdc 4, hdc inc) x 4 [24]
Round 7:hdc around [24]
Round 8:(hdc 3, hdc inc) x 6 [30]
Round 9:hdc 2, hdc inc, (hdc 4, hdc inc) x 5, hdc 2 [36]
Round 10:hdc 2, hdc2tog,(hdc 4, hdc2tog) x 5, hdc 2 [30]
Round 11:hdc around [30]
Do not fasten off. Continue to leg instructions.
LEGS (MAKE 2)
Lay the body flat and find the middle of the last round. Reserve 2 sts at the center (1 at the front of the body and 1 at the back of the body) using a st marker to mark. The legs will be worked individually off each set of 14 sts.
-
Begin working off the 14 reserved sts on one side of the body.
Round 1:hdc around [14]
Round 2:hdc2tog around [7]
Round 3:(hdc 1, hdc2tog) x 2, hdc 1 [5]
Round 4 to 11:hdc around [5] 8 rounds
Round 12:hdc inc around [10]
Round 13:(hdc 4, hdc inc) x 2 [12]
Round 14:(hdc 5, hdc inc) x 2 [14]
Round 15:hdc around [14]
Round 16:hdc2tog around [7]
-
Fasten off, leaving a long tail for closing the foot. Use a darning needle to thread through the outside loops of the remaining 7 sts, then pull tight to close. Use the needle to pull the yarn end up into the leg to finish off.
-
Sl st new yarn to the center of the body for the second leg, leaving an 8-inch (20-cm) tail (this will be used to stitch the body closed at the end). Repeat the above directions for the second leg.
-
Finishing the Body+Legs
To close the space between the legs, whip stitch through the outside loops of each open st using the long tail left at the beginning of the second leg. -
Gently knot each leg.
ARMS (MAKE 2)
Begin working in MC with 8 mm hook.
-
Round 1:sc 5 in magic circle [5]
Round 2:(hdc 1, hdc inc) x 2, hdc 1 [7]
Round 3 and 4:hdc around [7]
Round 5:(hdc 1, hdc2tog) x 2, hdc 1 [5]
Round 6 and 7:hdc around [5] -
Fasten off, leaving a long tail.
-
Sew the arms in place between rounds 1 and 2 of the body, approximately 3 sts apart.
TAIL
Begin working in MC with 8 mm hook.
-
Round 1:sc 6 in magic circle [6]
Round 2:sc around [6]
Round 3:(sc 1, sc inc) x 3 [9]
Round 4:sc around [9]
Round 5:MC:sc 3, CC:3x bobble, MC:sc 2, CC:3x bobble, MC:sc 2 [9]
Round 6:sc around [9]
Round 7:(sc 2, sc inc) x 3 [12]
Round 8:sc around [12]
Round 9:MC:sc 5, CC:4x bobble, MC:sc 3, CC:4x bobble, MC:sc 2 [12]
Round 10:sc around [12]
Round 11:(sc 3, sc inc) x 3 [15]
Round 12:sc around [15]
Round 13:MC:sc 7, CC:5x bobble, MC:sc 4, CC:5x bobble, MC:sc 2 [15]
Round 14:sc around [15]
Round 15:sc2tog x 3, sc 9 [12]
-
Fasten off, leaving a long tail.
-
Stuff lightly with fiber fill to give it a full shape.
-
Sew in place with the decreased side of the tail facing down on the back center of the body,using rounds 8 to 11 as a guide.
WINGS
Begin working in CC with 8 mm hook.
-
Row 1:ch 22, working in second ch from hook,sc 21 [21]
Row 2:ch 1, turn, skip first st, BLO sc 19 [19]
Row 3:ch 1, turn, skip first st, BLO sc 17 [17]
Row 4:ch 1, turn, skip first st, BLO sc 15 [15]
Row 5:ch 1, turn, skip first st, BLO sc 13 [13]
Row 6:ch 1, turn, skip first st, BLO sc 11 [11]
Row 7:ch 1, turn, skip first st, BLO sc 9 [9]
Row 8:ch 1, turn, skip first st, BLO sc 7 [7] -
Fasten off and weave in ends.
-
Use a 20-inch (50-cm) piece of yarn and a darning needle to gather the wing piece.
-
Starting at row 8 and working toward row 1, weave the yarn back and forth through each row of the wings, pulling the yarn gently to ruche.
-
Attaching the Wings to the Body
Whip stitch the wings to the center back of the body, using rounds 2 to 4 of the body as a guide for placement.