Create a Butterfly Haven
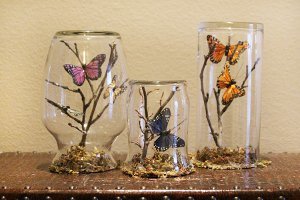
The Butterfly Haven from Shaunte Wadley for Consumer Crafts is a great spring and summer craft inspired by simple household items. The result is a beautiful, impressive, inexpensive project that adds a special spark to any room. You're going to love the sophisticated look.

Materials:
- 2.5″ Butterflies in Various Colors (as desired)
- Green Moss
- Hot Glue Gun and Glue Sticks
- Wire Cutters
- Twigs
- Chipboard – from a spiral notebook, cereal box or anything else you could recycle from
- Glass Jar(s) that you have on hand
Instructions:
- I sent my kids outside to gather twigs for my project. They brought in giant branches! I guess I wasn’t very specific. (But I had a lot to choose from!)

- You will want to choose sections of twigs that have a lot of “character.” V’s, and knobs and tiny branches for the butterflies to “sit” on. While they were scavenging outside, I was scavenging inside, gathering my jars. You can use any jar that has a wide-mouth opening. You can use canning jars, those clear vases you get with flower arrangements, or old candle jars. I was surprised how many perfectly-sized jars I found in my pantry. Spaghetti sauce, salsa, and jams were a great size.

- After you select your jars, remove any labels and wash them thoroughly (Goo Gone is wonderful for removing the sticky residue from labels and stickers.)

- Using jars of different sizes and shapes makes your display more interesting.Let’s prep those twigs! Trim down the twigs to fit inside the jar. Use wire cutters to give the twigs a nice, clean edge.

- Then, select the butterflies you would like to use, and arrange them onto your twig as desired. Glue them to the twig using hot glue. Make sure they are really secure, as you will not be able to make changes once they are inserted into the jar. Insert your butterfly twig into the jar. Do not glue the twig, it should stay fine.

- Now, take your jar, flip it upside down, and trace the bottom lip of the jar onto a piece of chipboard. I used the back of a spiral-bound notebook. You need the chipboard to be sturdy. A cereal box would also work well. Whatever you would like to recycle.

- Cut out the traced circle.

- Adhere green moss to the circle using hot glue. Apply the glue generously, and mush the moss into the glue. (Mush is a very sophisticated crafting term.)

- Don’t worry if the moss hangs over the edge of the circle.Then take your hot glue gun, and run a generous line of glue around the rim of your jar.

- You will need to work quickly here While the glue on the rim is still hot, press your inverted moss circle onto the rim. Press and hold until the glue dries.

- Some of the moss is going to fall down into the interior of the butterfly jar. That is okay. It will settle back down to the bottom when you turn it upright.

- That's it!

Read NextFarmhouse Egg Wreath
Your Recently Viewed Projects
KLC
Mar 22, 2018
Wow, these are stunning. I like that you can simplify the craft for kids or really amp up the details for adults.
Weberme
Apr 03, 2017
I love fairies, dragonflies and butterflies so this butterfly haven is so cute and I have got to add this in the extra bedroom decor. So simple and easy to do and you can buy the supplies you need at the dollar store or hobby lobby with 40% off coupon,Joann's 50% or Micheal's 50% coupons. This haven looks so real but I would also use styrofoam on bottom to hold the twigs up better. I am also going to do one with dragonflies too and see if I can make a fairy to put watching them. I am looking forward to this project. A great tutorial and super project.
Marilyn B
Jan 22, 2017
You can find silk type butterflies for sale, or even clip art and print on both sides. Is don't think air freshener would work in this project since it is closed on top and bottom, unless you used your glass container right side up and left the top open, then maybe you could place a sachet inside.
Wheeling Ma
Aug 27, 2016
That Create a Butterfly Haven looks real cute and it dont look like its hard to make, Are the butterflies made of cardboard, Could you put some type of air freshener to freshen the air or not?Please Reply back and let me know ASAP! ThankYou!
Ask93 7929298
Jun 12, 2016
What a lovely project. I absolutely will be making a few of these I know I can find all the supplies I need in my house and the rest at the dollar store. But I would add a styrofoam base or floral foam base to give the branch something more sturdy to adhere to.
bobbylonardo 50143 99
Apr 24, 2015
Very pretty. I have all the items on hand too so it's really a freebie for me.
Report Inappropriate Comment
Are you sure you would like to report this comment? It will be flagged for our moderators to take action.
Thank you for taking the time to improve the content on our site.

