Decorative Studded Ornament
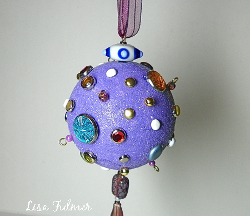
Who says you can only make ornaments during the Christmas season? If you're looking for crafts using rhinestones, decorative headpins and more, you can't go wrong with a Decorative Studded Ornament from Lisa Fulmer. Leave it on a hook or doorknob all year long.

Materials:
- 2-1/2″ smooth foam ball
- Craft paint and brush
- Q-tip
- Clear glitter and glitter tray
- Assortment of brads, beads, head pins, eye pins, decorative straight pins
- Thin ribbon
Instructions:
-
Insert q-tip into large hole at one end of the ball to make a handle to hold the ball while painting.
-
Paint the ball with one coat of craft paint.
-
While the paint is still wet, sprinkle the ball with clear glitter over a glitter tray and allow to dry.
-
Carefully insert your brads, etc. all around the ball in a random fashion.
- If the prongs of the brad seem too flimsy, insert a large pin into the ball first, remove and guide the prongs into that hole.
- Use a thimble to protect your finger if you’re using lots of head pins/eye pins.
-
Coat the base of your brads, etc. with a little glue before sinking into the foam for extra reinforcement.
-
To fill the large hole in the ball, squeeze a little glue inside, then press a long trumpet-style bead down into the hole until it’s flush with the surface.
-
Place a large decorative bead on a long eye-pin and sink it through the trumpet bead into the foam. This becomes your ornament hanger.
-
Place some large decorative beads on a long head pin, coat the pin with some glue, and press it up into the opposite end of the ball.
- After the glue has dried for a bit, thread a ribbon through the eye pin at the top, tie a knot and your ornament is ready to hang.
Read NextTobacco Basket Wreath

