Decoupage Fairy
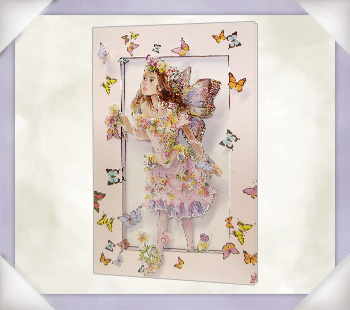
Create a work of art in just five simple steps! With one pot of Spring Flower Soft™ you can create a beautiful decoupage fairy. This is a perfect spring craft project to decorate any room in your home, from Flower Soft.

Materials:
- One pot of Spring Flower Soft™
- Flower Soft Glue
- Blank Card (A6 size)
- Scissors or craft knife
- Two ‘half’ sheets of pink butterflies paper from our Decorative Paper: Butterflies Pack
- Pretty fairy illustration (several copies for decoupage)
Preparation:
- Take some of your Flower Soft™ and place it in a dish so that you can get your fingers in and fluff it up.
- Place a sheet of paper over your working area to collect any spills of Flower Soft™, which can be returned to your pot later.
Step 1
Cut out all elements of the fairy illustration including each detail you wish to decoupage. Lay them out ready for assembly. Cut one sheet of pink butterfly paper from our Decorative Papers range, in half. Remove the centre of one of the oblong 'paler' areas (making your own aperture), centralise it on top of the un-cut sheet and stick together using spacers. Mount on to the front of your A6 card.

Step 2
Add high tack glue to areas of the fairy you wish to embellish with Flower Soft™. Sprinkle over Flower Soft™ and tap off excess. Allow to dry.
Step 3
Cut our some of the butterflies from another sheet and fold in half to give a more realistic impression.

Step 4
Glue (or use spacers) your fairy into the centre of your card, place one foot behind the aperture you have just created, this will make her look like she is stepping through the card.
Step 5
Glue your folded butterflies around the card to bring it to life.

Read NextUpcycled Sweater Wreath
Your Recently Viewed Projects
Report Inappropriate Comment
Are you sure you would like to report this comment? It will be flagged for our moderators to take action.
Thank you for taking the time to improve the content on our site.

