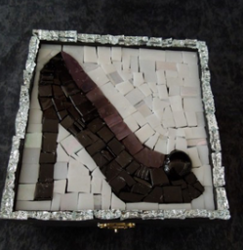
Fabulous Shoe Mosaic
Add a touch of class to your decor with a Fabulous Shoe Mosaic from Heidi Borchers. Apply Aleene's Tacky Glue to the back of mosaic tiles to create the desired look for your piece. Mosaic craft projects are so much fun and easy to make.

Materials:
- Aleene’s Tacky Glue
- Mosaic tiles
- Flat back marble
- Wheel nippers
- Cereal box
- Pencil
- Scissors
- Wood box (or wood surface of your choice)
- Acrylic paint
- Paint brush
- Protective eyewear
- Glass jar (optional)
- Shoe pattern
- Pencil
- Wheel nippers
Instructions:
-
Select tile pieces of your choice. I have used mirror tile and stained glass mosaic pieces for my design.

-
You can use any design pattern of your choice for your project. For my high-heel pattern, I went online to find a shoe style that I loved and traced the design onto a cereal box. I love to use cereal boxes for my patterns because of their durability — and it’s easy to store the lightweight pieces.

-
Paint box desired color. Let dry completely. Transfer pattern to box top with pencil.

-
Use the wheeled nippers to cut your tiles to the desired shapes. Several shape choices are: cutting your tile in half or in quarters, or take those quarters and cut them into triangles. Remember to use protective eyewear whenever you are cutting tiles.

-
Once your tiles are cut, it’s time to start gluing. Here’s a quick tip: keep your bottle of Aleene’s Original Tacky Glue tip down in a glass jar. Then the glue is always ready to squeeze.

-
Apply a dab of Aleene’s Original Tacky Glue to the back of each tile and glue in place following your pattern lines as a guide. Cut pieces to fit specific areas within your design.

-
If you are using a flat-back marble in your design, be sure to glue it in at the toe and then glue in the mosaic tiles around the marble.

-
Here’s a close-up look at the slight variation of tile colors to complement the design. I also glued mirrored tiles along the edge of the box. For this project, I chose not to grout my mosaic. If you do want to grout, be sure to let your glued pieces dry completely before grouting.

For a comprehensive video tutorial of this project, check out How to Make a High Heel Mosaic Box.
Read NextPom Pom Monogram