Glowing Jack O'Frost
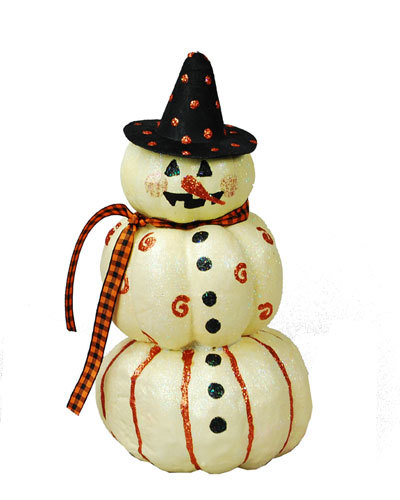
Use foam pumpkins to create a frosty snowman for winter decor.
by DecoArt.com

Materials:
DecoArt Products Required
Glamour Dust
- DAS37 - Glamour Dust Crystal
Craft Twinkles Writers
- DCTW13 - Orange
- DCTW14 - Black
Craft Twinkles
- DCT19 - Sparkling Pink
Americana Acrylics
- DAO67 - Lamp (Ebony) Black
- DA258 - Butter
Glow-in-the-Dark Paint
- DS50 - Glow-in-the-Dark Medium
Americana Brushes
- DBR2002-B - Round 2
- DBF2575-B - Flat 3/4"
Supplies
- Felt witch hat, 3" wide at rim base and 2" tall
- Foam plate
- Lo-temp glue gun and glue sticks
- 1/4" round foam pouncer brush
- Coordinating 3/8" ribbon, 18 length
- Three foam pumpkins: 2" high x 3" wide; 2 3/4" high x 4" wide;
- 3" high x 5" wide
Steps:
- Preparation: Remove all stickers or labels from surfaces.
- Remove stems from two largest pumpkins.
- Glue pumpkins together with smallest at top and largest at bottom.
- Use 3/4" flat brush and Butter to paint stacked pumpkins; let dry.
- Apply one coat of Glo-in-the-Dark Medium to pumpkins. Apply second coat to one pumpkin at a time and while second coat is wet, sprinkle pumpkin with Glamour Dust. Let dry.
- Referring to photo for placement, use liner brush and Lamp Black to paint eyes and mouth. Let dry.
- Use Black Craft Twinkles Writer to paint buttons down front of snowman shape and to go over Lamp Black facial details. Let dry.
- Use pouncer dipped in Sparkling Pink to make circles for cheeks; let dry.
- Use Orange Craft Twinkles Writer to paint carrot shape for nose, dots on hat, stripes over indentions of bottom pumpkin, and spirals on middle pumpkin. Let dry.
- Glue hat on top of snowman shape.
- Tie ribbon around neck and tie in knot at left side.
Helpful Hint
If pumpkin stems are not easily removable, carve into pumpkin above it with craft knife and insert stem into hole. Stem on smallest pumpkin will fit under hat.
Read NextDecorative Glass Bottles

