Magnetic Family Calendar
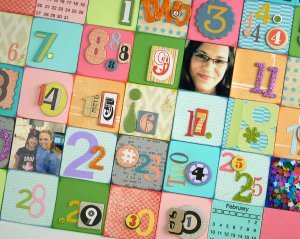
This vibrant Magnetic Family Calendar is a must have for today's busy family! Keep track of everyone's comings and goings with this simple magnetic calendar that can remain on display year after year on your refrigerator. Use your favorite family photos to make your calendar decorative and functional.

Materials:
- Self-Adhesive Magnetic Business Cards (Staples)
- Patterned Paper (Bazzill)
- Cardstock (Bazzill)
- 2013 Month-At-A Glance Calendar Stickers (SRM Stickers)
- Number Stickers (various)
- Chipboard Numbers (various)
- Magnetic Dry Erase Board
- Mod Podge (optional)
- SureCut™ Deluxe Craft Paper Trimmer (12")
- Cutting Mat (24" x 36")
- Softgrip® Detail Knife
- Titanium Scissors (8")
- Alpha Basic Clear Stamps (8"x8")
- Stamp Block Set
Instructions:
-
The overall calendar dimensions you’ll end up with using the measurements given in these instructions is 14” wide x 11 ½” tall.
-
You’ll need a box of self-adhesive magnetic business cards. The magnets measure 2” x 3 ½”. Use your bypass trimmer to cut your magnets down to 2” x 2”, and keep the leftover pieces for a later step. (Note: I bought a box of 100 and used approximately 70 magnets, but you could get by with a box of 50 if you don’t use the month at a glance squares and turn less photos into magnets.)

-
If you’ll be using photos as memory triggers for important dates like the holidays, birthdays, medical appointments, sports practices, etc, you’ll need to select photos, crop them to 2” square and print them out. I found it easiest to open a new 8” x 10” canvas at 300dpi in my photo editing program, cropped and resized photos and arranged 20 of them on the canvas so I could print them all together on one sheet.

-
Once printed, they were quickly cut into individual squares using my paper trimmer, and then applied to magnet. If you were slightly off on your measurement, you can easily cut or slice through the overhang, whether it is the photo paper or the magnet material, using your detail knife or a pair of scissors.

-
Then, gather a handful of coordinating patterned papers and/or cardstocks and trim them to 2” square. This is a great way to use up some scraps you have leftover from other projects. Lay 31 squares out on your work surface, placing them in rows of 7 across. Start adding number stickers or chipboard numbers to the squares #1 – 31.

-
SRM Stickers has Month-At-A-Glance stickers that measure exactly 2” square with the black border removed. I always find the quick glance at the whole month super helpful and it’s a great way for kids to have a visual to count the days ahead to an upcoming event they are looking forward to, as well. You just need to apply these clear stickers to whatever patterned paper or cardstock you prefer and then stick it to a 2” magnet square.

-
Next, cut 7 pieces of cardstock to 2” x 1 ½” and use a block from the stamp block set along with your Bold Alphabet Stamp Set to stamp the days of the week using a bold dark colored ink. Then, apply them to the leftover pieces of magnet you cut down earlier. Trim up any slight measurement differences.

-
Lastly, build your January calendar on a magnetic dry-erase board, or even on the refrigerator. If you notice, the beginning and end of the month have space before the month starts and ends. If you want a perfect rectangle, you may choose to create some blank patterned paper or cardstock squares to fill in these spaces. As each month changes, you can teach your child how to look at the Month-At-A-Glance calendar to reconstruct the new month by simply shifting the magnets.

-
Extra photos can remain on the magnetic board or refrigerator off to the side, or placed in a bag and taped to the back of the board. You can also use the remaining leftover magnetic rectangles to stamp the letters to spell out the month headings.

- If you’ll be using this as more of a ‘play toy’ than a calendar that goes untouched through the month, or if you’re placing it in a high-traffic area, I recommend sealing each piece with Mod Podge to protect the pieces from fingerprints.
Read NextSuper Simple Etched Mason Jar

