Paisley Letter
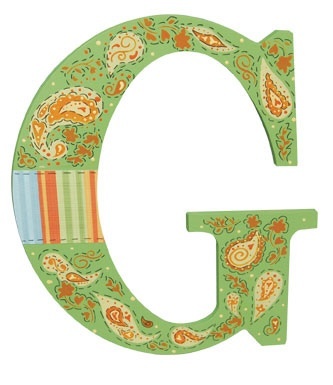
Dress up any wall letter with layers of paisley shapes. Create a Paisley Letter and hang it up on your wall - this is one of the best DIY wall hangings out there. This is a great craft for beginners. Create a DIY wall decoration that you can hang on your wall with pride. This would look great n a young girl's bedroom and would turn her bedroom into a personal haven. While you're at in, make a few letter and give them away as a housewarming or birthday gift. The personalization will really touch people's hearts. Also, be sure to experiment with fun scrapbook papers and switch up the prints as much as possible.

Materials:
- DecoArt Laurie Speltz's Instant Images IIT01 - 3/4 in. Flat Brush
- DecoArt Laurie Speltz's Instant Images IIP02 - Paisley Pocket Template
- DecoArt Laurie Speltz's Instant Images IIT05 - 1 Short Liner Brush
- DecoArt Laurie Speltz's Instant Images IIT06 - 3/8 in. Duo Tool
- DecoArt Laurie Speltz's Instant Images IIT07 - 1/4 in. Duo Tool
- Americana Acrylics DA184 - French Vanilla
- Americana Acrylics DA228 - Bright Orange
- Americana Acrylics DA269 - Foliage Green
- Assorted scrapbook papers
- Permanent ink pen
- Adhesives
- Wooden letter
Instructions:
- Cut scrapbook paper to fit letter.
- Attach scrapbook paper to letter.
- Base letter with Foliage Green.
- Layer paisley shapes with Bright Orange and French Vanilla. Let dry between layers and/or coats of color.
- Add dots, hearts, and doodles with stylus.
- Outline and embellish with permanent ink pens.
Helpful Hint:
- Refer to template and tool packages for additional information on template and tool usage and techniques.

