Thrifty Candle Holders and Plate Stand
Ready to have some thrifty fun? Get the shimmery, colorful look of Japanese Raku for a smaller price tag by making this copper-based Thrifty Candle Holders and Plate Stand project.
Materials:
- 6 cupcake holder die cuts
- 2 rolls ofCreative Metal™ in copper from Walnut Hollow® (Optional but nice is the Creative Metal™ tool kit with scissors, smoothing tools, embossers and so much more. If you do not have this kit you can use craft scissors and a wooden spoon handle. The tools in the kit will give you more options and save some time.)
- Earth Safe Finishes products:
- Black Perfect Paint™
- Gold, Copper, Teal, and Magenta Shimmers™
- Gel Medium
- 30” 22 GA Artistic Wire in Copper
- Utility knife
- Tealights or other small candles
- Duct tape
- Paintbrush
- Medium density sponge
- Craft scissors (Or scissors from Walnut Hollow tool kit.)
- Round nose pliers
- Propane torch (This is optional, sheet copper is beautiful left alone as seen inside the candleholders.)
Instructions:
- Butt the ends of 2 cupcake holders together. Tape securely to hold. Use utility knife to cut 6 scallops of a third cupcake holder to fill in the ring. Butt then tape ends together.
- Paint ring and 3 more cupcake holders black. (Don’t forget to do the holder bottoms.) Flex the scorelines to allow some paint in. Paint all edges black.
- Use an edge of the sponge dipped into a small amount of Gold Shimmer™ to randomly and lightly sponge over the black. Repeat with Teal, Magenta and Copper Shimmers.
.jpg)
- Trace the mat outlines onto the copper sheeting with either the stump or a dull pencil. Roughly cut out ½” beyond traced lines. Brush gel medium over the backs of the candleholder mats then press them onto the copper sheeting.
Smooth using the stump or spoonhandle to make sure you have complete contact between the mat and copper. Allow gel medium to dry.
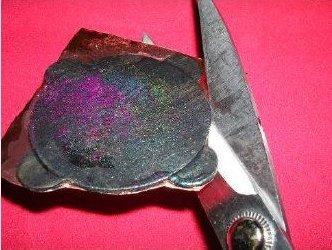
- Cut of excess copper using scissors.
- Lightly trace the center ring opening onto copper. Cut out 1” beyond traced line. If you are going to torch the copper now is the time. This process is best done outside. Hold the copper with pliers or tongs while you wave the torch over the copper. You will see it change before your eyes! Dunk into cold water to cool and preserve color.
- Once the copper is cool brush gel medium on backside of ring around the opening. Press the copper in place from the back. Place a weight on top of the entire ring to insure good contact while the gel medium dries.
- To connect the sides of candleholders you could use small brads or use copper wire. Cut 10” of wire.
Form a spiral in one end using round nose pliers.
- Insert free end of wire from the outside of holder into the corresponding hole on the other side.
- Bring the wire end up and through the center hole from the inside to the outside then back down through the first hole next to the spiral.
- Now bring the wire up to the top hole on the inside, insert from inside to out. Twist remaining wire into a spiral on the outside.
- Fold the tabs up on the bottom then fit into candleholder sides. Smooth the copper liner with the stump or spoonhandle flattening the tabs down inside the holder.
- Place one candleholder upside down. Sit or double stick tape copper ring on.
- Add candles to the remaining holders and you are done!
Read NextDollar Store Blueberry Lemon Wreath

