Bunny Soap
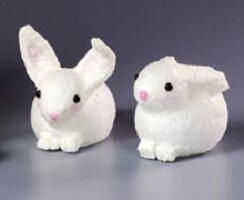
Let the bunny eat up all the soap. This adorable bunny soap dispenser is what everyone should have in their home especially around the Easter holiday. They can go in the tub with you or just sit out as a decoration.

Materials:
- STYROFOAM* Brand Foam:
- Ball, 1-1/2"
- Egg, 3"
- Ivory bar soap: white; pink (or red food coloring)
- Black animal eyes with shank, 6mm, two
- Electric mixer and bowl
- Cheese grater
- Small round paintbrush
- Water basin
- Serrated knife
- Candle stub or paraffin
- Tablespoon
- Paper towels
- Low-temp glue gun and glue sticks
- Wooden clay tool (optional)
Steps:
Note: Do not allow small children to use bunny while bathing, as animal eyes could come loose and present a choking hazard.
- Wax serrated knife with candle stub or paraffin. For body, cut and discard thin slices from upper narrow end (neck) and one lengthwise side of foam egg (bottom of body). For head, cut small slice from one side of foam ball. Firmly twist head onto body for snug fit; use glue gun to secure. (NOTE: Glue guns should be handled by adults only; never let a child operate a glue gun.)
- To make soap clay, grate bar of white soap into bowl. Sprinkle four or five tablespoons of water over soap. Stir soap; let sit until soft. When soap looks mushy, use mixer to beat into smooth, sticky paste.
- Use fingers to rub even layer of soap clay over bunny; add more to front of head to form muzzle. To add texture to fur, pat surface firmly with fingertips.
- Form ears, tail, and front paws with more soap clay. Press additional pieces to bunny, using fingers or clay tool to ensure good bond. Note: Shape ears as desired, using photo as guide.
- Soften a bit of pink soap, or add red food coloring to small amount of softened white soap, to make pink nose. Use paintbrush to add thin layer of pink soap to inside of ears. Insert eyes.
- Let dry overnight. Be careful when handling; ears are delicate.
®™ Trademark of The Dow Chemical Company ("Dow") or an affiliated company of Dow. For more project ideas, please see styrofoamstyle.com.

