Easter Egg Factory
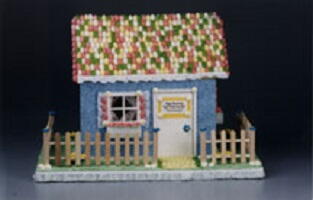
Grab the kids and some STYROFOAM™ Brand Foam to build this fun Easter version of a gingerbread house. Flip it around and follow our quick and easy instruction on how to create bunny workers and decorate the factory interior.

Materials:
- STYROFOAM Brand Products:
- Sheets: 3- 12" x 18" x 1/2"; 1- 12" x 18" x 1"
- 2- Four-pane dollhouse windows
- Balsa wood: 1- 3/8" x 3" x 5 1/2" for door
- 1 " x 1/16" x 65" for outside door trim and inside trim
- 1- 3/8" x 1/2" x 24" for fence posts
- 1- 3/16" x 3/16" x 51" for fence
- Acrylic craft paint: light blue, pale yellow, white, light pink, Kelly green
- 4 cups of mini jelly beans
- Icing flower cake decorations
- Acrylic spackling
- 33 Craft sticks
- 1 White eyelet, 1" x 60" length
- Toothpicks
- Masking tape
- Utility knife with new blade
- Utility scissors and/or knippers
- T-square
- Scissors
- Paint brush
- Thick, white craft glue
- Low temperature glue gun and glue sticks
For pattern, click here. (pdf)
Steps:
Note: See "Small Bunnies" and "Decorating the Inside" for additional materials.
- Following patterns, cut out the sides, front and roof of the house using utility knife and T-square; take care to keep edges as straight as possible. Glue side walls to inside of front wall using glue and toothpicks between pieces; snap toothpicks in half first, and insert carefully between pieces, making sure they don't poke through the sides. Glue the smaller roof section at a 90° angle against the inside surface of the larger roof piece; do not glue roof to house - it will be easier to work inside the house when the roof is not attached.
- Cut the balsa wood as follows:
a. Door: 3/8" x 3" x 5 1/2"
b. Outside door trim: two 5 1/2" strips; one 3 1/2" strip
c. Inside baseboards: two each 8", 5 3/4" and 1 1/2" strips
d. Inside door trim: two each 5 1/2" and 3 1/2" strips
e. Fence posts: six 3 1/2" strips
f. Fence railing: two each 8 1/4" and 4 1/4" strips; four 7 1/2" strips
- Paint the following:
a. Outside of house, blue
b. Inside of house and roof, yellow
c. Windows, white
d. Door, pink
e. Inside baseboards and inside door trim, green
f. Outside door trim, white
- When paint is dry, glue wood trim in place.
- Using low temperature glue, glue jellybeans onto roof in variegated pattern. Glue one row along edges of roof.
- Glue house to the 1" foam sheet. Do not glue roof in place.
- Fence: To make fence pickets, snip off rounded ends from craft sticks; trim to 2 3/4" length and shape a point on one end. Tape down fence railings 1 1/4" apart; add pickets with white craft glue. When dry, hot glue fence posts to picket strips. Make holes for fence posts in foam base, but do not yet glue fence in place.
- Tint 1 cup of acrylic spackling with green paint to make "grass". Spread spackling over base, including fence postholes. While spackling is still soft, push fence posts into place. Add flower cake decorations to create "garden". Create a walkway to the front door by making a path with jellybeans. Add sign to door (optional): "Egg Factory. Open Daily 5 a.m. - 5 p.m. Major Credit Cards and Carrots Accepted."
- Glue white eyelet around base.
Small Bunnies

Materials:
Materials listed are for one bunny, but you may find that you need to make a lot more to help decorate all of those eggs!
- STYROFOAM Brand Products:
- 1- 2-3/8" egg
- 1- 1 1/2" ball
- 1- 1" ball
- 2- 4.5mm Shank eyes
- 1 Pom pom, 3/16" pink
- Felt, scrap white
- Quilt thread, gray
- Blush
- White glitter
- Serrated knife
- Pencil
- Wooden skewer
- Paintbrush
- Clear-drying craft glue
- Low temperature glue gun and glue sticks
For pattern, click here. (pdf)
Steps:
- Using serrated knife, cut a thin, lengthwise slice from foam egg so it will sit flat; this is the bunny's body. (Refer to Diagram A.) Cut a thin slice from the narrow end of the egg; rub the 1 1/2" ball against narrow end of egg until it fits snugly. Glue ball in place; this is the bunny's head. (Hint: For smoother cuts, wax the knife blade with an old candle.)
- Cut the 1" ball in half; glue one half to wide end of egg for tail.
- Press in sides of head, shaping a gentle point for the nose. Shape the haunches by outlining the haunch area with a pencil; press and shape around the outline so the leg appears to stand out. (Diagram B.)
- Make a 1/2" cut in either side of head for ears. Press eyes into head; remove and set aside.
- Insert a wooden skewer into bottom of rabbit to use as a handle. Spread a generous, even layer of glue over rabbit; sprinkle with glitter. Let dry.
- Using pattern, cut ears from white felt. Push ears into slits on either side of head. Brush a small amount of blush on insides of ears. Glue on eyes. Tie together in the middle four 3" lengths of thread; glue to nose. Glue pom pom over center of whiskers.
Decorating the Inside
Use your imagination to decorate your egg house - from dye vats and chocolate eggs to dollhouse furniture you may already have. Here's how we decorated our house:
- Table: Glue four balsa legs measuring 2 5/8" x 1/4" x 1/4" to the balsa tabletop measuring 3" x 5" x 3/8".
- Egg drying rack: Cut three 1" x 5" shelves from 1/2" foam sheet. Cut curved ends from three tongue depressors. Glue together shelves and tongue depressors, creating three stepped shelves; let dry. Cut two 2 1/2" back legs and two 2" front legs from tongue depressors; glue legs to shelves.
- Wall shelves: Cut two tongue depressors into 4 3/4" lengths. Glue a 4" length of 1/2" square balsa wood to bottom of shelf along back edge. Glue 1/4" balsa supports to wall.
- Curtains: Use 13" length of 4 1/2" wide lace with eyelet edge. Cut lace strip into four, 3 1/4" x 4 1/2" pieces. Cut two wooden dowels the width of windows; paint dowels and four wooden beads. Thread curtains onto dowels; glue wooden beads to each end. Glue to windows; tie back curtains with narrow ribbons and pin ribbons to wall.
- Decorated eggs: Roll 1" foam balls to create egg shapes. To make chocolate eggs, cover foam eggs with a thin layer of modeling clay, insert toothpick for easier handling; dip eggs in melted crayons (melt brown crayons over low heat in double boiler). For colored eggs, paint eggs with acrylic paints. We used 14 eggs in our house.
- Pails:
a. Big pails: Poke a tiny hole in either side of the top of a clean, restaurant creamer container. Thread a 3" length of thin wire through holes for a handle. Fill pail with acrylic spackling or modeling clay. Paint the filler to make it look like paint and dribble small amount of paint on outside of bucket.
b. Small pails: Hot glue a thin, 2" length of thin wire into top of clean toothpaste cap. Fill with hot glue. Sprinkle cake-decorating jimmies on glue while drying; or, let glue dry and paint to look like paint.
c. Chocolate-filled pail: Pour melted brown crayon wax into plastic medicine cup. When cooled, poke a tiny hole in either side of the top; thread a 3" length of thin wire through holes for a handle.
- Packages: Cut 1" x 1" blocks from a scrap piece of a foam sheet. Wrap blocks in brown paper. Write on packages: "Rush. Fresh Eggs" or create labels using your computer.
®™ Trademark of The Dow Chemical Company ("Dow") or an affiliated company of Dow. For more project ideas, please see styrofoamstyle.com.

