Tropical Fish Embroidery
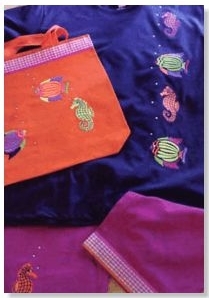
Embroider a shirt, bag or kitchen towel with a colorful, tropical fish. These free embroidery designs from Kandi Corp. are a great way to embellish just about any fabric. Seahorses are available as a free download at Dawn's website, while you can also purchase kit for creating fish.
Materials:
- Seahorse and fish designs or other tropical designs*
- Chalk marker or disappearing pen
- Ruler or straight edge
- Shirt, Capri pants and canvas bag
- Decorative Touch™ heat tool from Kandi Corp (optional)
- 16ss (4mm) clear Swarovski® Crystals
- 2 1/2 yard coordinating ribbon
- 1/4 yard Heat and Bond or Steam A Seam
*The fish design may be found on the Crystal Rainbow Embroidery Designs page on www.designbydawn.com
Seahorse Design
Free Seahorse Design is available here.
Instructions:
- Cut strips of heat and bond the same width as the ribbon and iron it on to the back of the ribbon. Cut the ribbon just a little longer than the length needed to go all around the pants. Peal away the paper and place on the bottom of the pants and iron in place according to the manufacturer's instructions. Turn the excess ribbon to the inside of the pants and press. Now, this step can be done by sewing the ribbon in place in addition to the fusible or instead of the fusible, but remember from previous articles, I don't know how to sew! (I really do...I'm just lazy)
- Follow the same instructions for putting the ribbon on the canvas bag.
- Print out a template of each of the designs that you will be using for the outfit using your favorite software. Cut out the template of each one. If the template has tick marks showing you the center both horizontal and vertical, great! If not, fold each template in half both ways to find the center.
- Stabilize your fabric. I used one layer of III Polymesh and a spray adhesive.
- Using your straight edge or ruler, mark a line going down the right side of your shirt. This will mark the center of each design. Now, lay the templates in place and lay the ruler over the top of them and mark the horizontal center for each individual design. The chalk lines will ensure that the designs will line up and not be crooked.
- Stitch out the designs on the shirt.
- Place the templates on the bag, but with this, I wanted the fish to be crooked. Once I got them in place, I marked the horizontal and vertical lines individually because they weren't lined up like they were on the shirt. Stitch the designs on the bag.
- Line up one seahorse or fish on the pant leg and stitch it.
- Now for the finishing touch. Each of the fish have crystal eyes and the bubbles are also crystals. Following the instructions that come with the Decorative Touch, place one crystal in the eye of each fish and stagger the crystals too look like bubbles. It is possible to use a regular household iron to attach the crystals. Using the iron method, place the crystal in place and lay the iron on top of the crystal for about 30 to 45 seconds or until the glue is melted. Using the Heat tool with the correct size tip attached, pick up the crystal and let the glue melt. Place the crystal where you want it. The crystals have glue on them already, so there is no messy glue to use. The crystals are permanent when put on properly.
- There were 9 hoopings with this outfit, but were all done in the 4-inch by 4-inch hoop. Finally, your project is complete and definitely one of a kind.
Read NextJesus Loves Me Embroidery Design
Your Recently Viewed Projects
1strae8
Jul 19, 2012
Again, yet another link that is not working! I downloaded and extracted the seahorse design just to find out you still need to access from the web. That is not getting the pattern. When I tried to access the web after extraction of course it did not work!
Report Inappropriate Comment
Are you sure you would like to report this comment? It will be flagged for our moderators to take action.
Thank you for taking the time to improve the content on our site.

