Heavenly Angel Centerpiece
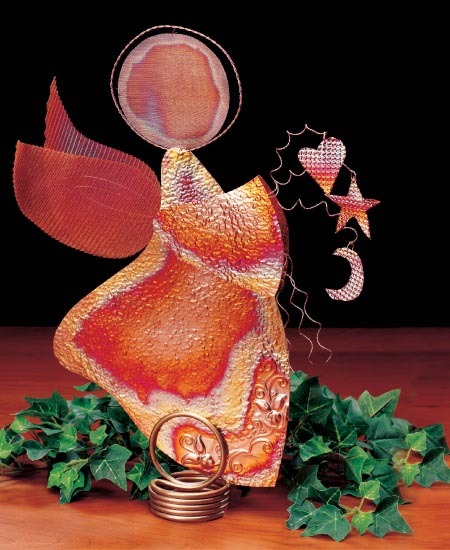
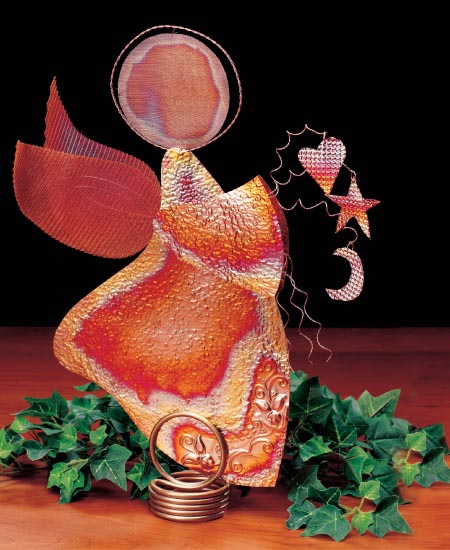
Create an angel centerpiece from AMACO for your table using wire form and metal embossing. This makes for a unique and colorful centerpiece any time of year.
Materials:
- AMACO® ArtEmboss® Pure Metal Sheets — Medium Copper
- AMACO® WireMesh® — Copper
- AMACO® WireForm® — Designer’s Mesh; Brass
- AMACO® WireForm® WireRod Modeling Wire (Coiled) — Aluminum, 3/16"
- AMACO® Brush ‘n Leaf® — Old Gold
- AMACO® ArtEmboss® Tool Set
- Spray Adhesive
- E6000 Glue
- Nicole Embossing Heat Tool
- Metal Baking Pan
- Pencil
- Brush
- Fun Foam Sheet
- Fiskars Scissors
- Pattern
Steps:
- Enlarge the angel pattern on a copier to the desired size. Cut out all of the pattern pieces.
- Place the dress and the sleeve patterns onto the ArtEmboss® Medium Copper sheet. With the pointed end of the embossing tool, trace around the dress and the sleeve patterns and cut out. Read the package instructions for tips on embossing with ArtEmboss®.
- Turn the two ArtEmboss® dress pieces over onto a padded surface and use the pointed end of the embossing tool or stylus to outline the dress pieces and to retrace the vine motif.
- Turn the two ArtEmboss® sleeve pieces over onto a sheet of fun foam and with the eraser end of the pencil, pound on it. To smooth it out, use the embossing tool as a rolling pin. Keeping the ArtEmboss® sleeve on the foam sheet, simply roll the embossing tool over the surface to flatten. Turn the sleeve over onto a hard surface and lightly roll the embossing tool over it again. You should have a soft hammered look. Set the dress and sleeve pieces aside.
- Place the head and wing patterns over the WireMesh® Copper sheet. With the pencil, trace two wing patterns and one head pattern. Cut out. To color The Copper By Heating (optional) Place the Copper WireMesh® and ArtEmboss® pieces onto a metal baking sheet. Heat each of the pieces with a heat gun to create a patina finish. With prolonged heat in one area the copper will turn orange, then rust, then red, then blue, then gold. By moving the heat gun around, you can create some unusual patterns of color. Let the copper cool, then continue with project.
- Check the dress pattern for the head and wing placement. With the pointed end of the embossing tool, mark their placement on both the ArtEmboss® dress pieces.
- Pull a long strand of wire from the Designer’s Mesh Brass WireForm®. Fold the wire in half and twist the two strands together. Wrap the twisted wire around a 2 oz. bottle of acrylic paint or any other round object of similar size to form a circle for the halo. Twist the wire again to secure it and form a stem. Slide the wire off the bottle and with the scissors, trim the excess wire, leaving a one inch stem.
- Apply an even coat of spray adhesive to the wrong side of both of the ArtEmboss® dress pieces. Place the WireMesh® wings into position on each side of the dress pieces. Align the ArtEmboss® dress pieces and adhere together. Press firmly to insure a good bond.
- Glue the ArtEmboss® sleeve pieces into place, on each side of the dress. Align the sleeves and lay the Angel flat until the glue has dried.
- Pull off three long strands of the Brass WireForm® wire. Fold the wire in half and twist together, leaving a small loop where the wire was folded. Repeat this step with the other two wires.
- Wrap each of these stems around a pencil to form a long spiral. Glue the stems between the two sleeves and let dry.
- Cut out a heart, star, and moon from the Copper ArtEmboss®. Punch a small hole at the top of each and attach to the stems using a jump ring.
If you like this angel project, you will love our collection of free angel crafts. Download our free eBook 11 Angel Crafts to Make: Homemade Christmas Ornaments & Decorations today!

