Hand Sewn Felt Owls
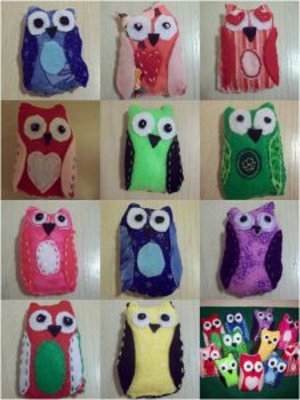
These adorable Hand Sewn Felt Owls are a great way to get rid of any fabric scraps that are taking up space in your craft bin. You can create them for any holiday or mix and match your favorite fabrics to create something that's truly unique. You only need a little bit of fabric to create these adorable felt owls, so you'll find yourself working through your stash in no time! Hang these owls from branches or attach them to gifts.
These charming felt owls are the perfect scrap project, because they use several colors of felt in varying sizes. No matter what colors you use, your owl is sure to be a happy little hooter because the project is designed to use eclectic colors and pieces. If you have an owl obsessed friend, make one of these as a Christmas ornament! Just one string atop your birdie’s head and it becomes a DIY ornament.

Materials:
- Owl template (I drew mine freehand-it stood about 4 1/2” long and 2 1/4” wide)
- Felt in varying colors
- Scissors
- Needle
- Thread
- Colored embroidery thread
- Sewing pins
- 5-6 cotton balls
Instructions:
- Here’s a picture of my template, in case you want to print it and use it yourself. You might have to scale it to the size you’d like.

- Pin your template to the felt you’d like to use for the wings of your owl. I marked the right and left wings just in case!

- Cut your wings out like so. Save all the extra pieces because you’ll need them later.

- Pin the middle template of your owl to the felt you’d like to use for the body of the bird. You’re using the main template to help you pin your wings in place.

- Using your white felt, cut out two circles, about the size of your thumb. These are for the eyes. Pin those in place on the body of the bird (remove the main template before pinning on the eyes, obviously!).

- Cut out two small circles and a beak from your black felt and a little tummy (if you want!) from another shade of felt. Pin the tummy in place so your bird looks like this:

- To attach the small black circles, use some colored embroidery thread and tie a knot at the end. I tied mine three times just for safe measure! Cut off the small tail and string the thread through the black dot so the knot is on the OUTSIDE. Then string it through the center of the white eye. Secure and repeat for the other eye.


- Continue to sew all the other embellishments into place. Soon your little owl will look like this!:

- Now it’s time to assemble your owl! Place the owl face down on the back fabric. You want both front sides facing each other and the back sides facing out…that way when your turn it inside out, the front sides are on the outside!

- Pin the segments of the cut templates back into place.

- Sew around the template, stitching the two fabrics together. You can use a machine for this, but I didn’t mind doing it by hand. Leave about 2 inches of room for stuffing.

- Cut about a quarter of an inch around your stitching to remove excess fabric. Remove the template and discard. Turn your owl inside out so the wrong side is now inside and the right side is on the outside.

- Pull your cotton balls apart so they’re long and stringy. Stuff some into the ears of your owl first, and then stuff until he’s full! Sew the hole closed and you’ve got yourself a cute little owl!


Read NextFelt Roll-ups For Easter
Your Recently Viewed Projects
Report Inappropriate Comment
Are you sure you would like to report this comment? It will be flagged for our moderators to take action.
Thank you for taking the time to improve the content on our site.

