Lucky Wish Paper Rosette
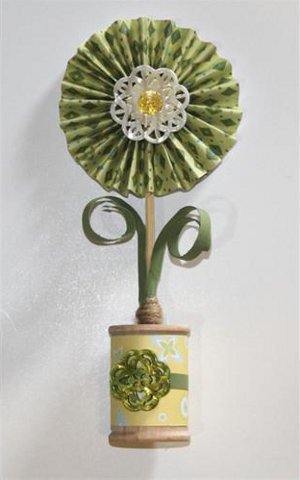
Make a wish on this Lucky Wish Paper Rosette! Great for St. Patrick's Day decorating, this precious paper flower tutorial is perfect for sitting on your desk or dresser and brightening your day. If you're feeling especially creative, you can create a whole garden of these paper flower patterns and instantly liven up any room in your home. Perfect for displaying on a mantel or in a bay side window, these cute flowers will have you ready for spring in no time!

Materials:
- X-ACTO® Designer Series Rotary Trimmer
- X-ACTO® Designer Series Gripster Craft Knife
- X-ACTO® Designer Series 12" Metal Ruler
- X-ACTO® Designer Series 12" x 12" Self Healing Mat
- X-ACTO® Designer Series 5" Precision Tip Scissors
- X-ACTO® Designer Series Circle Cutter
- Elmer’s® Craftbond™ Pop-Up Glue Spots - Medium
- Elmer’s® Craftbond™ Glue Spots – Medium
- Elmer’s® Craftbond™ Extra Strength Glue Stick
- Elmer’s® Craftbond™ Tacky Glue
- 12” x 12” Patterned Paper
- 8 ½” x 11” Cardstock (coordinating color) and green for leaves
- 2” x 1 ½” Wooden Spool
- ¼” Dowel or wooden skewer
- Blumenthal Lansing “Favorite Findings” decorative buttons (one each small, med & lg)
- Bakers Twine, yarn, cotton string or jute
Tip:
- There are many ways to create paper flower. The second flower was created from two, 3” circles as follows: Use the circle cutter to cut two, 3” circles. Fold each circle in half. Crease firmly. Open up the circle then fold in half again in the opposite direction aligning the first fold line in the paper. There are now 4 sections. Fold in half again with fold lines aligned, then one more time to create 8 sections. Cut the circle along one of these fold lines from the outside edge to the center. Carefully accordion fold the circle by aligning adjacent folded edges together all around the circle. Make two then glue the ends together to make the flower. Variation: Trim the outside edge of the flower with decorative edge scissors.
Instructions:
-
Cut a 12” strip of patterned paper 1½” wide. Tip: The finished flower will be twice the size of the width of the strip of paper. Accordion fold the strip in ½” increments. Crease one end of the fold only, so the outside edges will have more rounded folds. If you need guides for folding, lightly score a line at ½” intervals. When the strip is folded, overlap the ends and glue in place with glue spots.
-
Cut a 2” circle of cardstock then glue to the back of the folded strip as follows: Spread Tacky glue on one side of the circle, with more glue at the center. Gently squish the folded paper into a circle then position on the cardstock. Place the bottle of Tacky glue on top to keep the folds flat, otherwise the center will pop up. Let dry thoroughly.
-
Cut a ¾” wide strip of paper long enough to go around the center of the spool. Overlap the ends and secure with a glue spot.
-
Cut 3, ¼” wide strips of paper about 6” long. Carefully run two of the strips over the cutting edge of a pair of scissors to curl. These will be the leaves. The amount of curl will depend on the thickness of the paper. You can also curl the strips by rolling around the dowel, or a pen.
-
Glue the 3rd strip around the center of the spool.
-
Once the glue has dried for the rosette, adhere a large, lacy button to the front with 4 or more glue spots. Glue the small button to the center of this button.
-
Cut a 6” piece of dowel. Use glue spots to secure the bottom of the curled strips to the dowel for leaves. Wrap jute, or cotton around the bottom of the dowel, so it sits snugly in the hole in the spool, then glue the dowel in place. (I pushed a pop up glue spot into the hole at the bottom of the spool to hold the dowel in place until the glue dried.) The dowel could also be secured with pop up spots.
- Glue a medium button to the front of the spool to finish.
Read Next81+ Printable Flower Patterns

