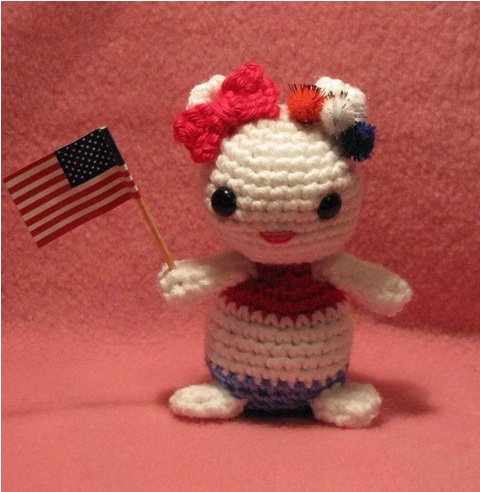
Independence Day Crochet Kitty
Make a 4th of July, Independence Day kitty with this amigurumi crochet pattern designed by Armina Parnagian. Decorate for 4th of July with this crochet kitty or give as a hostess gift for an Independence Day party.

Materials:
- Size US-F/3.75mm Crochet Hook
- Lion Brand Pound of Love - White
- Caron Simply Soft – Red
- Caron Simply Soft – Berry Blue
- Pink & Black embroidery floss
- Polyester Fiberfill
- 2 - 9mm Safety Eyes
- Blunt darning needle
- Toothpick Flag
- 3/4” Tinsel Pompoms – 1 Each Red, White & Blue
- Aleene’s Tacky Glue
Abbreviations:
SC = Single Crochet
HDC = Half Double Crochet
Ch = Chain
Rnd(s) = Round(s)
Beg = Beginning Sts = Stitches
2tog = Crochet 2 stitches together (decrease)
* = Repeat stitches from * to end of *
2nd = Second
Notes:
- This pattern is worked in continuous rounds; do not join and do not turn unless specified. Use stitch marker to indicate beginning of rounds.
- May not be safe for small children.
- Toothpick flags and tinsel pompoms are available at Michaels Arts & Crafts and Joann’s.
Head:
With White Yarn, Ch 2
Rnd 1: Work 5 sc in 2nd ch from hook = 5 sc
Rnd 2: Work 2 sc in each sc = 10 sc
Rnd 3: *Sc in first sc, 2 sc in next sc*, repeat from * around = 15 sc
Rnd 4: *Sc in next 2 sc, 2 sc in next sc*, repeat from * around = 20 sc
Rnd 5: *Sc in next 3 sc, 2 sc in next sc*, repeat from * around = 25 sc
Rnd 6: *Sc in next 4 sc, 2 sc in next sc*, repeat from * around = 30 sc
Rnds 7-12: Sc in each sc around
Rnd 13: *Sc in next 4 sc, sc 2tog*, repeat from * around = 25 sc
Rnd 14: *Sc in next 3 sc, sc 2tog*, repeat from * around = 20 sc
Rnd 15: *Sc in next 2 sc, sc 2tog*, repeat from * around = 15 sc
Fasten off, leaving a very long tail. You will use this piece of yarn to sew the head on to the body. Position and insert safety eyes. Stuff head firmly. Do not sew opening closed.
Body:
With Red Yarn, Ch 2
Rnd 1: Work 5 sc in 2nd ch from hook = 5 sc
Rnd 2: Work 2 sc in each sc = 10 sc
Rnd 3: *Sc in first sc, 2 sc in next sc*, repeat from * around = 15 sc
Rnd 4: *Sc in next 2 sc, 2 sc in next sc*, repeat from * around = 20 sc
Rnd 5: *Sc in next 3 sc, 2 sc in next sc*, repeat from * around = 25 sc
Join White Yarn
Rnds 6-10: Sc in each sc around
Join Blue Yarn
Rnd 11: *Sc in next 3 sc, sc 2tog*, repeat from * around = 20 sc
Rnd 12: *Sc in next 2 sc, sc 2tog*, repeat from * around = 15 sc
Rnd 13: *Sc in next sc, sc 2tog*, repeat from * around = 10 sc
Fasten off; leaving a tail long enough for sewing. Stuff body firmly. Sew opening closed; weave in yarn.
Arms: (Make 2)
With White Yarn, Ch 2
Rnd 1: Work 5 sc in 2nd ch from hook = 5 sc
Rnd 2-9: Sc in ea sc around
Fasten off, leave a tail long enough for sewing. Do not stuff arms.
Legs: (make 2)
With White Yarn, Ch 2
Rnd 1: Work 5 sc in 2nd ch from hook = 5 sc
Rnd 2-5: Sc in ea sc around
Fasten off, leave a tail long enough for sewing. Do not stuff legs.
Ears: (Make 2)
With White Yarn, Ch 2
Rnd 1: Work 5 sc in 2nd ch from hook = 5 sc
Rnd 2: Work 2 sc in each sc = 10 sc
Rnd 3: Sc in each sc around
Fasten off, leave a tail long enough for sewing.. Do not stuff.
Bow:
With Red Yarn, Ch 6
Row 1: Sc in second ch from hook, ch 1, turn
Row 2-5: Sc across, ch 1, turn.
Fasten off, leave long tail for sewing.
To Form Bow:
1. Weave in short piece of yarn (where ch was started) to center;
2. Weave in long tail to center;
3. Pinch center and wrap long tail around several 5 times;
4. Thread through blunt needle and secure by running under the wrapped part, bringing it out; secure firmly.
To Assemble:
1. Attach head to body.
2. Attach arms, just below head.
3. Attach legs.
4. Attach bow to one ear.
5. Using black embroidery floss; sew whiskers.
6. Using pink embroidery floss, sew nose.
7. Glue the tinsel pompoms on the other ear – red, white & blue.
8. Place toothpick flag in hand – secure flag with a drop of glue.
9. Allow glue to dry.
10. Weave in all excess yarn.
Your Amigurumi Independence Day Kitty is Done! Doll measures 4”
Happy Crocheting!

Find this project with 20 different 4th of July crafts in the 4th of July Crafts: Blogger Edition 2010 eBook.