This project was submitted by one of our readers, just like you.
Travel Pocket Gift Card Holder
Wrap up gift cards in these adorable travel-themed gift bag ideas.
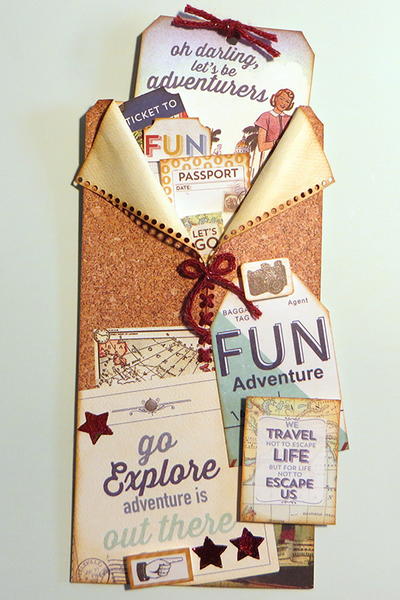
In the Designer's Words: "I frequently find myself needing a quick gift for somebody. What to do? Answer: A gift card! These days you can get a gift card for just about anything from home improvement to manicures and massages. The real question is how to stylishly present the gift card. This pocket tag is the perfect solution! I chose a travel theme for my tag but you can easily personalize it for any occasion. Using Eileen Hull’s Stitchlits dies from Sizzix, the unique stitched opening is easy to create and makes a fun to fill pocket for your gift and good wishes! I sometimes use plain cardstock or a manila tag for the back of the pocket as that makes a nice place to write a personal note to the giftee! These pocket tags can be as simple or embellished as you would care to make them. Have fun, be creative and I hope you find some time to play today!"
Giving gifts with a personal touch will always mean so much more. Wrapping something up you picked out for someone in DIY gift wrapping you made yourself just comes with that extra layer of sentiment that will easily impress. If you truly want to say thank you or let your loved one know you care, these Travel Pocket Gift Card Holder and Bag are absolutely perfect for crafting.
Estimated Cost$11-$20
Time to CompleteIn an evening
Primary TechniqueGeneral Paper Crafting
Project or Page SizeCard
Type of Paper UsedScrapbook Paper

Materials List
- Sizzix Thinlets 660760 Border Stitchlits by Eileen Hull
- Sizzix Thinlets 660329 Banners & Pennants by Eileen Hull
- Therm O Web iCraft Easy Cut Adhesive
- Therm O Web iCraft Easy Tear Tape, ¼”
- Therm O Web iCraft Deco Foil, Rainbow
- Therm O Web 3D Foam Squares
- Therm O Web Zots Singles, 3D
- Premier Yarns Downton Abbey Collection, Lady Mary/Crimson Night
- Authentique Papers - Explore Collection
- Quick Quotes PowderPuff Chalking Ink, Creamy Cocoa
Instructions
-
Cut a 4” x 8.5” tag from heavy weight scrapbook paper. This will be the front of the pocket.
-
Position the Sizzix Border Stitchlits die at center top of tag and secure with washi tape.
-
Run through die cutting machine and remove die, revealing holes for stitching.
-
Use scissors to carefully cut between the die cut holes.
-
Flip tag over and apply ¼” iCraft Easy Tear Tape along sides and bottom of tag. Do not remove liner at this point.
-
On front side, cross stitch using Crimson Night yarn to close about 1/3 of the way up the bottom, tying a bow to finish it off.
-
Starting in the center, use a pencil to gently roll each of the die cut edges down and out. Use Thermoweb 3D Zots to hold the curled flaps in place.
-
Starting in the center, use a pencil to gently roll each of the die cut edges down and out. Use Thermoweb 3D Zots to hold the curled flaps in place.
-
Use star shaped die from the Sizzix Banners & Pennants set to cut 3 stars from iCraft Easy Cut Adhesive. Peel off the liner and adhere the stars to the front of the tag.
-
Remove the top liner revealing the star shaped adhesive.
-
Apply Deco Foil, with the silver side facing down against the adhesive and the colored side facing up. Burnish well. If you missed a portion of the star simply place another piece of Deco Foil on top of the adhesive and burnish again!
-
Use Thermoweb 3D Foam Squares to add dimension to stickers and cardstock embellishments on the front of the tag.
-
Stuff the pocket with cardstock embellishments, adding more of the yarn at the top of a tag. Be sure to leave room to include a gift card and a special note!
Read NextTravel Pocket Gift Card Holder


