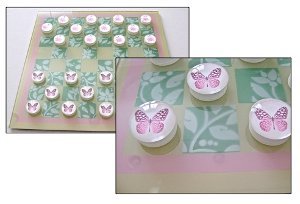
Butterfly Checkers Game
This Butterfly Checkers Game from Gloria Uhler makes a great Mother's Day or birthday gift for someone who loves game nights. Since you make the board and the pieces yourself, this is a great way to personalize a beloved game for both friends and family.

Materials:
- RAF Sky Type (green) paint
- Piping Pink paint
- Radome Tan
- Craft Knife
- Masking tape
- Aztek airbrush
- Scotch Self-Stick Rubber Pads
- Scotch Spray Mount Repositionable Spray Adhesive
- 24 clear glass Cabochons 1.2”
- 14” square 1/8” clear glass with polished edges
- 24 white, plastic, water bottle caps
- Diamond Glaze by Judikins
- Card stock
- Mat board
- Americana Jacobean Floral Stencil
- Beacon Fast Finish Decoupage
- Beacon Dazzle-Tac
- Soft brush 1”
- Checkerboard Template
- Butterfly Template
- Flower Template
Instructions:
-
Print out 4 copies of the checkerboard template on card stock. The template represents one quarter of the finished board.
-
Tape the copies together allowing a one-inch border on the four outer edges. The thin black lines indicate the edges of the playing board area. Once taped together, the playing area should measure 12” square. The complete card stock template should measure 14” square. With a craft knife and ruler, cut out all the black squares.
-
Step 3 - Spray the back of the completed template with spray adhesive.
-
Clean the front and back of the glass.
-
Place a strip of half-inch masking tape along the edges of the glass on all four sides, aligning the edge of the tape with the outer edge of the glass.

-
Apply another strip of tape inside the first strip on all four sides. The two tapes should be touching. This will leave a 12” square of uncovered glass in the center.
-
Create a 12-inch square from card stock. Spray only the outer edges on one side with adhesive spray. To minimize the transfer of adhesive to the glass yet still allow it to adhere, press the sprayed areas on the surface of an old tee shirt then remove. Do this two or three times then stick the card stock to the open glass.
-
Remove the second line of masking tape you applied to the glass which will expose a ½” margin between the card stock and the masked outer edge. Spray the open area pink to create the perimeter of the playing area.
-
Spray adhesive onto the entire back of the board template. Treat the board template as you did the card stock in step 7, pressing it onto fabric then applying it to the glass. Be sure that the edges of the template and the glass are aligned. The pink border will be visible in some squares.
-
Spray the leaf stencil with adhesive and position it on top of the board template. The stencil is not large enough to cover the entire board so it will have to be worked in sections.

-
Place the stencil over open squares and spray the glass with white paint. When all the painted leaves are dry put aside the leaf stencil.
-
Paint over the leaf designs with green paint.

-
When the paint is dry, carefully remove the template stencil.

-
Spray the entire surface with the tan paint. Allow the paint to set for 48 hours.
-
Cut a piece of mat board to measure 14 x 14.
-
Pour some Diamond Glaze in a small bowl. With a 1” wide soft brush apply a generous amount of the glaze to the wrong side of the mat board.

-
Position the board against the painted side of the glass. Let it dry overnight with the glass side facing up. Finish by attaching clear, self-stick bumper pads to each corner of the board.
-
Print out the checkers images on a laser printer. You can get this done at Kinko’s if you don’t own a laser printer. Images printed on an inkjet printer don’t work well because they bleed when they come in contact with the Decoupage.

-
Cut out the round printed images. Brush the flat side of a round glass piece with Decoupage. Immediately apply the image to the flat side of the glass.

- Brush the flat side of a plastic water bottle cap with Dazzle-Tac and attach it to the blank side of the card stock. Dazzle-Tac won’t darken the card stock like some adhesives. Allow the checker pieces to dry completely before handling.
Read NextMidnight Blue Prayer Box

