Dragonfly Friendship Box
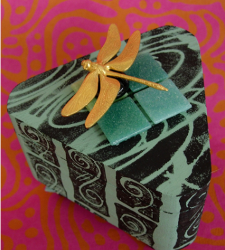
Creative homemade gifts are a great way to show how much you care. This year, make a Dragonfly Friendship Box from Tiffany Windsor and give it to your closest comrade. Fill the box with something special to add a personal touch to your project.

Materials:
- Wood box – unfinished
- Sandpaper
- Acrylic paint
- Palette (can be waxed paper or paper plate to hold your paint)
- Rubber stamps
- Cosmetic sponges
- Wet wipes
- Stencil (I used a dragonfly stencils from The Crafters Workshop)
- Mosaic tiles (for feet and for top)
- Flat backed marbles (for feet and one for top)
- Jewelry pin – I chose a gold dragonfly pin for this project
Instructions:
- I love to select interesting shapes for my trinket boxes. If using unfinished wood, be sure to lightly sand any areas that are rough along the edges.

- Paint the box inside and out. Let dry.

- I like to stamp my boxes with acrylic paint instead of ink. That way, if I make a mistake, I can easily wipe off the paint with a wet wipe and start over again. When using acrylic paint, you will want to apply it with a cosmetic sponge. I like to “season” the stamp with one coat of paint, let it dry for a minute or so and then apply another coat of paint with the cosmetic sponge. Be sure to lift your sponge in a direct up and down direction in order to get the cleanest application of paint.

- Stamp immediately onto your box.

- Repeat to create your desired pattern. See the area in the lower left corner where the stamp did not stamp? Don’t worry if your designs do not stamp entirely because as I’ll show you in a later step, you can use smaller stamps and fill in.

- You will also need to use smaller stamps to fill in areas where you cannot stamp with a larger stamp such as this area around the hinges.

- Here’s what I stamped to fill in the area on the bottom of the box where my large stamp did not stamp! These swirls are perfect!

- For the top of my box I used this super cool dragonfly stencil by The Crafters Workshop. I used the same technique of stenciling with acrylic paint using the cosmetic sponge to apply my paint. When picking up your paint with the cosmetic sponge, do not over-saturate your sponge! Keep your sponge very dry with paint so that you can create a dry-brush stencil effect.

- Notice how I have a very light and uneven coat of paint applied for the stencil design.

- For the feet on my box, I stacked mosaic tiles and a flat back marble and glued them together with Aleene’s Platinum Bond 7800 Glue. Be sure to let these stacked tiles dry completely before trying to glue them to the bottom of your box. Also, keep checking them every 10 minutes after gluing as they can tend to slip until the glue starts to hold.

- I used the same mosaic tiles on the top of my box. These can also be glued on with the 7800 glue.

- I removed the back from a dragonfly pin so that it could be glued to a flat backed marble that I glued on the tiles.Also, if you like a glossy look, you can use a spray-on gloss or apply a glossy top coat to your box before you add your embellishments.

For a comprehensive video tutorial, check out How to Make a Stamped and Stenciled Box.
Read NextBlessing Bags DIY
Your Recently Viewed Projects
Report Inappropriate Comment
Are you sure you would like to report this comment? It will be flagged for our moderators to take action.
Thank you for taking the time to improve the content on our site.

