Friends Decoupage Frame
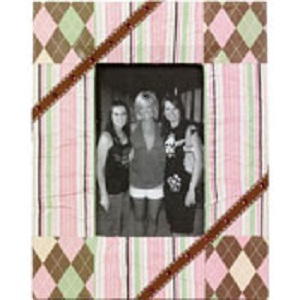
This artistic decoupage frame would make a great gift for a friend.
Materials:
- Aleene's® Instant Decoupage Sealer & Finish
- Aleene's® Fast Grab Tacky Glue®
- Tulip® Glam-It-Up!™ Iron-On Crystals™
- TR325 Crystal 4mm
- Scissors
- Foil
- Frame
- Paper, 1 sheet each of two coordinating designs
- Brush, flat ¾”
- Iron or Textile Heat Tool by Walnut Hollow
- Ribbon, ¼” wide coordinating color
Steps:
1. Remove glass and backing from frame.
2. Cut paper to fit top, bottom and sides of frame, adding enough around edges to fold around frame and on back. NOTE: We used striped paper for this step. Crumple paper then smooth slightly.
3. Protect work surface with foil. Area should be twice as large as frame. Working with one piece of paper at a time, brush Instant Decoupage on frame where paper will be placed and on back of paper. Immediately place paper on frame. Smooth paper onto frame with fingertips, leaving wrinkles visible. Wrap paper to inside and around to back on outer edges. Brush over paper with Instant Decoupage. Continue around frame.
4. Cut pieces of coordinating paper to cover corners and wrap to back. This paper does not go over edge of opening because the first paper should be covering all of the area. Adhere this paper as before with Instant Decoupage wrapping around to back. Brush a coat of Instant Decoupage on top. Let dry.
5. Brush Instant Decoupage to front and back of frame for added protection. NOTE: The back can be finished off with strips of paper applied with Instant Decoupage. Let dry.
6. Cut two pieces of ribbon long enough to go across frame at an angle and around edge to back. Apply Fast Grab Tacky Glue to back of ribbons and place on frame. Refer to photo. Let dry.
7. Place Crystals on ribbon as desired. Touch top of Crystal with iron or textile heat tool for about 20 seconds. Pressure is not needed as long as the Crystal is in contact with tool or tip of iron.
Find more accessories to decorate with your decoupage skills. We've gathered 33 Fabulous Decoupage Ideas Plus 3 Helpful Tutorials just for you!
Read NextHow to Make DIY Guitar Picks

