Scrap Fabric Tags
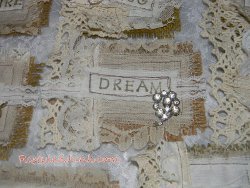
Scrap fabric crafts are a quick and easy way to clean out your stash. Scrap Fabric Tags from Cyndee Kromminga are a fun and unique take on a traditional paper craft. Make each of your creations a little different and experiment with fun stitches and unusual fabric pairings.
Materials:
- Burlap scraps
- Fabric scraps-white and off white
- Trim, lace and ribbon scraps
- 3/4-inch letter stamps
- Stamp pad-brown or black
- Scissors
- Sewing machine
- Contrasting thread
- Buttons, vintage jewelry, charms
- Craft glue
Instructions:
-
Cut a burlap rectangle approximately the size of a playing card. Fray approximately a 1/4 inch edge on all sides of the rectangle. Rough-cut (no need to measure) a rectangle of lace fabric slightly smaller than the burlap. Rough-cut a rectangle of white or off white fabric slightly smaller than the lace. I ripped my white fabric to give it a frayed edge.

-
Layer the lace on top of the burlap. Do not pin. Sew around all edges of the lace approximately 1/4 inch from the edge. Be lazy. Allow the stitch line to sway and curve unevenly. Sloppy sewing is encouraged. Place the fabric rectangle on top and repeat.
-
Layer a couple different lace trims over one end of the rectangle. Do not pin. Sew them on. I then took a skinny flat trim and placed it across the length of the tag. I stitched it on right down the middle of the trim.
-
Using 3/4-inch letter stamps and a brown or black stamp pad, stamp inspirational words on white or off white fabric. Cut out the word about a 1/2 inch from the letters on all sides. Place the word in the center of your tag. Sew around all sides. I went around it a couple of times, making sure I didn't sew evenly over the previous stitch lines.
-
Dig through you old buttons or vintage costume jewelry for some bling. If you choose a pin or an earring, you can simply attach them to the tags using the pin backs or the earring posts. If your jewelry or buttons do not have a 'built-in' attachment, apply craft glue to their backs and place them on the tags where desired.
- Repeat the process to make tags for all of your friends and family, or keep a ready supply on hand to had a personal touch to gifts or home decor items.
Read NextNo Sew Fabric Bookmarks

