Mosaic Heart Plaque
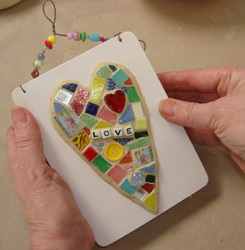
Show how much you care with a Mosaic Heart Plaque from Heidi Borchers. This recycled craft uses glass from broken china or other collectibles to create a unique project.

Materials:
- Wood for background- (Sample in photo is 5” x 6”) Painted white
- Drill with 1/16” drill bit (pre-drill 2 holes in wood at the top edge of wood for wire)
- Pencil for tracing pattern
- Tiles, stained glass pieces, buttons, alphabet letters, glass shapes
- Tile Nippers (my favorite…the wheeled tile nippers)
- Glue (I’ve used Weldbond)
- Masking tape
- Craft stick
- Grout (color is Butter Cream)
- Bowl with water
- Sponge
- Gloves
- Cotton swabs for cleaning small tiles
- Paper towels
- Wire for hanging - 18” 18-20 gauge
- Beads for trim
Directions:
- Trace heart onto the pre-painted wood background.

- Cut tiles to fit using wheeled tile nippers. Lay out pieces in heart pattern design.

- Glue piece onto the background. Let glue dry.

- Place masking tape around the tile heart, leaving about ¼” between the tile and the tape edge.

- Using a craft stick, mix a small amount of grout according to package instructions. ( I like my grout the thickness of oatmeal or peanut butter.) Protect your hands with gloves and use the craft stick to apply the grout to the heart.

- Push grout carefully over and around the tiles (remember that some tiles may have sharp edges so be VERY CAREFUL in this step. Do not over grout, you still should be able to see the tiles.

- Squeeze all the excess water from your sponge. (When removing the grout from the mosaic your sponge should be almost dry. You do not want to put excess water onto the mosaic). This step is only to smooth out grout and uncover tile pieces. We will clean in step 10.

- With a hair dryer on LOW, carefully dry the ‘film’ on the tiles. This should only take about 1-2 minutes. You will see a dry film on the tiles.

- Carefully remove the masking tape. If you pull off some of the grout, simply replace and smooth out with your finger.

- Clean tiles with a dry cotton swab. Clean plastic letters with a slightly damp cotton swab. If you don’t get to this step right away, you can clean off the next day when grout is completely dry.

- Place beads on the wire, place wire through the drilled holes. Use needle nose pliers to twist and fasten wire to back. Twist and bend wire and beads.

Read Next62 Toilet Paper Roll Crafts

