Painted Plate Owl
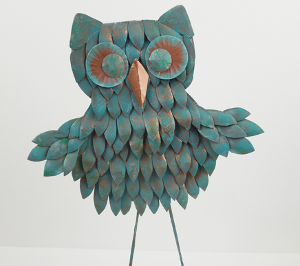
If you're looking for home decor crafts to make but don't want to spend a fortune, consider creating your own Painted Plate Owl. You might think that these crafts are for kids, but this is actually a sophisticated project you'll want to display.

Materials:
- Aleene’s Tacky Glue
- White paper plates (2-1/2 plates per owl)
- Paper Plate Owl Patterns
- Scissors
- 18 gauge florist wire
- Wire cutters
- Florist tape – brown
- Clothespins
- Wax paper
- Spray paint – copper metallic
- Blue masking tape
- Acrylic paint – medium teal, light teal, green, white
- Sea sponge
- Pliers
Instructions:
-
Cut owl patterns from center of paper plates.
-
For legs, wrap wire with florist tape.
-
Apply Aleene’s Tacky glue to one side of owl body, place both wire legs in place and glue second owl body in place, sandwiching the wire legs in between. Use clothespins to hold the layers together. Set aside to dry.
-
Cut fluted edges of plates into feathers.
-
Squeeze puddle of glue onto wax paper. Dip end of feather(s) into glue and place onto owl body, starting at the bottom and working up by layering the rows of feathers.
-
When you reach the top, just glue the feathers hanging over the top edge. You can cut them off when the glue is dry. Glue feathers onto wing pieces. Glue wings onto body.
-
In a well ventilated area, spray entire owl and both legs with spray paint.
-
Use masking tape to hold the smaller owl body pieces onto spraying surface so that they don’t blow away when you spray. Let dry.
-
Use sea sponge to apply acrylic paint over sprayed pieces layering each color for a faux patina effect. Be sure to leave some copper showing through.
-
Use brush to apply acrylic paint in any areas that the sponge does not reach and to apply to eyes. Let dry.
-
Glue owl eyes and beak in place. Let dry.
- Bend bottom leg wire to create triangles (for feet) so that the owl can stand.
Read NextUpcycle Thrift Store Plates

