Plastic Bottle Robot
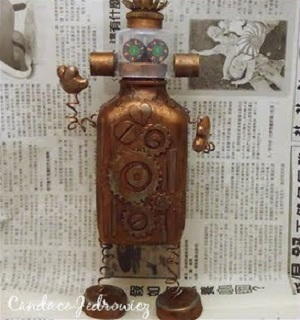
Recycle plastic bottles and create your own eco-friendly robot! To create your own Plastic Bottle Robot from Candace Jedrowicz, try a new technique and distress the bottle with acrylic paint. This gives the piece a very industrial-look edge. Watch your robot come to life!

Materials:
- Plastic bottle
- Large bottle caps
- Electrical wire
- Clear spray can top
- Beads for eyes
- Odds and ends for body parts – I made polymer clay hands and found a cool hose part for the very top
- Acrylic paint – copper and dark brown
- Metallic paste – I used Patina Rub n Buff
- Paper to cut out gears and screw heads
- Scissors, punches and needle tool
Instructions:
- Gather some interesting looking recycle bits to build your robot. For texture, I punched several size circles and used small hole punches to clip half circles around the edges of the paper circles for the look of gears and screw heads.I used electrical wire because it’s thick enough to become strong arms and legs but it’s easy to bend.

- If making a robot, do as much of your assembly construction as you can before you paint to avoid scratching through it. Paint the entire project with your basecoat paint (I used copper) and let dry. Pick up metallic paste on your finger and dab on a piece of scratch paper before rubbing over the edges of your textures. If you get too much paste on any area, wipe it immediately with a paper towel.

- Since the metallic paste dries right away, you can start your distressing as soon as you’ve applied it. Brush on mall areas of brown acrylic paint, wiping back with paper towel as you go.The object is to create an antiqued effect to outline your texture pieces.

- Here you can see the paint has been wiped off and highlights the edges quite well. Continue distressing until you have the look you want. Pick your character pieces thoughtfully. I think the beads I chose for eyes bring the whole project together.


For a comprehensive video tutorial of this project, check out Plastic Bottle Robot.
Read NextPine Cone Angel Wings

