Recycled Glue Tube Doll
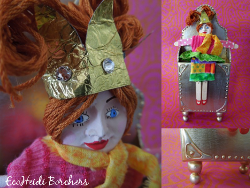
How often do you create recycled gifts? Crafts from repurposed materials can be extremely meaningful and fun for all ages. A Recycled Glue Tube Doll from Heidi Borchers is inexpensive to create but looks like an antique. Display one on your shelf or give it as a gift.

Materials:
- Aleene’s Platinum Bond Super Fabric Textile Adhesive
- Empty glue tube
- Heavy duty small hole punch or drill with small bit
- Fabric scraps
- Toothpick
- Craft sticks (1 for arms and 1 for legs)
- Jump rings (2 to attach legs)
- Needle and thread
- Cool2Cast face
- Embroidery floss – 1 skein – hair color of your choice
- Gold foil
- Rhinestones
- Cool2Cast face (you can purchase a painted face at shopcool2craft.com or create your own face from polymer clay and paint on features)
Instructions:
- Bend empty glue tube into seated position. Leave cap off empty glue tube for several days so that remaining glue in tube can dry out.

- Punch or drill holes along bottom edge of tube. Insert jump rings.

- For legs, cut one craft stick in half, paint with flesh paint. Let dry. Paint shoe design.

- Tear 3-4 strips of fabric (approximately 3/4″ – 1″ wide) to wrap around tube. Glue in place starting with the bottom piece first. Use toothpick to apply glue to tube and then glue strip in place. You want the first strip to hang off the edge of the tube to cover the jump rings.

- Cut remaining craft stick in half. Paint with flesh paint. Let dry. For sleeves, cut and glue fabric to cover sticks. Glue sleeves to glue tube. Let dry.

- To make top, cut fabric approximately 3″ x 8″. Cut down center stopping at mid point. Using photo as guide, cut snips into fabric. This will help fabric to fit around neck of glue tube. Drape fabric over top of glue tube. Adjust neck to fit tube. Glue in place down back seams and at side.

- Tear or cut one strip of fabric approximately 2″ x 10″. Stitch running stitch along one edge. Gather skirt to fit around tube and glue in place over top at waistline.

- For scarf, tear strip of fabric approximately 1″ x 8″.

- You can create a face from Cool2Cast, polymer clay or purchase one pre-painted by EcoHeidi. Glue face onto front of tube lid. Let dry. Glue skein of embroidery floss across back of head. Let dry. Cut crown from foil and embellish with rhinestones. Determine size of crown by overlapping ends. Adjust as needed and glue in place. Let dry. Pull embroidery floss up through crown, adjust as needed while pulling crown into place.Loop scarf around neck.

For a comprehensive video tutorial of this project, check out How to Upcycle a Glue Tube into An Art Doll.
Your Recently Viewed Projects
lindastepp 8770545
Apr 28, 2013
I really like this! Something so crazy using a used up glue tube really challenges your creativity and that is always a good thing! The results are ofter very pleasing because of it and I will give it a try myself! Linda
sdsemail 4622725
Mar 27, 2012
I think this is really cute!! That being said, the popups covered half of each picture & I had to delete the popups. Do not like popups at all!!
Report Inappropriate Comment
Are you sure you would like to report this comment? It will be flagged for our moderators to take action.
Thank you for taking the time to improve the content on our site.

