Recycled Magazine Floral Wreath Easy Paper Craft
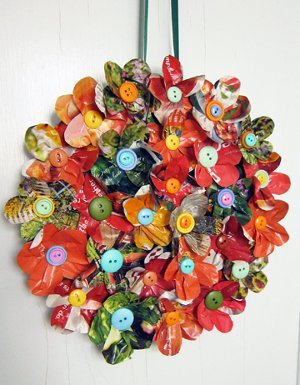
This Recycled Magazine Floral Wreath Easy Paper Craft will help you use up all those old magazines in a very stylish way. Get your home ready for spring cleaning (and decorating!) with fun DIY paper crafts like this one. Crafting with magazines is also a great way to celebrate Earth Day with your family. Kids will love ripping out pages and helping sort the paper. DIY craft projects are a great excuse to get the entire family together, turn off the television, and work on something amazing. Gather everyone together, round up all of your old magazines and get ready to create something beautiful and fun.

Materials:
- Smoothfoam 12" x 1" Disc
- Aleene's Turbo Tacky Glue Pen
- Old magazines
- Buttons - various sizes, shapes and colors
- Scissors
- Aluminum foil
- Foam sponge
- Green acrylic paint
- Double-faced satin ribbon in green
- Tape measure or ruler
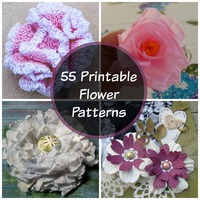
Paper flowers are just the beginning! If you love to make flowers, there are so many DIY craft projects to try. Whether you love to crochet or prefer working with recycled materials, you can't go wrong with this list of 55 Printable Flower Patterns. Create a rose, iris or daffodil using this list - there's no water required. Even if the weather is cold or there's no rain in the forecast, you can create your own garden using these flower crafts.
Instructions:
- Cut out petals. Carefully cut or tear out magazine pages. As orange is my color-du-jour, I chose pages with that color plus a few in shades of green. Vertically fold the magazine page in half. Fold it the same way again. With each petal cut, you will automatically get 3 more due to the folding of the paper. I chose to make my petal round at the top and tapered at the bottom. If you would rather have a daisy look to your flower, make the top of the petal pointed. The key here is that each petal has tapered bottom and is approximately 2" tall. For a slightly rustic look and to add a bit more texture, lightly crumple the petals in your hands.
- Glue petals to the button. Pinch in the paper at the tapered end of the petal. Add a few dots of glue and place on the back of the button. Each flower should have 5-6 petals. To keep the buttons from sticking to your craft table, place them on a piece of aluminum foil and allow to dry.
- Paint Smoothfoam disc. Squirt some paint onto the foil and paint one side and the edges. Allow to dry. Paint the other side and allow to dry.
- Add ribbon loop. Cut a 24" piece of ribbon. Glue ends together. Allow to dry. Glue to top of disc. Allow to dry.
- Glue down flowers. Arrange the flowers on the disc. Once you are satisfied with the arrangement, add a few dots of glue to the center of the back of each flower and press into place on the disc. Allow to dry.

Read NextPine Cone Angel Wings
Your Recently Viewed Projects
BeckySue
Mar 11, 2016
This is great for recycling magazines, but if you don't have magazines, I don't see why scrap book paper wouldn't work. I have a lot of that because I can't seem to pass it by when it's on sale! And I have all kinds of colored craft buttons, so this project is perfect for me!
graceespiritusanto 4943161
Nov 23, 2013
I have not made it but from what I saw, I know my granddaughter will get a very high grade when she's done with them. Thank you so much for making her project so easy and useful.
the1crazychrissie 1533404
Jul 31, 2013
I loveee this, my son and I are making one together and its coming out awesome because we are both cutting leaves and they are different so the flowers dont all look alike! We used cardboard for the back and cut a hole in the middle also, i like to use an idea and go off on my own a lil, thanks so much!!!
17gabby17 4685112
Jul 20, 2013
Today I cut out whole flowers instead of single petals... I don't understand the foil stuff... Tomorrow I will shape petals on flowers, and glue flowers on cardboard, then glue button. No need to paint background. I can't see yours and no one will see mine. (I take the easy way) but very pretty.
gammygo
May 06, 2013
Pretty, instead of using styrofoam, cut out 3 cardboard backs from corragated cardboard and glue them together as your base. I did this that with my bottle cap wreath I made.
mjslesinski 173365 5
May 03, 2013
I have written similar comments before. Any project that begins with buying anything made of styrofoam or other plastic stuff, is not earth friendly. This plastic never degrades, just breaks into smaller and smaller toxic bits that remain on earth forever. AND, worst of all, this is made from oil, so encourages yet more drilling for, and increasing the price, of petroleum products. I urge you to think of something else to use as a base for this otherwise charming project.
floralsbyesther 36 18777
Apr 22, 2013
wow, wow, this one is so neat and looks like fun. I just love your website so much. thank you for thinking of me who loves to do everything and good at nothing-i.e., crafting! God bless
lapw41 9342937
Apr 21, 2013
I want to try this rather than just discarding my favorite magazines
verginekeshishian3 55 2568127
Apr 21, 2013
I shall try. As you look at it your mood gets better.
Report Inappropriate Comment
Are you sure you would like to report this comment? It will be flagged for our moderators to take action.
Thank you for taking the time to improve the content on our site.

