This project was submitted by one of our readers, just like you.
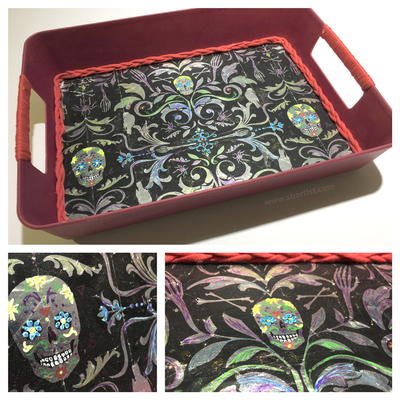
Shabby to Fabulous Tray Redux

Shabby to Fabulous Tray Redux
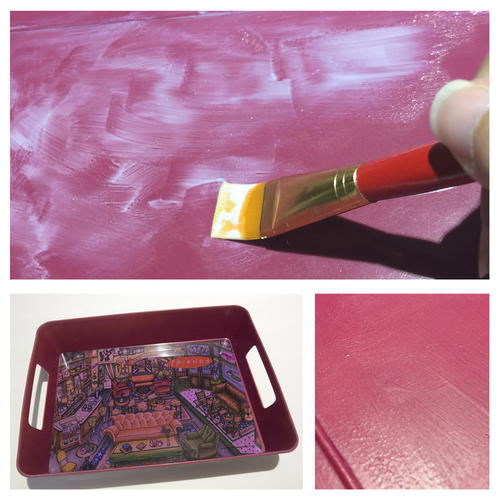
From the Designer: "This is a tale of trash to treasure... starting with an old plastic tray from the TV show "Friends" which has been sitting as a catchall on my computer table for about as many years as it's been off the air. This shabby plastic tray is faded and doesn't look so "friendly" anymore. It's still functional, so instead of tossing it, I've given it a much a fabulous transformation - one that is sugary sweet!"
Time to CompleteWeekend project
Primary TechniqueRepurposing

Project TypeMake a Project
Materials List
- Old Plastic Tray to upcycle
- Mod Podge® Ultra Matte Chalk & Mod Podge® Antique Matte
- Leftover Halloween treat bags
- Paintbrush
- Mod Podge® Squeegee
- 1/2" Corner Round Punch & 1/2" circle punch
- Assorted Sakura of America Gelly Roll Glaze and Gelly Roll Soufflé Pens
- Bernat® Maker Home Dec™ yarn (woodberry)
- Four (4) recycled water bottle lids for feet
- Mod Podge® Mod Melter & Mod Melt gluesticks
Instructions
-
Wipe clean tray and coat entire tray with a coating of Mod Podge® Ultra Matte Chalk. I wasn't really concerned about the brush strokes as it dries clear - I just want to alter the finish of this shiny plastic tray. I applied a second coat when the first layer dried and the result is a fabulous faux surface resembling "old" painted wood.
-
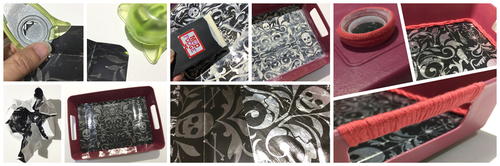
While the tray is drying, I gently disassemble a treat bag and use a paper trimmer to cut to size {which is 10 1/2" x 7 1/2"}. I used a corner rounder punch to round corners for a perfect fit.
-
Add distressing by gently crumpling the prepared paper to add a bit of texture and to take attention away from the fold lines.
-
Pour some Mod Podge® Antique Matte into the base of the tray, spreading to the edges and cover the base completely, and brush excess onto backside of prepared paper. This product looks like pancake batter, though it dries clear.
-
Place paper pattern side up into tray then used squeegee to gently press out air bubbles and excess Mod Podge®. Use the brush to paint remaining Mod Podge® to seal paper in place and give the surface an antique treatment. I am quite impressed with how it transformed the very reflective and glossy surface on the paper treat bag.
-
I prepared some feet with recycled water bottle lids, then I punched a circle of the paper bag to fit into the center of each and PODGED them in place.
-
I made a braid of the Bernat® Maker Home Dec™ yarn to line the edge around my reNEWed decoupage tray and tacked in place using the Mod Melter. I also wrapped some yarn around handles and prepared feet and glued in place.
-
The finishing touch... using various colored pens to doodle some sugar skull features, scrollwork and flowers into the design.
Click the image for a larger version.
NotesThis throwaway tchotscke has a new lease on life! I just love how the yarn braid gives a woven touch to this recycled project - adding charm to the faded pink tray. I love how this turned out and still has a bit of sparkle and shine!!
More Crafty Ideas For You
If you enjoyed transforming a shabby tray into something fabulous, we have some more craft project ideas that you might love to try! For those who appreciate upcycling and refinishing projects, we suggest giving old picture frames a new lease on life. You can pick up some vintage frames from a thrift store or flea market and use paint, decoupage, or other embellishments to create unique and stylish home decor pieces.
If you have a knack for sewing and enjoy creating soft furnishings, why not try making a set of patchwork coasters or placemats? These projects are a great way to use up fabric scraps and can be personalized to suit your own style and color preferences. Plus, they make wonderful handmade gifts for friends and family.
For those who like to add a touch of whimsy to their crafting projects, we recommend trying your hand at creating a set of hand-painted mugs or dishes. Using food-safe ceramic paint, you can transform plain white dishes into one-of-a-kind pieces that are perfect for special occasions or everyday use. This project allows for endless creativity and personalization, making it a fun and rewarding craft to try.
No matter what your crafting style or skill level, there are always new and exciting projects to explore. We hope these suggestions inspire you to get creative and continue turning old, tired items into fantastic new creations!

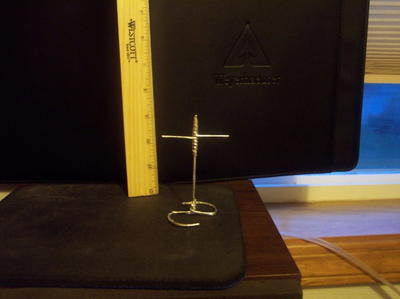
Read NextImpressive Gum Wrapper Cross