Mummy Treat Container
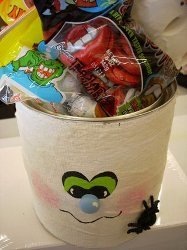
Go trick-or-treating with your new mummy treat container by Vicki O'Dell. This is so much fun to make. You can use it as a decoration too. Homemade Halloween decorations really make a statement. Lots of candy can fill this container.

Materials:
- Keepsake Tote
- Rigid Wrap
- Gesso
- Distress Ink (Antique Linen and Tea Dye)
- Sponge
- Acrylic Paint
- Paint Brushes
- Wooden Furniture Plug
Instructions:
- Following package directions wrap Rigid Wrap around the Keepsake Tote. You can also use a paint can for this project but I like the Keepsake Tote because it's light weight. Don't worry about getting the Rigid Wrap to lay perfectly flat. I think it looks better to have some bumps and creases. Let dry overnight or until completely dry.
- Once it has dried go over the Rigid Wrap with a coat or two of gesso. This seals the Rigid Wrap and keeps it from flaking off. Let dry throughly.
- Once the gesso is dry use the sponge and distress with Distress Ink in Antique Linen and Tea Dye. Just pick up some of the color on the sponge and lightly tap until you get the look you want. Let dry.
- Next, our little Mummy gets a face. Paint the furniture plug and add a little highlight in white for the nose. You don't have to use the colors I did. Feel free to use what you have on hand or colors that you like better.
- Paint a couple of close set ovals for the eyes.
- Add in Iris' and highlights to the eyes. Glue the nose on and paint on a mouth. With a stiff brush and a very light amount of pink paint dab on some cheek color. Let dry. Cover a small plastic spider with Mod Podge and glitter and glue in place.
Read NextSpooky Glass Treat Jars

