Easy Skeleton Sweater
No bones about it, this scary skeleton sweater costume from Bernat Yarns is an easy make. Knit your child his costume this year and he'll love wearing it out. It's a thrifty craft. Complete the look with these Easy Skeleton Mittens!

Materials:
- Bernat® Berella or Bernat® Super Value yarn in black and white (2 balls for size small, 4 for medium, 6 for large, 8 for extra large)
- Sizes 4.5 mm (U.S. 7) and 5 mm (U.S. 8) knitting needles or size needed to obtain gauge
- 2 st holders
Sizes:
To fit chest measurement
- 2 21 ins [53.5 cm]
- 4 23 ins [58.5 cm]
- 6 25 ins [63.5 cm]
- 8 26½ ins [67.5 cm]
Finished chest
- 2 25½ ins [65 cm]
- 4 27½ ins [70 cm]
- 6 30 ins [76 cm]
- 8 33 ins [84 cm]
Gauge: 18 sts and 24 rows = 4 ins [10 cm] with larger needles in stocking st.
Abbreviations:
Alt = Alternate(ing).
Beg = Beginning.
Cont = Continue(ity).
Dec = Decrease(ing).
Inc = Increase(ing).
Pat = Pattern.
Rem = Remaining.
Rep = Repeat.
RS = Right side.
St(s) = Stitch(es).
Tog = Together.
WS = Wrong side.
Instructions:
The instructions are written for smallest size. If changes are necessary for larger sizes the instructions will be written thus ( ). When only one number is given, it applies to all sizes. For ease in working, circle all numbers pertaining to your size.
Back
-
**With MC and smaller needles, cast on 57 (61-67-73) sts.
-
1st row: (RS). K1. *P1. K1. Rep from * to end of row.
-
2nd row: P1. *K1. P1. Rep from * to end of row.
-
Rep last 2 rows of (K1. P1) ribbing for 1 inch [2.5 cm], ending on a 2nd row and inc 1 st at center of last row. 58 (62-68-74) sts.**
-
Change to larger needles and proceed in stocking st until work from beg measures 7½(8-9-11) ins [19 (20.5-23-28) cm], ending with a purl row.
-
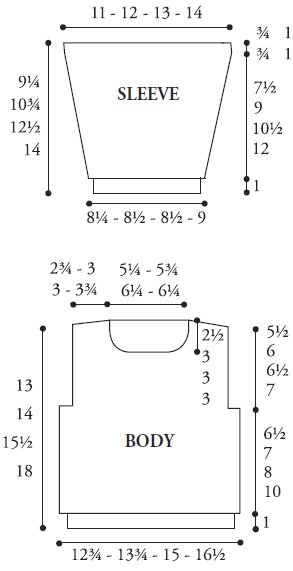
Shape armholes: Cast off 4 (4-6-6) sts beg next 2 rows. 50 (54-56-62) sts.
-
Cont even until armhole measures 5½ (6-6½-7) ins [14 (15- 16.5-18) cm], ending with a purl row.
- Shape shoulders: Cast off 6 (7-7-8) sts beg next 2 rows, then cast off 7 (7-7-9) sts beg following 2 rows. Leave rem 24 (26-28-28) sts on a st holder.
Front
-
Note: When working from chart, carry yarn not in use loosely across WS of work but never over more than 5 sts.
-
When it must pass over more than 5 sts, weave it over and under color in use on next st at center point of sts it passes over. The colors are never twisted around one another.
-
Work from ** to ** as given for Back.
-
Change to larger needles and proceed in stocking st for 0 (4- 6-10) rows.
-
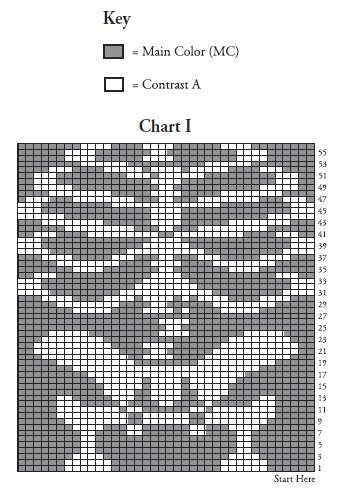
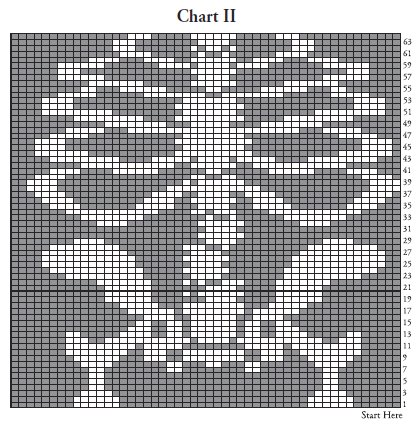
Place chart: 1st row: (RS). K10 (12-9-12). Knit 1st row of Chart I (I-II-II) across next 38 (38-50-50) sts, reading row from right to left. Knit to end of row.
-
2nd row: P10 (12-9-12). Purl 2nd row of Chart I (I-II-II) across next 38 (38-50-50) sts, reading row from left to right. Purl to end of row..
-
Keeping cont of chart, as placed in last 2 rows, cont even until work from beg measures same length as Back to armholes, ending with a purl row.
-
Shape armholes: Cast off 4 (4-6-6) sts beg next 2 rows. 50 (54-56- 62) sts.
-
Cont even until armhole measures 3½ (3½-4-4½) ins [9 (9- 10-11.5) cm], ending with a purl row.
-
Shape neck: Next row: K20 (22-22-25) (neck edge). Turn.
-
Leave rem sts on a spare needle.
-
Dec 1 st at neck edge on next 4 rows, then on every following alt row 3 (4-4-4) times. 13 (14-14-17) sts.
-
Cont even until armhole measures same length as Back to beg of shoulder shaping, ending with a purl row.
-
Shape shoulder: Cast off 6 (7-7-8) sts beg next row. Work 1 row even. Cast off rem 7 (7-7-9) sts.
-
With RS facing, slip next 10 (10-12-12) sts onto a st holder.
-
Join MC to rem sts and knit to end of row.
-
Dec 1 st at neck edge on next 4 rows, then on every following alt row 3 (4-4-4) times. 13 (14-14-17) sts.
-
Cont even until armhole measures same length as Back to beg of shoulder shaping, ending with a knit row.
- Shape shoulder: Cast off 6 (7-7-8) sts beg next row. Work 1 row even. Cast off rem 7 (7-7-9) sts.
Sleeves
-
With MC and smaller needles, cast on 33 (35-35-37) sts.
-
Work 1 inch [2.5 cm] in (K1. P1) ribbing as given for Back, inc 4 sts evenly across last row. 37 (39-39-41) sts.
-
Change to larger needles and proceed in stocking st, inc 1 st each end of 5th and every following 4th row until there are 41 (47-47-53) sts, then on every following 6th row until there are 49 (55-59-63) sts.
-
Cont even until work from beg measures 8½(10-11½-13) ins [21.5 (25.5-29-33) cm] ending with RS facing for next row.
- Place markers at each end of last row. Work 4 (4-6-6) rows even. Cast off.
Finishing
-
Pin garment pieces to measurements. Cover with damp cloth, leaving cloth to dry.
-
Neckband: Sew right shoulder seam. With RS of work facing and smaller needles, pick up and knit 13 (15-15-15) sts down left front neck edge. K10 (10-12-12) from front st holder. Pick up and knit 13 (15-15-15) sts up left front neck edge. K24 (26-28-28) from back st holder, dec 1 st at center. 59 (65-69-69) sts.
-
Beg on a 2nd row, work 7 rows in (K1. P1) ribbing as given for Back. Cast off in rib. Sew left shoulder and neckband seam.
- Sew in sleeves, placing rows above markers along cast off sts of front and back to form square armholes. Sew side and sleeve seams.
Your Recently Viewed Projects
brenda
Oct 06, 2011
Love the pattern must try it out for my grandson.Tried to print ran out of black ink.
aje127
Sep 12, 2011
Forget making this for the kids!!!! I want one. And the mitts to go with!!!
TuttleDB1
Oct 17, 2010
This is a really cute pattern, but where is the chart for the skeleton design on the front? All that is available with the pattern is a skull chart.
Report Inappropriate Comment
Are you sure you would like to report this comment? It will be flagged for our moderators to take action.
Thank you for taking the time to improve the content on our site.

