Halloween Treats Jar
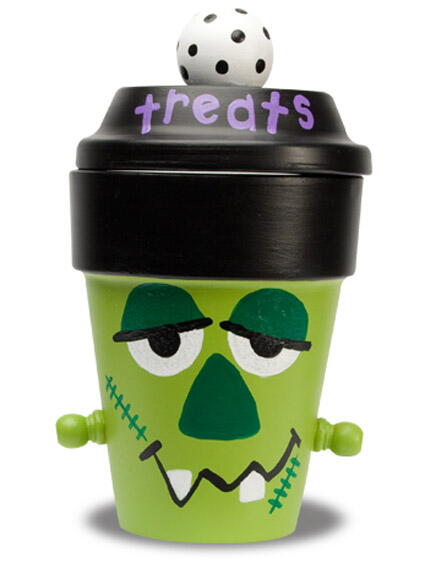
This Halloween create your own quick and easy DIY Frank N. Stein treat jar. This is great for crafting with kids. They won't be able to keep their hands off of it. Painting it will be the most fun.

Materials:
- Patio Paint
- DCP14 - Cloud White
- DCP21 - Wrought Iron Black
- DCP25 - Citrus Green
- DCP29 - Petunia Purple
- DCP46 - Mistletoe Green
- 4" rose pot
- 4" saucer
- Unfinished wood pieces: 1 1/2" doll head/knob, Laras Crafts; two finial dowel caps with 1/4" hole, Laras Crafts
- Craft bond or E6000 industrial strength glue
- Foam plate
- 3/4" flat brush
- #2 round brush
- #8 filbert brush
- Liner brush
- 1 1/4" and 1/4" round foam pouncer brushes
Steps:
- Clean and dry surface before painting.
- Center and glue doll head/knob to bottom of saucer for lid. Refer to photo for placement and glue dowel cap to each side of pot. Let dry.
- Use flat brush and Citrus Green to paint dowel caps and sides of pot below rim; let dry.
- Use filbert brush and Cloud White to paint knob on lid and let dry.
- Use flat brush and Wrought Iron Black to paint lid, inside of pot, and pot rim.
- Use end of brush handle dipped in Wrought Iron Black to dot on lid knob; let dry.
- Referring to photo for placement, use large pouncer dipped in Cloud White to paint circles for eyes. Let dry.
- Use small pouncer brush dipped in Wrought Iron Black to dot on centers of eyes and let dry.
- Use round brush and Petunia Purple to paint word "treats" on front side of lid; let dry.
- Use filbert brush and Mistletoe Green to paint eyelid with slanted bottom over top half of each eye. Paint rounded triangle for nose.
- Use liner brush and Wrought Iron Black to paint thick line across bottom of eyelid for eyelashes on each eye, extended sides of eye. Paint jagged line for mouth. Let all dry.
- Use liner brush and Mistletoe Green to paint scar line on each side of face; let dry.
- Use round brush and Cloud White to paint teeth; let dry.
Read NextSpooky Glass Treat Jars

