Happy Halloween Ring
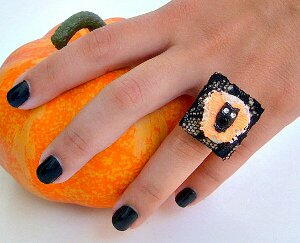
The hand that hands out candy this year will look extra festive if it bears this Happy Halloween Ring from Maria Chatzi. Made with a few simple recycled materials, this easy Halloween project is great for kids and adults. You could even swap the owl for a different bead or charm that you love. This clever Halloween project is easy to customize to suit your needs, and how fun would it be to have a ring for every holiday?

Materials:
- Small piece of cardboard (1 x 1 inches)
- Small, flat, smooth and rounded beach pebble, color: any pale and neutral one will do -mine is beige
- Small flower (or butterfly) cut out from a lacy design, color: orange
- Tiny black owl (or spider) - mine was a stud earring I’ve bought for cents from a thrift store
- Ready made ring base
- Black button (the same size as the ring base)
- Small piece of black lace ( approximately 1.6 x 1.6 inches)
- Glue
Instructions:
-
Cover the cardboard piece with the black lace and glue the lace on the back side. Wait till the glue has dried. Trim any lace in excess.

-
Glue the button on the ring base. Wait till the glue has hardened (Very Important ).
-
To continue, glue the orange flower (or butterfly) lacy design on your pebble. Wait for the glue to dry and then glue the owl on top of the flower design. Wait till the glue hardens before you proceed.
-
Now for the last step: Glue the pebble on the cardboard you’ve covered with the lace and (after the glue has dried completely and hardened enough to keep the pebble in place) glue your whole Halloween design on the black button. Wait till the glue hardens again and your ring is ready.

Tip: It takes some time for the glue to harden. When you apply glue to the back side of the lacey-covered cardboard piece to attach it onto the black button, you need to keep your ring standing straight. To make your work easier, you can use a small container full of rice and store your ring there till the glue hardens.

