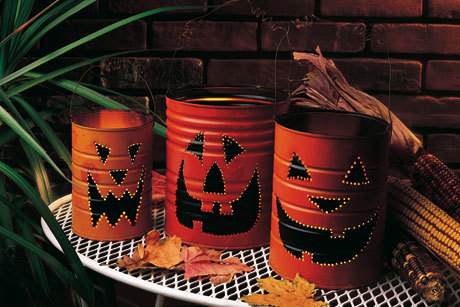
Jack O Lantern Luminaries
It's no trick! These cute pumpkins light up the night to help everyone see their Halloween treats. Decorate with style with this projects from Krylon.

Materials:
- Krylon Indoor/Outdoor Primer - Gray (#51318)
- Krylon Indoor/Outdoor Paint - Black (#51601)
- Krylon Indoor/Outdoor Paint - Pumpkin Orange (#52411)
- Krylon Indoor/Outdoor Paint - Tuscan Sunset (#53535)
- Krylon Fluorescent Paint - Yellow-Orange (#3102)
- Krylon Crystal Clear Acrylic - Clear (#1303)
- Votive candle (one per pumpkin)
- 19 gauge steel wire, darkened anneated (approx. 11/2 – 2 1/2 ft. per pumpkin)
- Sponges (slightly dampen before use)
- Paper plate
- Drop cloth
- Assorted clean metal cans (models made using 1 to 2 lb. coffee cans)
- Awl and wooden mallet
- One 1/2" flat brush
- Marker
- Pencil
- Pliers
Instructions:
-
Fill can to 3/4" from top with water. Freeze.
-
Use marker to draw pumpkin face on can. Carefully punch holes along marked line, 1/8"– 1" apart, using awl and mallet. Punch two holes for handle at top. Thaw ice and remove from can. Wipe dry.
-
Spray inside and outside of can with Gray Primer. Let dry.
-
Spray inside of can with Gloss Black. Let dry.
-
Spray outside of can with desired orange base color. Let dry.
-
Spray a puddle of Fluorescent paint on paper plate. Sponge paint randomly over outside of can. Let dry.
-
Spray a puddle of Tuscan Sunset paint on paper plate. Sponge onto cheek area at corners of mouth. Let dry.
-
Spray a puddle of Gloss Black paint on paper plate. Use brush to apply paint to eyes, nose, and mouth. Let dry.
-
Spray two coats of Crystal Clear, allowing to dry between coats.
-
Cut a length of wire 6" to 8" longer than desired size. Create loops by coiling wire around pencil. Attach wire through handle holes. Wrap ends to secure; trim off excess wire.
- Place candle inside can and light.
Read NextMonster Mash Halloween Favors
Your Recently Viewed Projects
mulberrygalprinces s
Sep 29, 2016
My grand daughter will love making these with me. She is big enough to handle most of these. She is a very good painter so she can do that part for sure. I have a few cans and I am sure the neighbors will donate to my cause. They enjoy seeing what we end up making.
amyjobes 4110890
Oct 03, 2011
Hi My girl scout girls th grade made these and had a blast a lot of them had never used a hammer or spray paing They ended up sharpee-ing different shapes before they punched out the cans and then painted different colors green purple white over They are really cute One thing i noticed is the types of cans certainly made a difference As girl scouts feeding at camp we bought less expensive canned vegetables and those cans seemed to not freeze as well as mine from home and they dented a lot one was even unusable One thing that alarms me is that I originally bought little tealight candles but ended up not giving them out and told them to have their parents buy the battery ones Googling i found that though dry spraypaint is not flammable burns at a higher rate it is combustible which means it may catch…Read More fire I opted on the safer side Anyway a very very cute project
Report Inappropriate Comment
Are you sure you would like to report this comment? It will be flagged for our moderators to take action.
Thank you for taking the time to improve the content on our site.

