LadyBug Costume
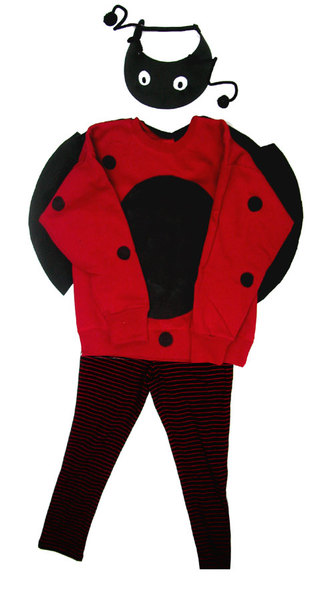
This ladybug costume can be made for this Halloween season and worn every year. In five easy steps you can save money by creating your own costumes. For more great Halloween costumes, check out our 19 Homemade Halloween Costumes collection.

Materials:
- Foam Paint
- FP01 - White
- FP09 - Black
- SoSoft Fabric Acrylics
- DSS24 - Lamp Black
- 1 1/4" and 1" round foam pouncer brushes
- Foam plate
- Two 1" black pompons
- 1" flat brush
- Two black chenille stems
- Hole punc1/2 yard of black felt
- Lo-temp glue gun
- Matching leggings (We found black with red stripes.)
- White pencil or chalk
- Red sweatshirt
- Black foam visor with springback
Instructions:
- Lay sweatshirt flat on work surface. For stomach of ladybug, refer to photo for placement and use foam plate to draw curved edge at top of oval with white pencil. Slide plate down to draw bottom of oval; draw straight lines between top and bottom curves for sides to complete oval. Use flat brush and Lamp Black SoSoft Fabric Acrylic to fill in oval.
- Squeeze Lamp Black SoSoft onto foam plate. Press large pouncer brush pressed into paint and stamp dots onto t-shirt front and sleeves. Allow to dry. Repeat dots on shirt back and sleeves. Allow to dry.
- For wings, draw 16" circle onto felt with white pencil. (We used large serving platter for pattern). Cut out circle and then cut in half. With wings at slight angle, tuck one end of each wing into back of neckline; glue into place. Refer to photo and glue to back of shirt.
- Squeeze White Foam Paint onto foam plate. Use small pouncer brush pressed into paint to stamp dots to visor front for eyes. Allow to dry. Use Black Foam Paint to paint small ovals for eyes.
- Refer to photo for placement of antennae. Punch two holes near upper edge of visor. Stick 1" end of chenille stem through each hole; twist that end over edge of visor and back around chenille stem to secure. Place dot of glue at inside of hole to hold. Twist chenille stems around two fingers to form coil; place glue around end of chenille stem and attach pompon over end. Repeat this process to form second antenna.
Hint:
When stamping dots with pouncer, practice technique on sheet of paper first. It may be necessary to press, then twist, brush in place to get good coverage.

