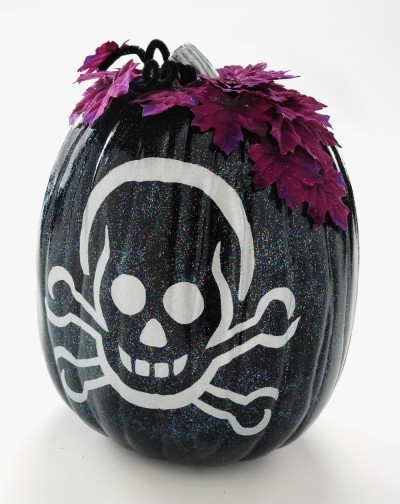
Pirate Pumpkin
Make your own Halloween pumpkin patterns with the help of spooky paints and a touch of glitter Mod Podge. Amy Anderson demonstrates how to create a pirate-themed skeleton pumpkin for unique Halloween decorating.
Check out this project and more ideas in 17 Pumpkin Patterns: Free Projects for Halloween!

Materials:
- Craft pumpkin – I used Celebrate It brand from Michaels
- Skeleton clip art printed out to fit the pumpkin – I got mine from Microsoft
- FolkArt Paint – Licorice, Dove Gray, Metallic Silver Sterling
- Mod Podge – Silver Glitter
- Purple craft leaves – again, Celebrate It from Michaels
- Paintbrushes in two sizes – small and large
- Hot Glue Gun
- Pipe Cleaners, black
- White transfer paper and stylus
-
Tape

Instructions:
-
Paint your pumpkin with Licorice until fully covered and allow to dry.

-
I grabbed my pumpkin and taped my pattern to the top of it. You just want to secure it in one place.

-
The next step is to have Chris, your local resident transfer paper expert, teach you what side is correct. THIS IS THE BAD SIDE.

-
This is the RIGHT SIDE. You can remember because it is the lighter side – the side that will transfer to your surface.

-
Slip your transfer paper RIGHT SIDE DOWN underneath your taped pattern. You obviously want to make sure that the transfer paper is all the way under all parts of the pattern that you are going to transfer. I then secured the bottom with a piece of tape. Depending on your surface, you may want to secure more sides with some tape. I didn’t because my surface was round.

-
Use your stylus to trace all parts of the pattern. I had a great time with this for some reason. I guess I’m easily entertained. If you can’t remember if you traced over a particular part of your design, the stylus does a very nice thing for you, which is leave a groove in the paper where you traced. So you can actually run your fingers over it and tell. Did I mention that I’m easily forgetful?

-
Peel the transfer paper off of your surfaces and behold your work. Amazing, huh?

-
Use your small brush to paint in the skeleton design with Dove Gray. Follow the transfer paper lines as closely as you can. Keep painting until you’ll filled the skeleton completely in and then allow to dry. Don’t forget the stem.

-
Use your small brush and Metallic Silver Sterling to paint over the Dove Gray. It gives it a nice little sheen. Cover and then allow to dry. Paint the stem too. You are so close to being done you can’t imagine. By the way, does this photo look like I’m painting in a basement?

-
Coat your pumpkin with several layers of Glitter Mod Podge, allowing to dry between coats. This should sparkle nicely on the black paint! Set aside and allow to dry.

-
While you are waiting for the pumpkin to dry, take some of your leaves and glue onto the ends of pipe cleaners. You should use your hot glue gun; I’m A.D.D. so I grabbed the glue that was sitting right there.

-
Once dry, wrap the pipe cleaners around your finger to make a curled vine effect.

-
Using your hot glue gun, attach the pipe cleaner “vines” to the top of the pumpkin, then start attaching leaves. Glue leaves down until you feel your pumpkin has enough – basically to your heart’s content!
- Let the glue cool before placing out, and then enjoy your spooky decoration. If you would like to set outside, make sure to spray with a waterproof enamel sealer.
Read NextMake Your Own Wand DIY
Your Recently Viewed Projects
realgonegal 259708 3
Jul 31, 2014
Glow in the dark paint would make it even 'scarrier' better!
Report Inappropriate Comment
Are you sure you would like to report this comment? It will be flagged for our moderators to take action.
Thank you for taking the time to improve the content on our site.

